
3175x175(CURRENT).thumb.jpg.b05acc060982b36f5891ba728e6d953c.jpg)
We have already reported several features hidden in the latest Windows 11 build 25247. However, the latest update keeps giving—users have discovered that the update contains a new VPN indicator in the notification area, allowing you to check quickly if your computer is connected to a VPN.
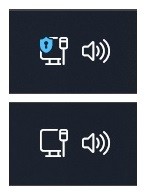
It is worth pointing out that the feature's current state looks half-baked. You can spot the new VPN indicator (on the screenshot to the right) only when you use a wired connection—no eye candy for those using Wi-Fi. Another major limitation is that the operating system cannot recognize third-party VPN applications, so the network indicator will remain unchanged if you access a VPN using its dedicated app.
You need to manually set up a VPN connection in the Settings app to see the new indicator in action. Some VPN services provide guides about connecting using Windows' built-in networking tools, so you should check your provider's website for more instructions.
The updated network icon in Windows 11 build 25247 is a work in progress, so expect Microsoft to polish it a bit more before unveiling it to Windows Insiders (add support for Wi-Fi, for example). If waiting is not an option, use the ViveTool app to force-enable it. Here is how to do that (credits for the finding go to @PhantomOfEarth).
Caution: Unannounced features are often raw, unstable, or borderline unusable. They can also break other things. Back up important data before enabling hidden options using the ViveTool app. Avoiding pre-release software is the best way to ensure your system remains as bug-free as possible.
How to enable the VPN indicator in the notification area in Windows 11 build 25247?
- Download ViveTool from GitHub and unpack the files somewhere convenient.
- Press Win + X and select Terminal (Admin).
-
Switch Windows Terminal to Command Prompt profile by pressing Ctrl + Shift + 2 or clicking the arrow-down button at the top of the window.

- Navigate to the folder containing the unpacked files using the CD command. For example, if you have extracted ViveTool to C:\Vive, type CD C:\Vive.
- Type vivetool /enable /id:38113452 and press Enter. Replace /enable with /disable if you want to revert the feature to its original state.
- Restart your computer.
- Connect to a virtual private network from the Settings app or using a dedicated button in the Action Center.
What do you think about the new VPN indicator? Share your thoughts in the comment section below.
Windows 11 now has a dedicated VPN indicator in the notification area
Recommended Comments
There are no comments to display.
Join the conversation
You can post now and register later. If you have an account, sign in now to post with your account.
Note: Your post will require moderator approval before it will be visible.