
3175x175(CURRENT).thumb.jpg.b05acc060982b36f5891ba728e6d953c.jpg)
Microsoft Windows 10 and 11 may be configured to only allow certain kinds of applications to be installed on the device. The restriction may be intention, e.g., when policies are in place that limit what can be installed on devices, but sometimes also unintentional.
The following guide provides easy to follow step-by-step instructions to resolve the error message if it is unintentional. Windows users who try to install certain types of applications may receive the error message "The app you're trying to install isn't a Microsoft-verified app".
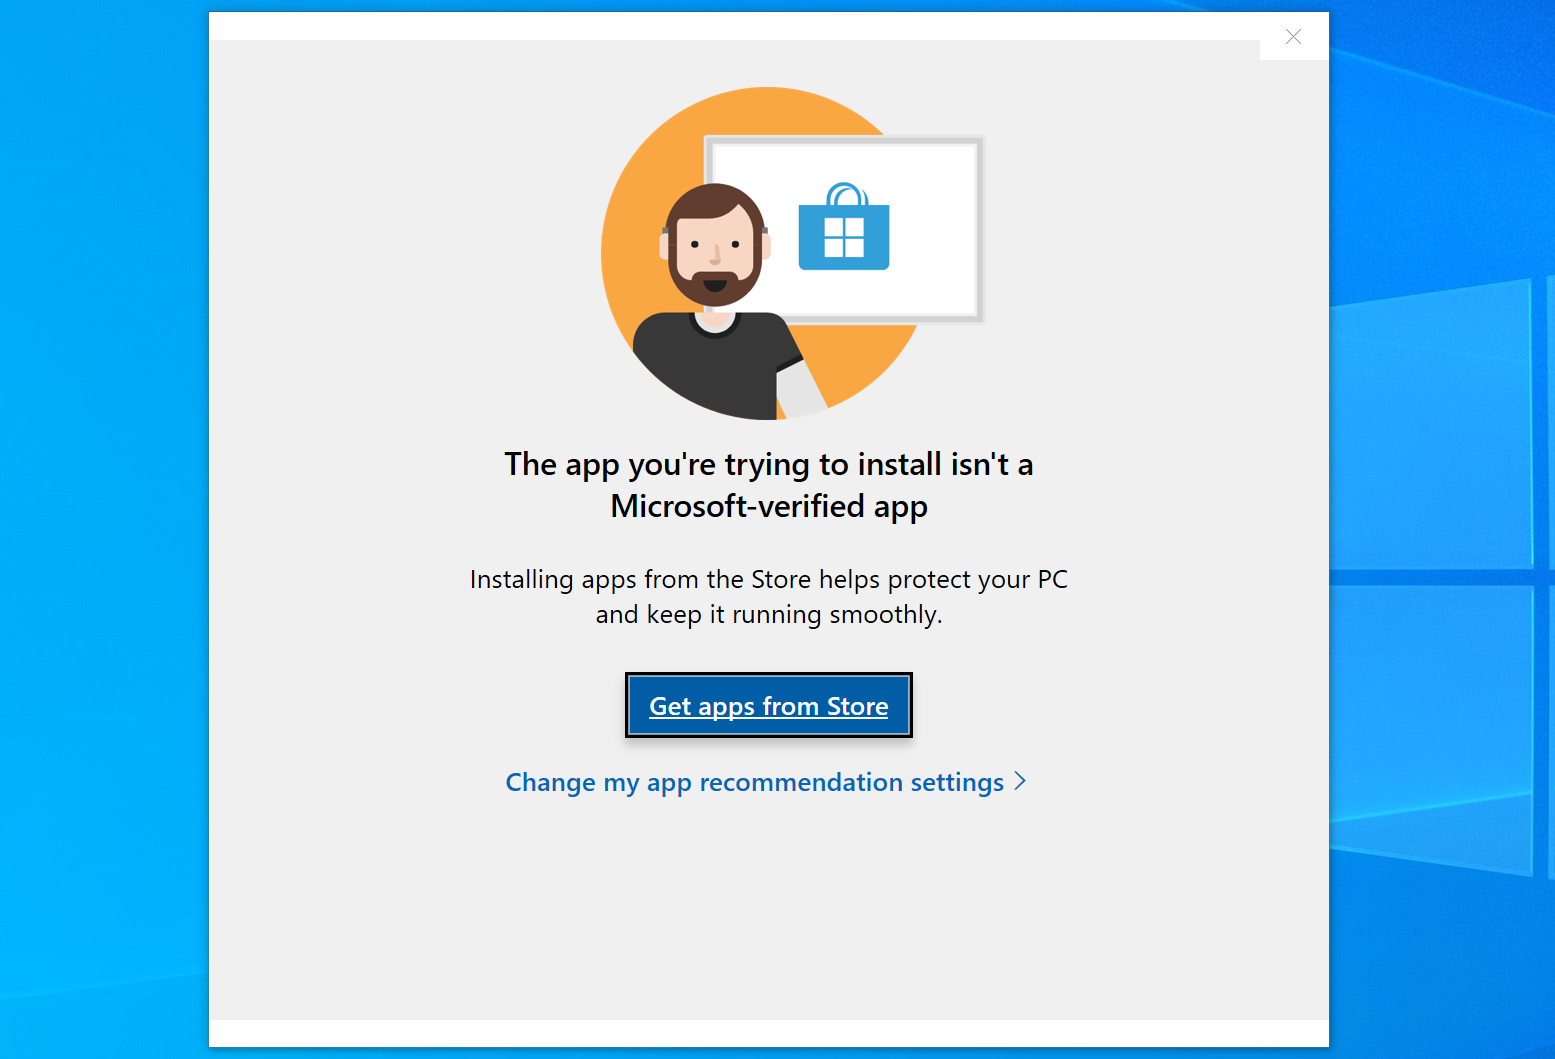
The dialog offers little information on why the installation was prevented. It states that "installing apps from the Store helps protect your PC and keep it running smoothly", and links to the Microsoft Store and the app recommendation settings. There is no option to bypass the restriction immediately.
Explanation for the error message
Microsoft Windows 10 and 11 systems can be configured to only allow software installations from the Microsoft Store. Any app that is not delivered via the Microsoft Store, or at least verified by Microsoft, can't be installed for as long as the setting is active.
Please note that this affects software installations only. Portable applications, those that do not need to be installed, can be run, even if they do not come from the Microsoft Store or are Microsoft-verified.
How to fix "the app you're trying to install" error on Windows
There is an easy option to resolve the issue and remove the limitation on Windows 10 and 11 systems. It should work in most cases, but there are additional options available for edge cases.
Here is how it works on Windows 10:
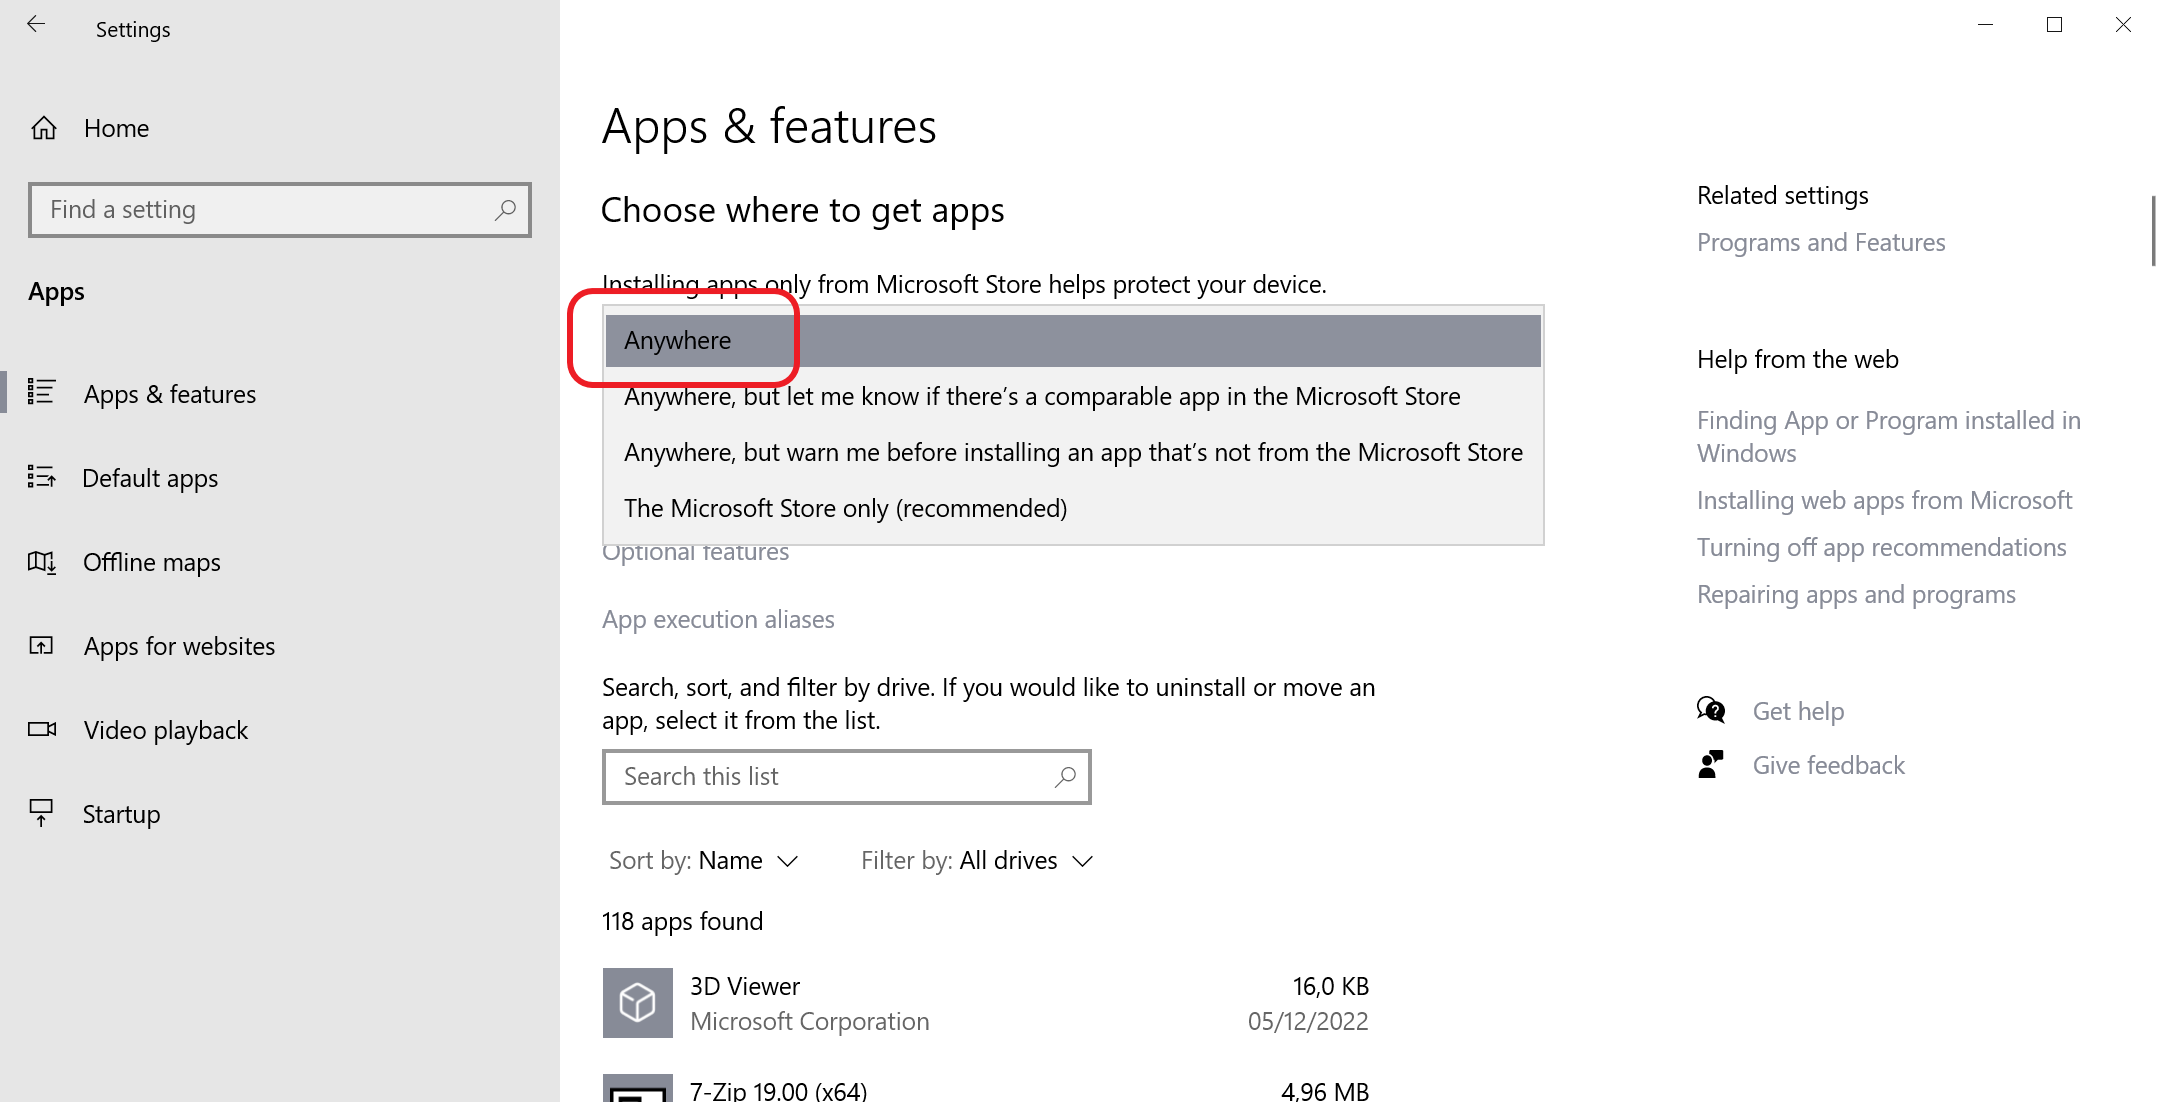
- Open the Start Menu and select Settings.
- Switch to Apps & features.
- Locate "Choose where to get apps"; it should be displayed at the top.
- Switch the setting to "anywhere" from "The Microsoft Store only (recommended)".
How to make the change on Windows 11:
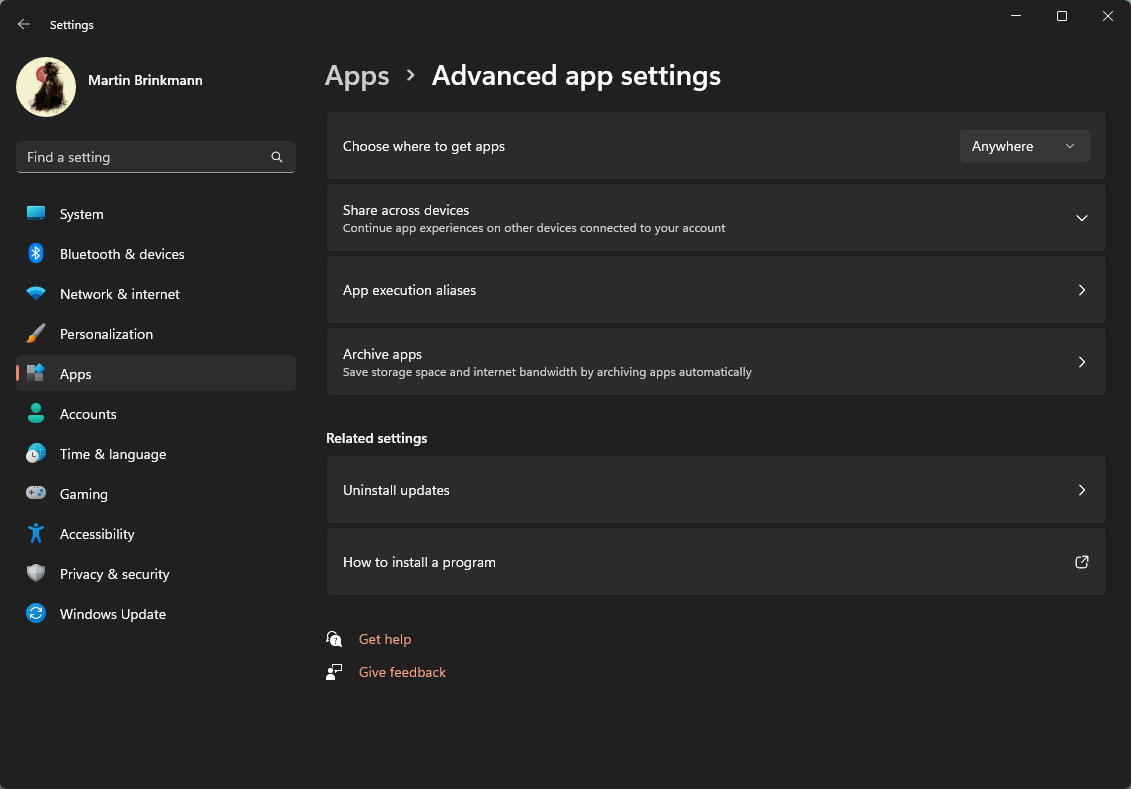
- Open the Start Menu and select Settings.
- Go to Apps.
- Select Advanced App Settings on the page that opens.
- Locate "Choose were to get apps".
- Change the setting to "anywhere".
The change takes effect immediately. Installations of non-Microsoft Store programs should be allowed now. The change can be undone at any time by reverting the setting to "The Microsoft Store only (Recommended)".
Tip: users who want to keep the restriction, but need to install a non-Store app occasionally, may toggle it off temporarily for the install and restore it after the installation finishes".
Advanced troubleshooting options

Application recommendation settings may also be changed in the Group Policy. This is only available in Professional, Enterprise and Education editions of Windows, and not in Windows Home.
- Open the Start menu.
- Type gpedit.msc and select Group Policy Editor from the results.
- Go to Computer Configuration > Administrative Templates > Windows Components > Windows Defender SmartScreen > Explorer.
- Double-click on Configure App Install Control.
- The policy is inactive if it is set to "not configured" or "disabled.
- If it has the enabled status, it may be configured to "allow apps from Store only"; this setting prevents the installation of non-Store apps.
- Change the value to "turn off app recommendations" to disable the feature entirely. Note that you may also set the entire policy to either Disabled or Not Configured.
- Select OK to complete the process.
- A restart of the PC is required.
Windows 10 and 11 Home devices may configure the change in the Windows Registry directly.
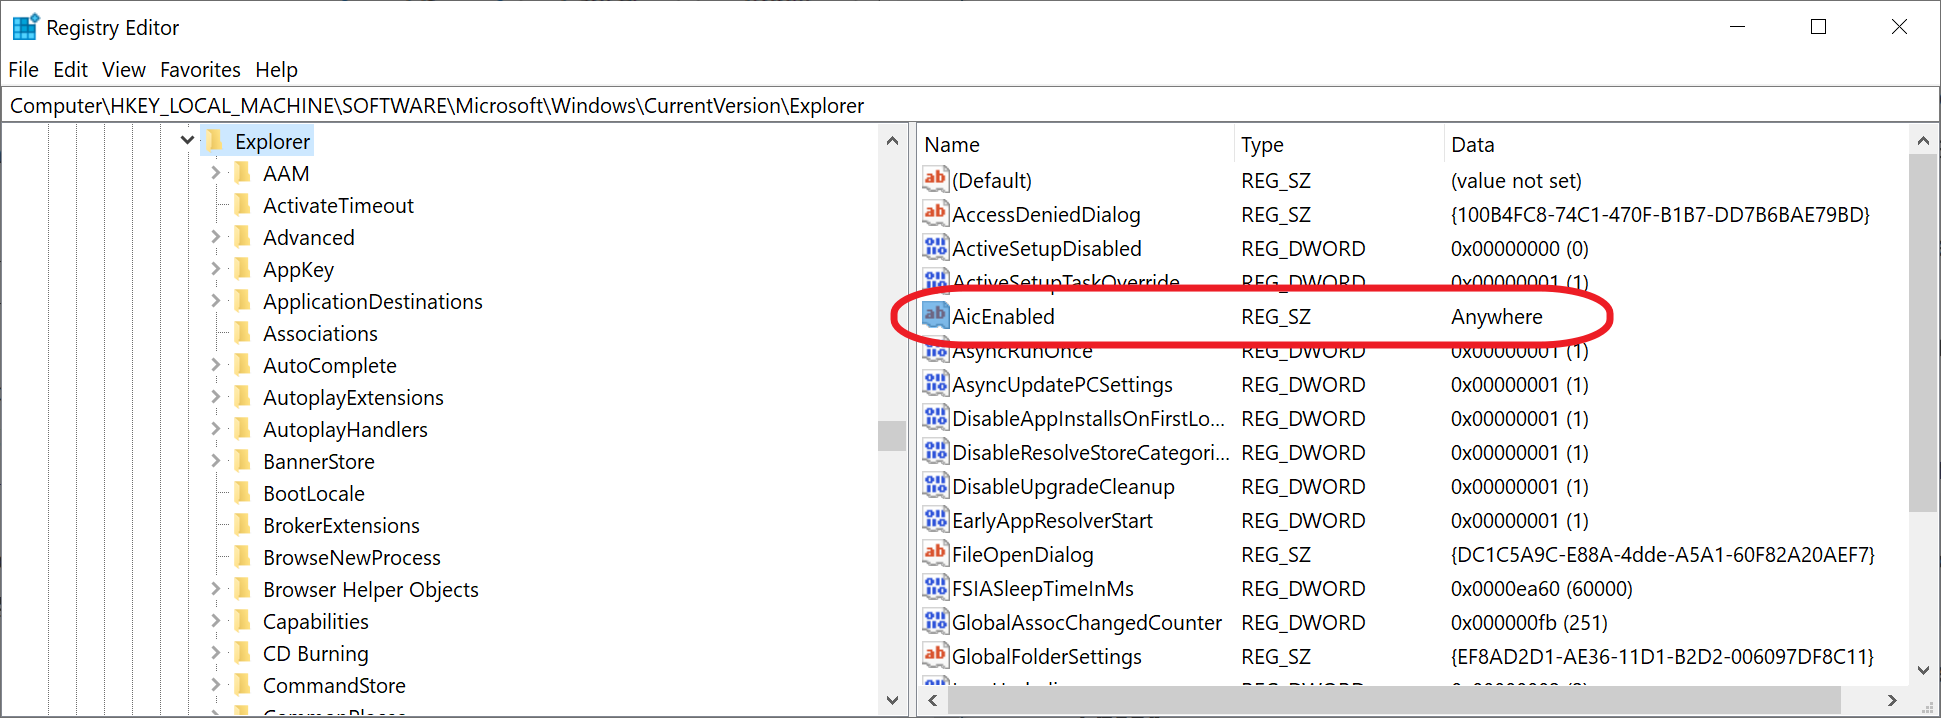
Here is how that is done:
- Open the Start Menu.
- Type regedit.exe and select the Registry Editor result.
- Go to HKEY_LOCAL_MACHINE\SOFTWARE\Microsoft\Windows\CurrentVersion\Explorer.
- Right-click on Explorer and select New > String value.
- Name it AicEnabled.
- Double-click on AicEnabled and set its value to Anywhere.
- Close the Registry Editor and restart the PC.
Last but not least, there is a special version of Windows, S Mode, which prevents the installation of non-Store apps on Windows devices. Users may leave S Mode under Settings > System > Activation on Windows 11 or Settings > Update & Security > Activation under Windows 10. Note that it is not possible to go back to S Mode once the change has been made.
How to fix The app you're trying to install isn't a Microsoft-verified app on Windows


Recommended Comments
There are no comments to display.
Join the conversation
You can post now and register later. If you have an account, sign in now to post with your account.
Note: Your post will require moderator approval before it will be visible.