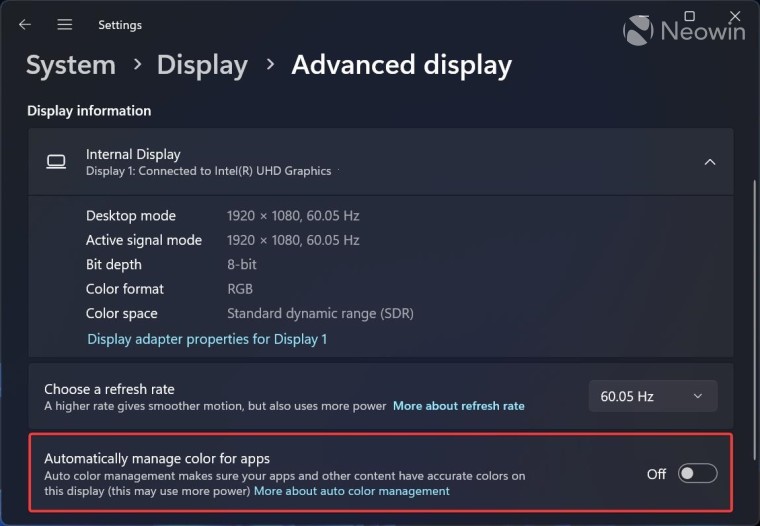
It appears that Microsoft is working on bringing Windows 11's auto colour management feature to more customers. The latest Windows 11 Dev buildcontains new feature IDs that enable a "wider rollout" of auto colour management, even on devices that do not officially support this tool or 10-16 bit colour precision.
Auto colour management is a Windows 11-exclusive feature you can enable in Settings > System > Display > Advanced Display. It provides system-wide colour management to ensure consistent and accurate colours on supporteddevices. Toggling on auto colour management provides extra details and reduces image artifacts in shadows or gradients.
The feature works best on compatible monitors with 10-16 bit colour precision, but displays with 8-bit colours can also benefit from auto colour management thanks to techniques such as dithering.

Newly found by @PhantomofEarth, IDs in Windows 11 build 25262 reveal that Microsoft wants to give more users access to auto colour management. Microsoft calls those IDs "AutocolourManagement_WideRollout_OnByDefault" and "AutocolourManagement_WideRollout." Pretty self-explanatory.
You can try auto colour management in Windows 11 build 25262 by force-enabling the feature with the Vivetool app before Microsoft starts rolling it out to Windows Insiders. Here is how to do that.
Caution: Unannounced features are often raw, unstable, or borderline unusable. Back up important data before using the ViveTool app. Remember that stable Windows 11 is the best option to ensure your computer remains as bug-free as possible.
How to enable auto colour management in Windows 11 build 25262?
- Download ViveTool from GitHub and unpack the files somewhere convenient.
- Press Win + X and select Terminal (Admin).
-
Switch Windows Terminal to Command Prompt profile by pressing Ctrl + Shift + 2 or clicking the arrow-down button at the top of the window.

- Navigate to the folder containing the extracted files using the CD command. For example, if you have copied the files to C:\Vive, type CD C:\Vive.
- Type vivetool /enable /id:36371531 and press Enter.
- Type vivetool /enable /id:41740192 and press Enter.
- Restart your computer.
- Press Win + I, go to System > Display > Advanced Display and enable the "Automatically manage colour for apps" option.
As usual, you can disable the hidden feature by repeating the steps above and replacing /enable with /disable on steps 5 and 6.
Let us know in the comments if you have noticed any difference in colours your monitor displays after enabling auto colour management in Windows 11 build 25262.
Windows 11 build 25262 brings auto colour management to more users
- flash13
-

 1
1


3175x175(CURRENT).thumb.jpg.b05acc060982b36f5891ba728e6d953c.jpg)
Recommended Comments
There are no comments to display.
Join the conversation
You can post now and register later. If you have an account, sign in now to post with your account.
Note: Your post will require moderator approval before it will be visible.