Here's how to uninstall Microsoft Edge from Windows 10 —permanently
If you want to learn how to uninstall Microsoft Edge on Windows 10, you wouldn’t be alone. Despite the current Chromium-based version of Microsoft’s browser being a much better browser than previous iterations of Edge, it’s still an unpopular browser.
Although you need a pre-installed browser on your PC in order to, y’know, install other browsers, many people take exception to having Edge forced upon them and not being able to get rid of it after they’ve used it to install Chrome, Firefox, Opera or other browsers.
And Edge is forced upon you by Microsoft. You see, Edge is now firmly integrated within Windows 10 and seemingly can’t be removed. It also opens automatically as the default app for certain tasks. So you’re stuck with it, right?
Wrong. It is in fact possible to remove Edge by using Command Prompt, and we’re going to show you the steps. If you’re a Windows 11 user, be warned: this process may throw up some issues as Microsoft is determined to push its Edge browser in its latest operating system.
To get started, we’ll look at the easiest way to uninstall Microsoft Edge, just in case it works for you.
How to uninstall Microsoft Edge through Windows 10 Settings
If you installed Microsoft Edge by downloading the browser manually, rather than it installing automatically through Windows Update, you should be able to uninstall it using the following simple method.
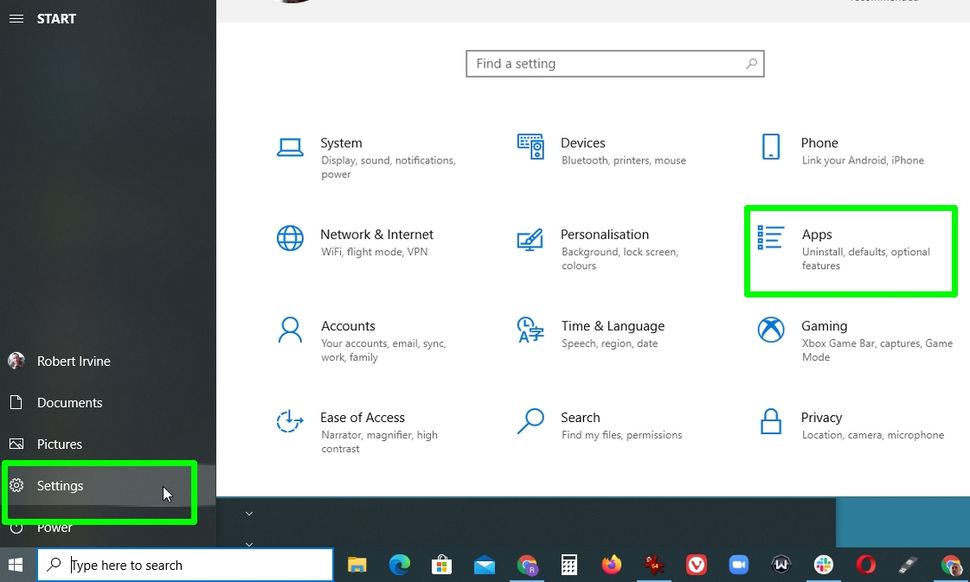
1. Open the Settings app in Windows 10 by clicking the Start button and selecting the gear icon. When the Settings window opens, click Apps.
2. In the “Apps & features” window, scroll down to “Microsoft Edge.” Select that item and click the Uninstall button. If this button is greyed out, sadly you’re out of luck and will need to use an alternative method.
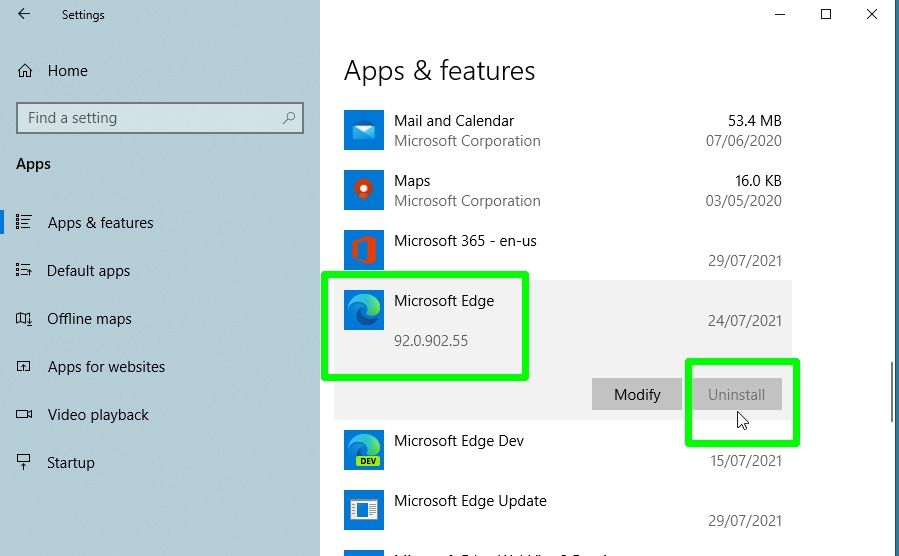
3. If you’ve installed the Beta, Developer, or Canary version of Edge, you'll be able to click Uninstall to remove the program. However, you’ll still be stuck with the latest stable version of Edge.
How to uninstall Microsoft Edge with Command Prompt
You can forcibly uninstall Edge from Windows 10 through Command Prompt, using the commands we’ll provide below. But first, you'll need to find out exactly which version of Edge is installed on your PC.
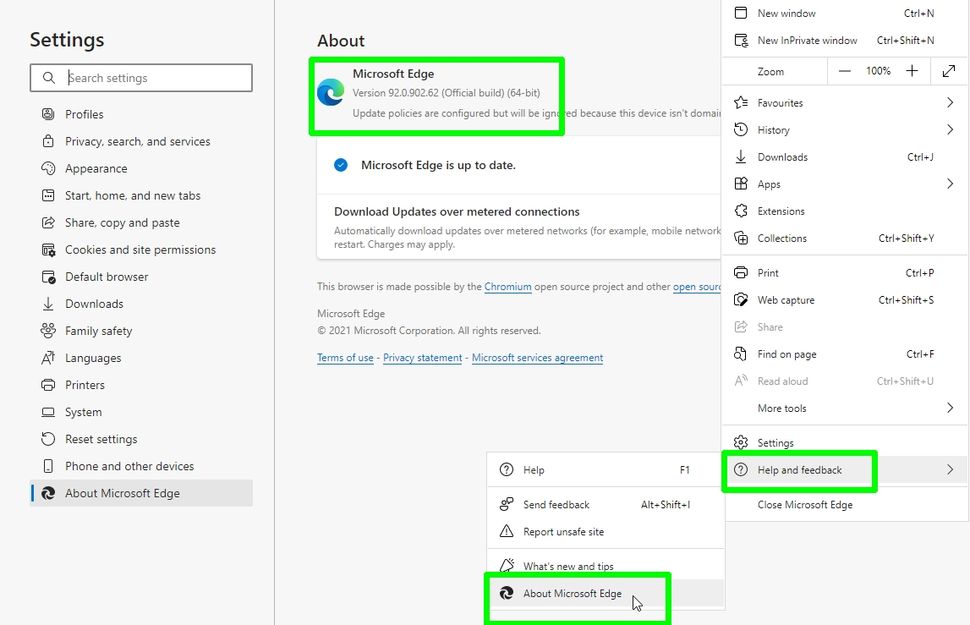
1. Open Edge and click the three-line button in the top-right corner of the browser. Select “Help & feedback,” then “About Microsoft Edge.”
Make a note of the version number below the browser name at the top of the page, or copy and paste it somewhere for reference.
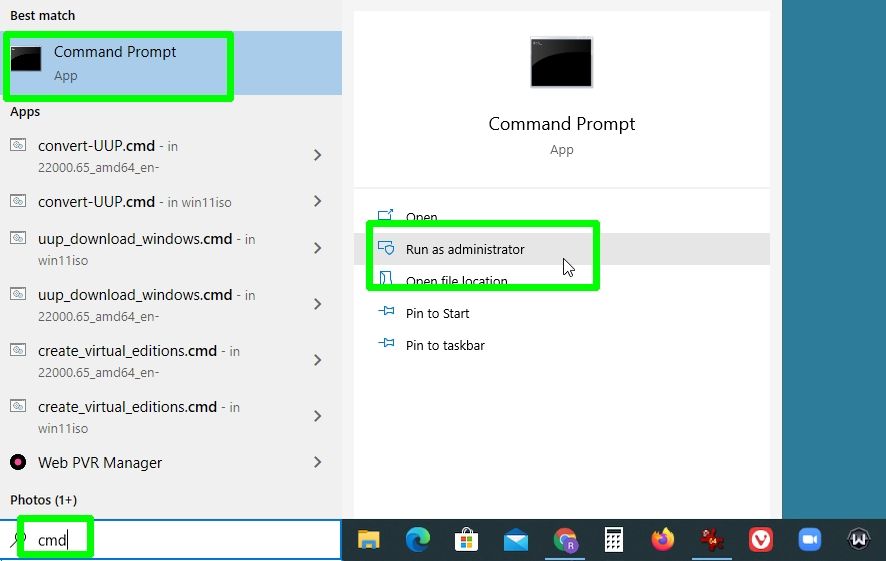
2. Next, open Command Prompt as an administrator. To do this, type "cmd" in the Windows search box and select “Run as administrator” next to Command Prompt at the top of the results list.
3. When Command Prompt opens, type (or copy and paste) the following command, but replace the “xxx” with the Edge version number from step 1, for example “92.0.902.62."
cd %PROGRAMFILES(X86)%\Microsoft\Edge\Application\xxx\Installer
Press Enter and Command Prompt will switch to Edge’s Installer folder. Now type (or copy and paste) the following command:
setup.exe --uninstall --system-level --verbose-logging --force-uninstall
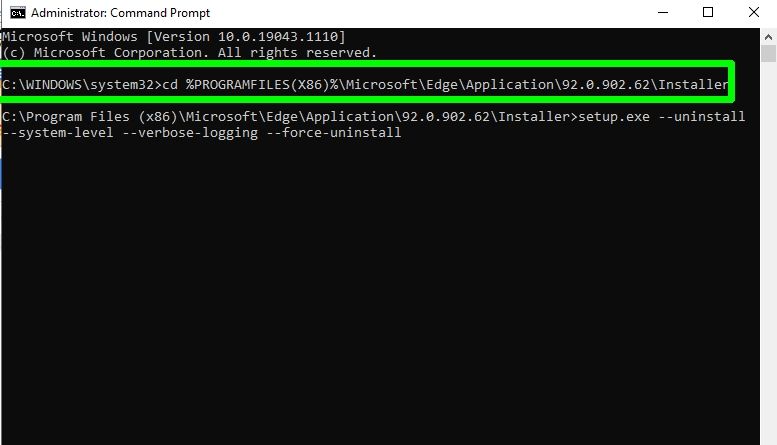
4. Press Enter and Edge will instantly be uninstalled from Windows 10, without you needing to restart your PC.
The browser's shortcut icon will disappear from your taskbar, though you may still see an Edge entry in the Start menu. However, this won’t do anything when clicked.
How to uninstall Microsoft Edge: Stop Edge reinstalling
Even after you’ve successfully uninstalled Microsoft Edge, there’s still a chance it could come back when you install future Windows updates. You can stop this happening using a simple registry tweak.
1. Type "regedit" in the Windows search box and click “Run as administrator” next to Registry Editor.
2. When the Registry Editor opens, navigate to the following key, or just copy and paste it into the Registry Editor address bar:
HKEY_LOCAL_MACHINE\SOFTWARE\Microsoft
3. Right-click the Microsoft folder, and select New, then Key. Name the key “EdgeUpdate” and then right-click it. Select New, then “DWORD (32-bit) Value” and call it “DoNotUpdateToEdgeWithChromium.”
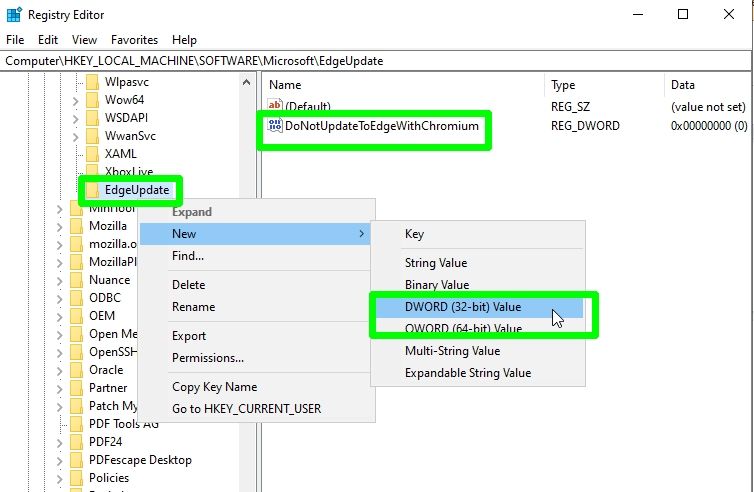
4. Once you’ve created the new DWORD Value, double-click it to open it and change its value to “1.” Click OK to confirm, then exit the Registry Editor.
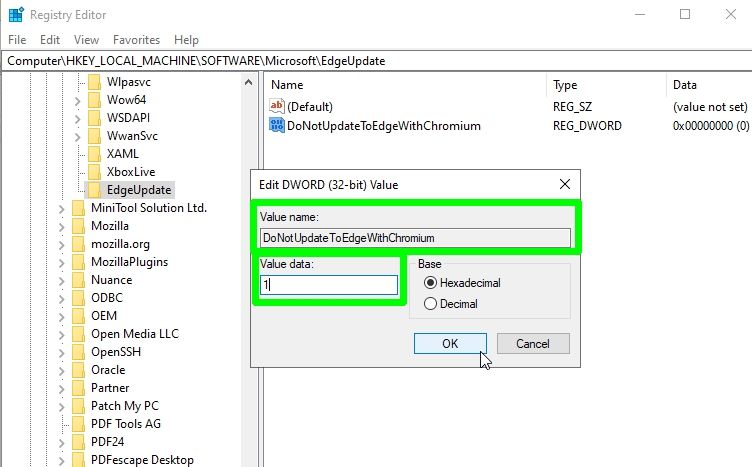
Your Windows 10 PC should now be completely free of Microsoft Edge. If you decide you want the browser after all, just change the value you created to “0” and download Edge from Microsoft(opens in new tab).
For more Windows themed tutorials, make sure you read our guides on how to uninstall a Windows update, how to install Windows 11 and how to turn off Windows Defender. If you've just upgraded to Windows 11, you might be interested in learning how to change the Windows 11 Start Menu back to Windows 10. If you're a Chrome user, read our guide on how to set Chrome flags to test out some cool, experimental features.


Recommended Comments
Join the conversation
You can post now and register later. If you have an account, sign in now to post with your account.
Note: Your post will require moderator approval before it will be visible.