If your Windows 11 PC keeps crashing with the error IRQL_not_less_or_equal, then use these instructions.
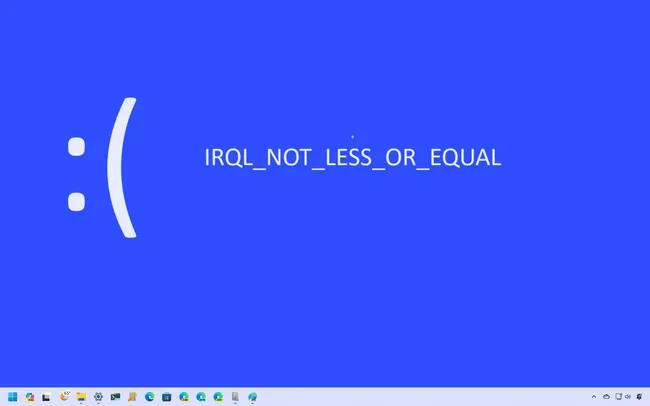
Error IRQL not less or equal (Image credit: Mauro Huculak)
On Windows 11, if you run into the "Error 0xA: IRQL_not_less_or_equal" error, you have at least five ways to troubleshoot and fix this problem, and in this guide, I'll show you how.
The "not less or equal" error is a known issue that essentially means that the system is having problems with one of the hardware drivers, the memory is misbehaving, or there's a conflict with the antivirus.
When you encounter this issue, Windows 11 provides at least six ways to resolve it using Windows Update, the System Configuration settings, DISM and SFC command-line tools, and Windows Memory Diagnostic. You can also try removing the antivirus and reinstalling the graphics drivers.
In this how-to guide, I will walk you through how you can try to fix the "not less or equal" error on Windows 11.
How to resolve the error IRQL not less or equal
On Windows 11, you can perform various troubleshooting steps to resolve the "IRQL_not_less_or_equal" problem on your computer, including making sure the system has the latest update that may include a fix for the problem. You can try a clean boot to discard a problem with a third-party service. It's also possible to repair installation to fix file system corruption. A memory test can rule out a problem with one of the modules. And you can try reinstalling the graphics drivers. Here's how.
Install latest updates
Your computer can receive two types of updates, including updates for the operating system and drivers.
Install system updates
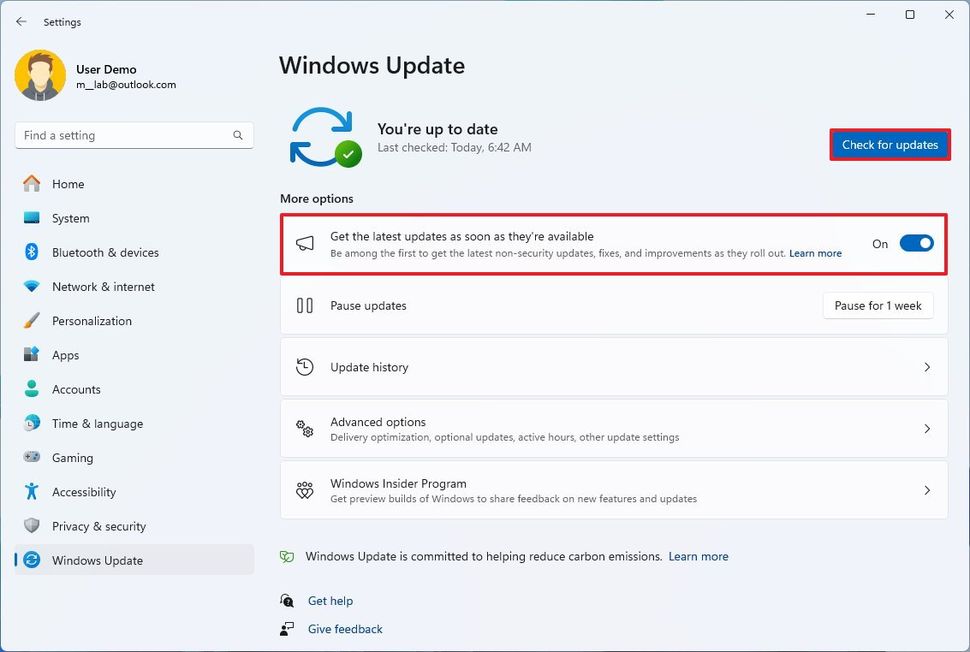
To update Windows 11, use these steps:
- Open Settings.
- Click on Windows Update.
- (Optional) Turn on the "Get the latest updates as soon as they're available" toggle switch.
- Click the "Check for updates" button.
(Image credit: Mauro Huculak)
- Quick note: If there's a known issue causing the error and Microsoft is previewing an update that will resolve the problem, you can turn this feature to download the update without having to wait until it becomes available to everyone.
- Click the Restart now button.
Install driver updates
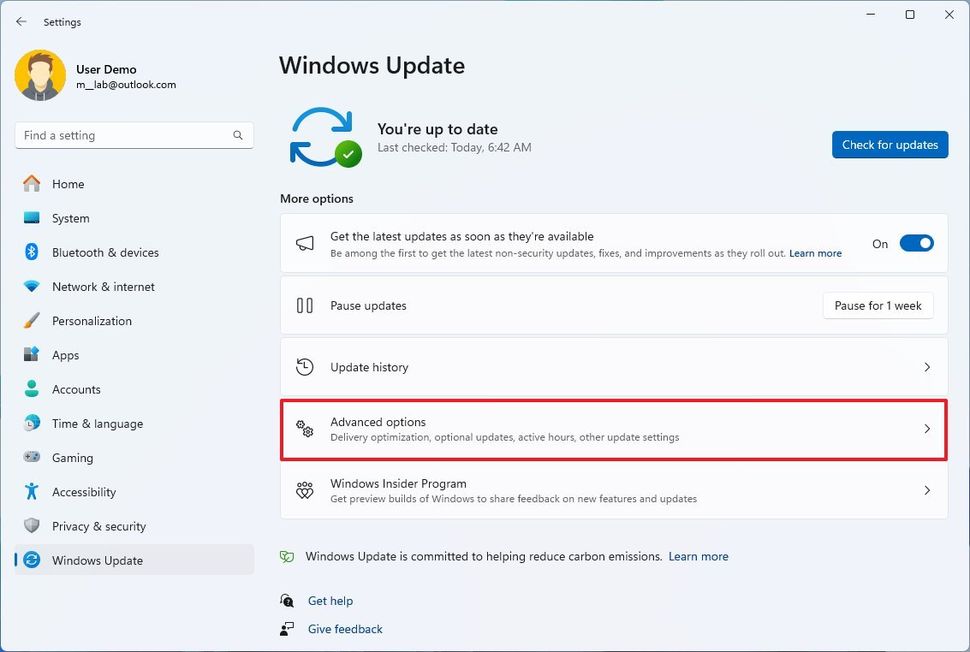
To update drivers through Windows Update, use these steps:
- Open Settings.
- Click on Windows Update.
- Click the Advanced options page on the right side.
(Image credit: Mauro Huculak)
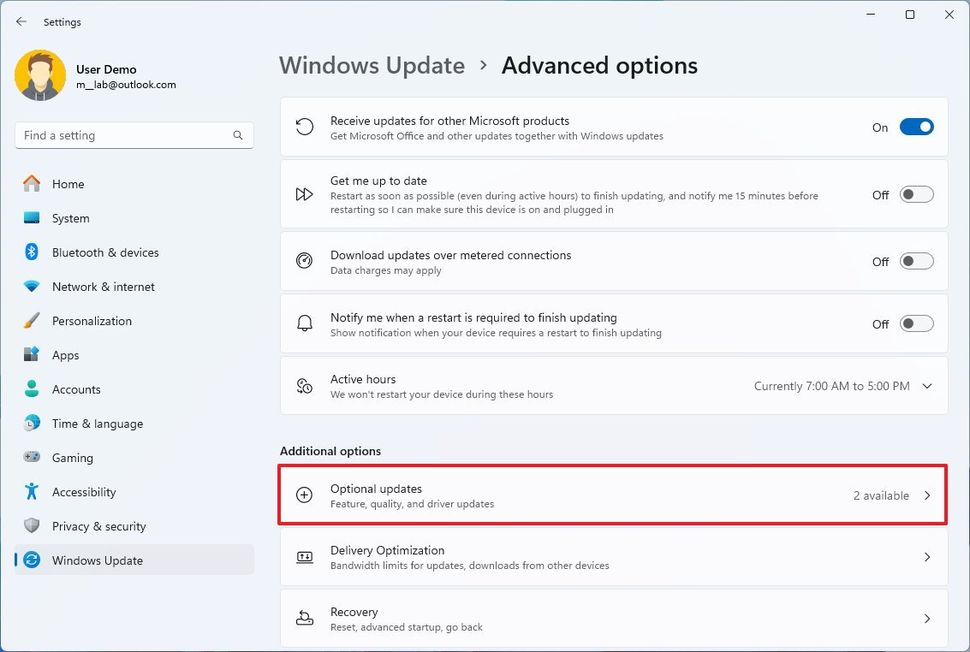
- Under the "Optional updates" section, click the Optional updates setting.
(Image credit: Mauro Huculak)
- Check the available drivers and other updates.
- Click the "Download & install" button.
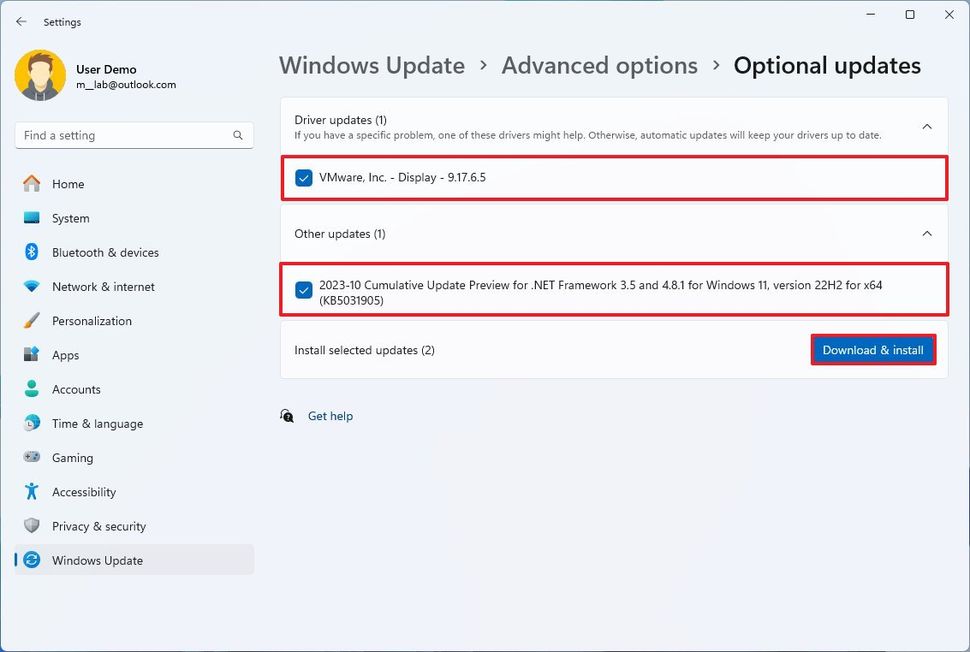
(Image credit: Mauro Huculak)
Once you complete the steps, confirm whether the device continues to show the "Error 0xA: IRQL_not_less_or_equal" error.
Perform a clean boot
Services from other non-Microsoft programs can also cause conflicts that might trigger the "IRQL" error. A "clean boot" is a way to start the computer with a minimal set of drivers and apps at startup to help you determine if third-party services are causing problems.
To perform a clean boot on Windows 11, use these steps:
- Open Start.
- Search for msconfig and click the top result to open the System Configuration app.
- Click the Services tab.
- Check the "Hide all Microsoft services" option.
- Click the Disable all button.
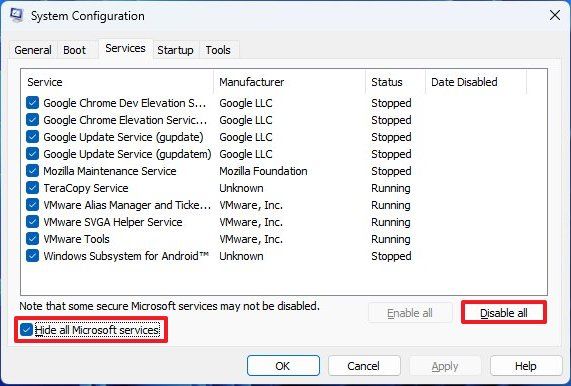
(Image credit: Future)
- Click the Startup tab.
- Click the Open Task Manager option.
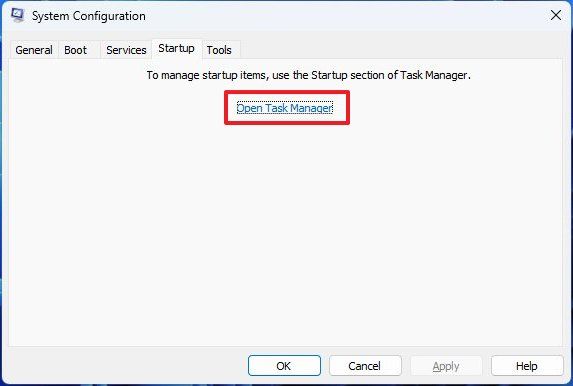
(Image credit: Mauro Huculak)
- Select each enabled application.
- Click the Disable button.
- Restart the computer.
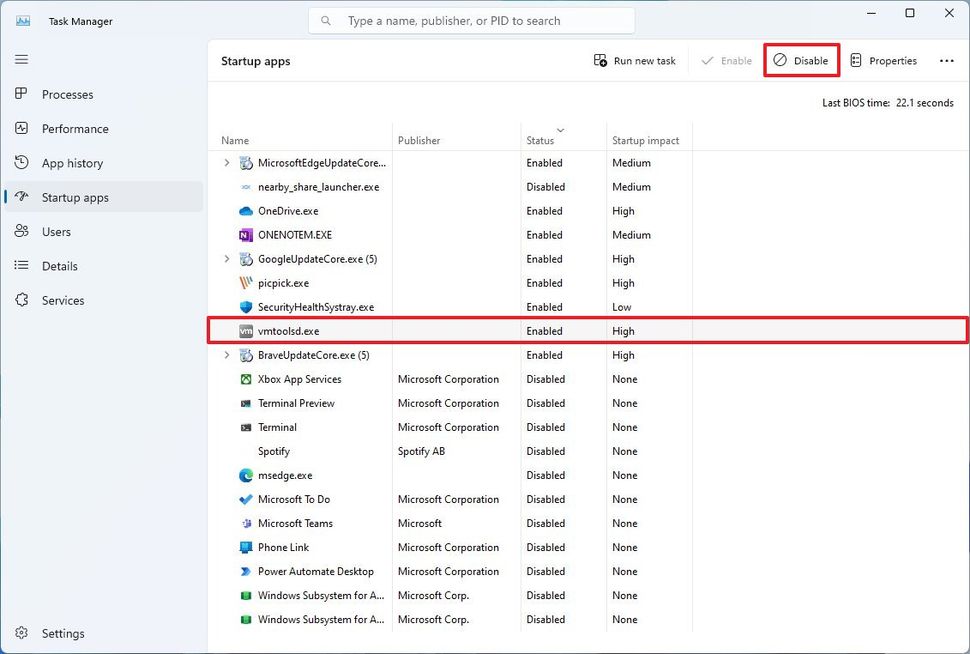
(Image credit: Mauro Huculak)
If, after you complete the steps, the error no longer occurs, you can re-enable one service at a time until you find the one causing the problem.
You can re-enable the services again using the same instructions outlined above, but in step 5, start enabling the services one by one with a reboot in between.
Repair the installation
Usually, you will come across the "IRQL_not_less_or_equal" error when one or multiple files become corrupted in the system. If this is the case, repairing the installation with the Deployment Image Servicing and Management (DISM) and the System File Checker (SFC) command-line tool can resolve the issue.
To repair the installation of Windows 11, use these steps:
- Open Start.
- Search for Command Prompt, right-click the top result, and select the Run as administrator option.
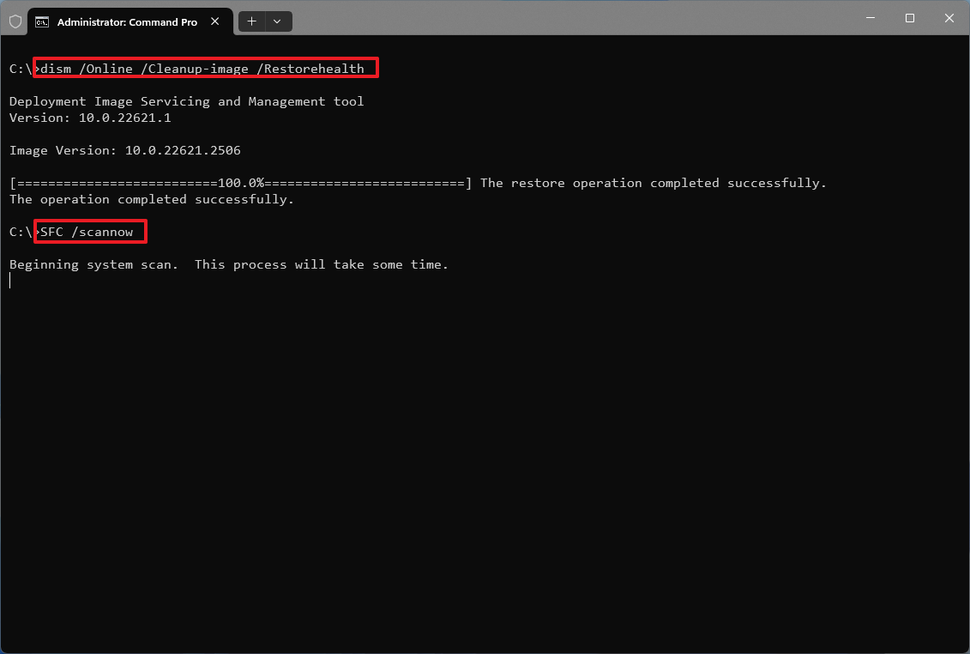
- Type the following command and press Enter: dism /Online /Cleanup-image /Restorehealth
- Type the following command to repair the installation and press Enter: SFC /scannow
(Image credit: Mauro Huculak)
Once you complete the steps, the DISM tool will scan and repair the files of the local image containing the system files, and the SFC tool will use the system files in the image to fix the current installation to resolve the "IRQL_not_less_or_equal" error.
This DISM command tool guide walks you through how to use the tools to repair the installation in more detail.
Run a memory test
If the problem lies in the system memory, Windows 11 includes a tool to diagnose and determine if there is an issue with the memory.
To run a memory test on Windows 11, use these steps:
- Open Start.
- Search for Windows Tools and click the top results to open the folder.
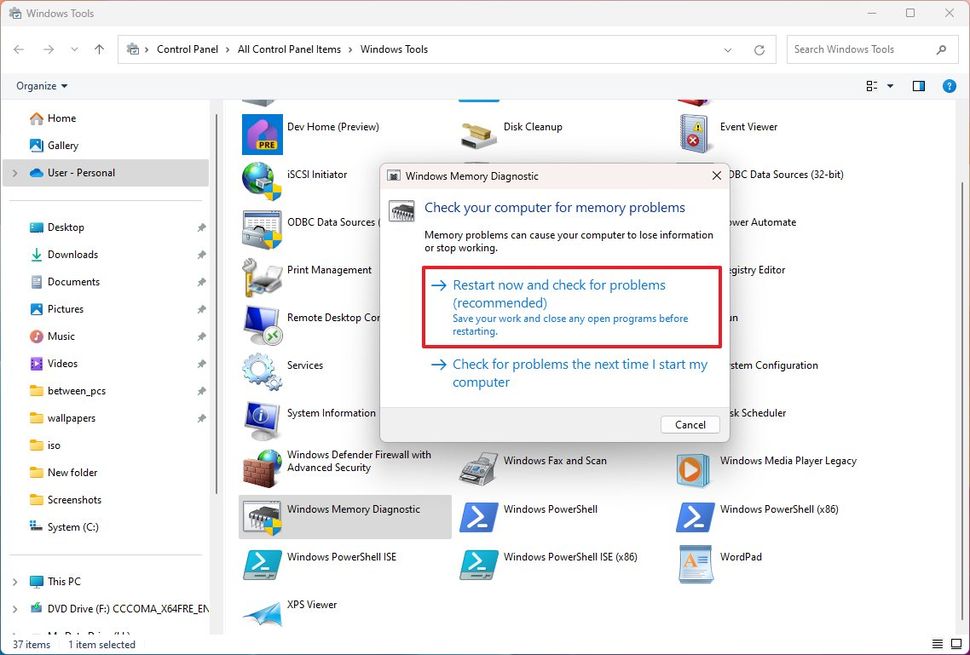
- Double-click the "Windows Memory Diagnostic" tool.
- Click the "Restart now and check for problems" option.
(Image credit: Mauro Huculak)
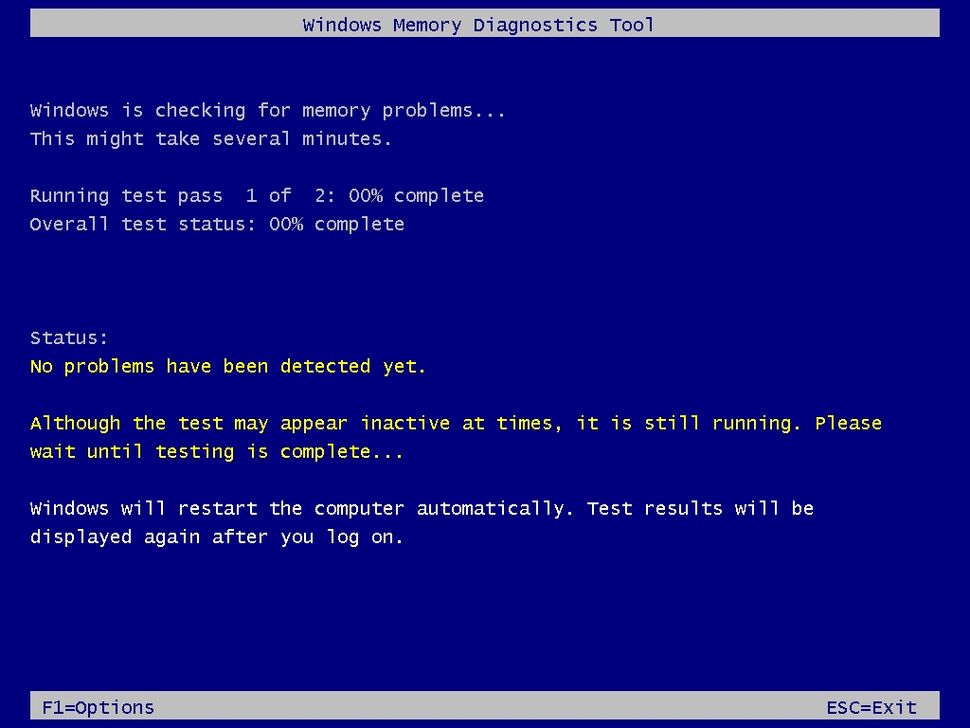
After completing the steps, the system will start in the Windows Memory Diagnostic tool and run the "Standard" mode test, which should be enough to determine if the memory is faulty. You can always use the "F1" key to open the page to change the scan options.
(Image credit: Mauro Huculak)
Once the test is completed, the computer will reboot. To check the Windows Memory Diagnostic results on Windows 11, use these steps:
- Open Start.
- Search for Event Viewer and click the top result to open the app.
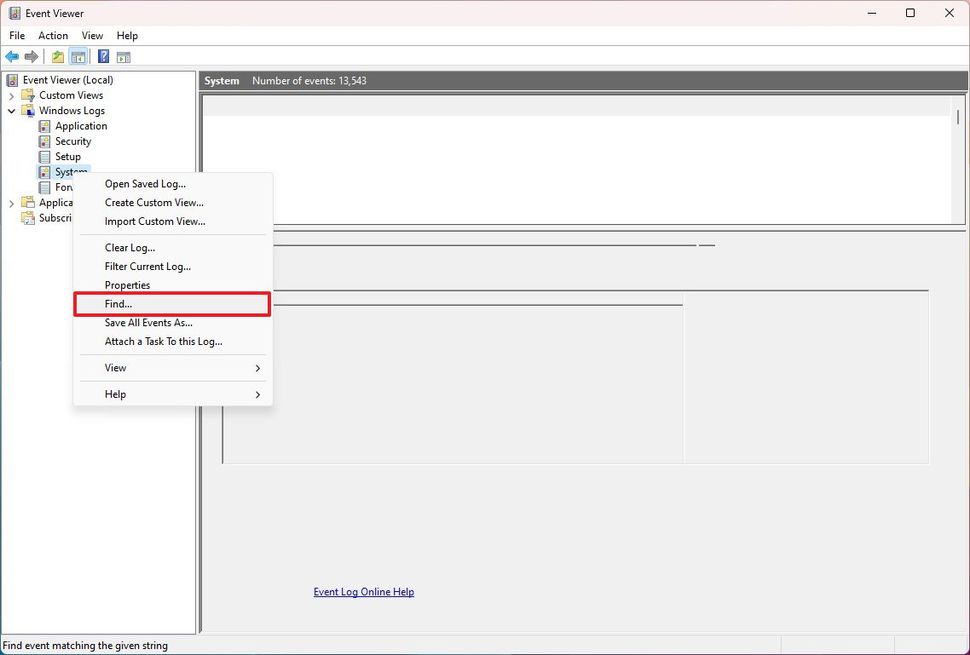
- Expand the Windows Logs category.
- Right-click the System item and choose the Find option.
(Image credit: Future)
- Confirm the "MemoryDiagnostics-Results" keyword and click the Find Next button.
- Click the Cancel button.
- Double-click the MemoryDiagnostics-Results source on the right side.
- Review the diagnostic results.
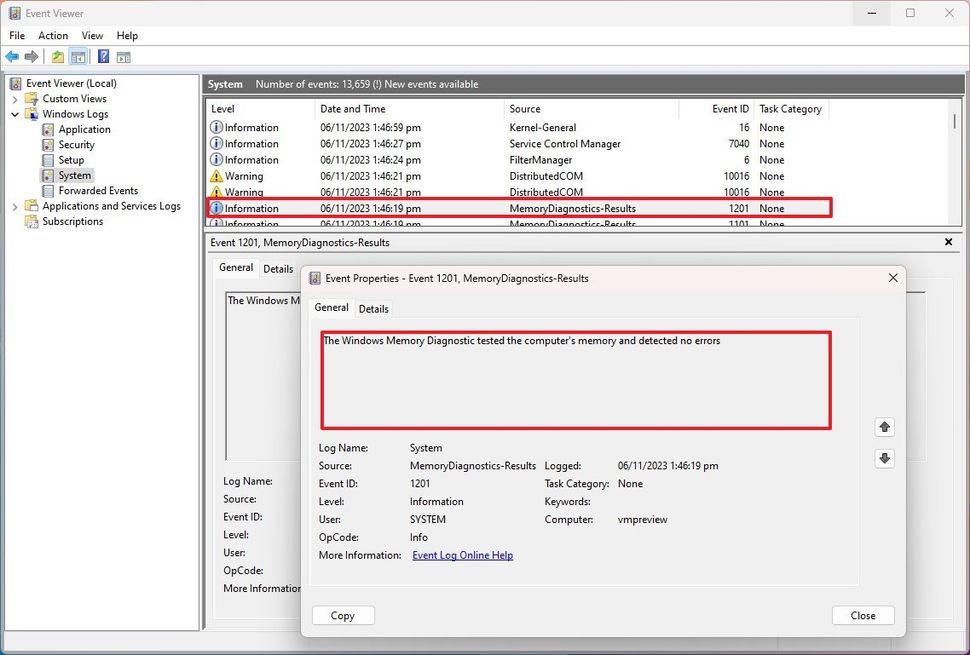
(Image credit: Mauro Huculak)
If the result reads, "The Windows Memory Diagnostic tested the computer's memory and detected no errors," you can discard memory as the root of the problem.
If the memory is experiencing problems, you can try reinstalling the modules on the motherboard. If the issue persists, it might be time to upgrade the system memory.
Remove the antivirus
The "Error 0xA" error could also mean that the antivirus (other than the Microsoft Defender Antivirus) conflicts with the operating system. You can troubleshoot this issue by uninstalling the antivirus temporarily.
Although it's not recommended to use a computer without an antivirus, when you uninstall the security application, the Microsoft Defender Antivirus will activate automatically.
To uninstall the antivirus software on your computer, use these steps:
- Open Settings.
- Click on Apps.
- Click the Installed apps page on the right side.
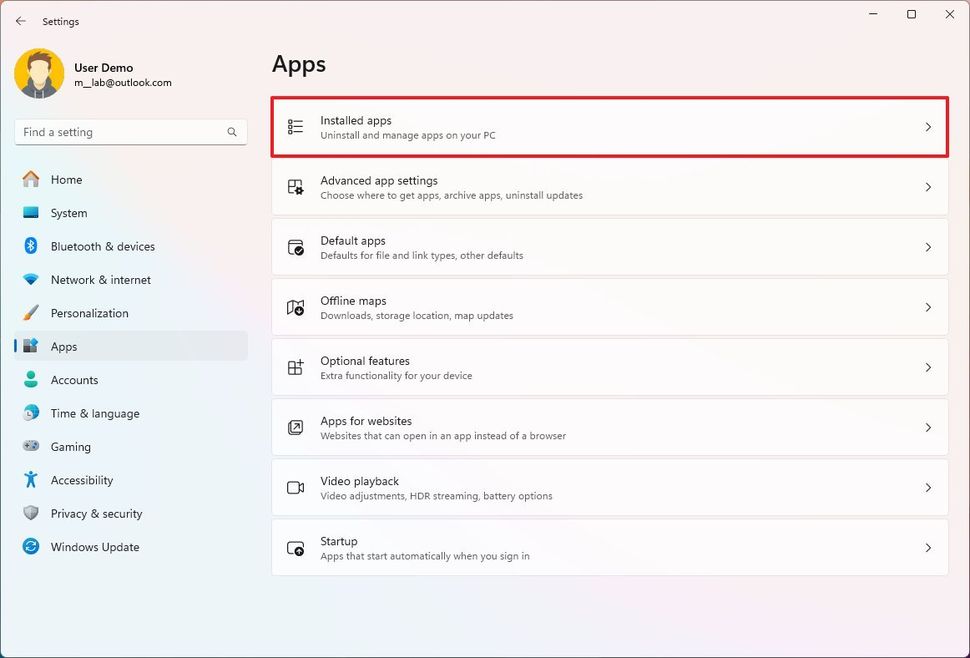
(Image credit: Future)
- Click the menu button (three dots) next to the antivirus and choose the Uninstall option.
- Continue with the on-screen directions to remove the software.
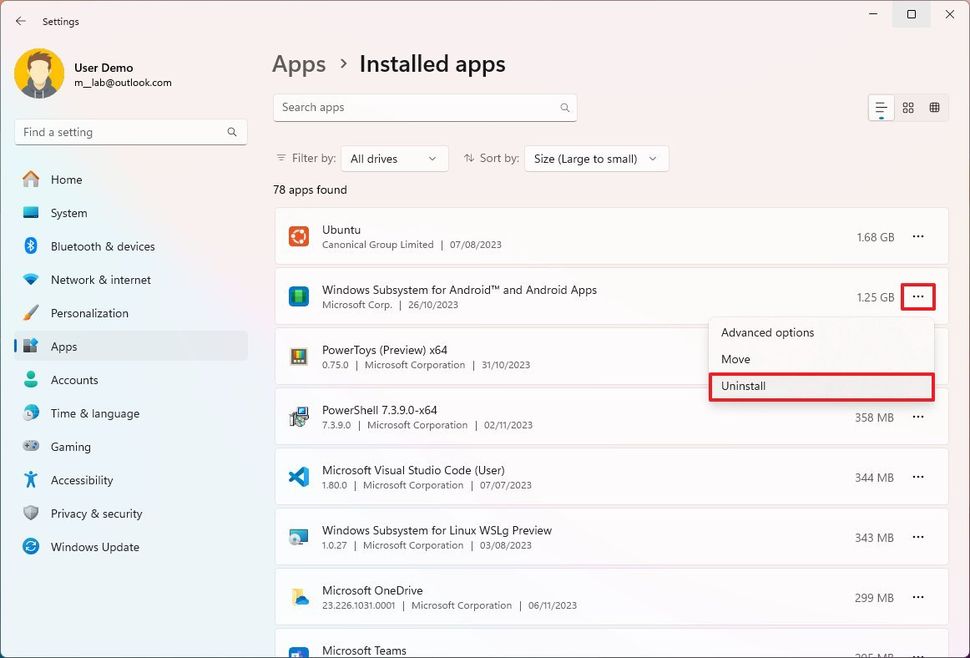
(Image credit: Mauro Huculak)
Once you complete the steps, if the error in question no longer appears, it could be related to the security software. If so, check the software vendor support website to determine if an update or a workaround is available.
Reinstall graphics driver
Usually, when you come across Blue Screen of Death (BSoD) errors and other problems, the issue ends up being the graphics driver installed on your computer. If you're dealing with the error "IRQL_not_less_or_equal," perhaps reinstalling the graphics driver can resolve the problem.
The instructions to install an updated version of the graphics driver will depend on the card's manufacturer (such as AMD, NVIDIA, or Intel), but you can use these general steps:
- Open the manufacturer support website.
- Download the control panel installer on your computer.
- Double-click to launch the application.
- Continue with the on-screen directions.
- In the steps to customize the installation, choose the option to perform a clean installation of the driver.
- Quick note: A clean installation involves uninstalling and removing any leftover files and configurations of the previous driver install and applying a fresh version. NVidia calls this option "Perform a clean installation," AMD refers to it as "Factory Reset," and Intel may have it as "Execute a clean installation."
- Continue with the reinstallation process.
Once you complete the steps, the computer will reboot, and the "IRQL" problem should now be resolved.


3175x175(CURRENT).thumb.jpg.b05acc060982b36f5891ba728e6d953c.jpg)
Recommended Comments
There are no comments to display.
Join the conversation
You can post now and register later. If you have an account, sign in now to post with your account.
Note: Your post will require moderator approval before it will be visible.