
3175x175(CURRENT).thumb.jpg.b05acc060982b36f5891ba728e6d953c.jpg)
Some Windows users prefer to sign-in to the Windows operating system automatically. While not advised on multi-user systems or systems with confidential files, the automatic login into Windows can speed up the start of the operating system.
Windows 11 users can configure the operating system to sign them in automatically into an account. A good setup combines automatic sign-ins to Windows 11 with full disk encryption, e.g. using the open source disk encryption tool VeraCrypt. The disk encryption protects the data on the device, but the login is still significantly faster.
Configure Windows 11 to sign-in automatically
Automatic sign-ins work best with local accounts. It is highly recommended to use a local account on Windows 11. Automatic sign-ins to Windows 11 work only if Windows Hello is not enabled. Two-factor authentication, e.g. by using Microsoft's Authenticator application, may also cause issues. You can add new local user accounts under Settings > Accounts > Family & Other users > Add account.
If you sign-in using a PIN or by using other authentication options powered by Windows Hello, you can't enable automatic sign-ins to Windows 11. In this case, it is necessary to disable Windows Hello functionality first. Windows 11 users who sign-in using a local account or by not using Windows Hello functionality can skip to the next section.
- Open the Settings application on the Windows 11 PC, e.g. with the shortcut Windows-I, or by selecting Start > Settings.
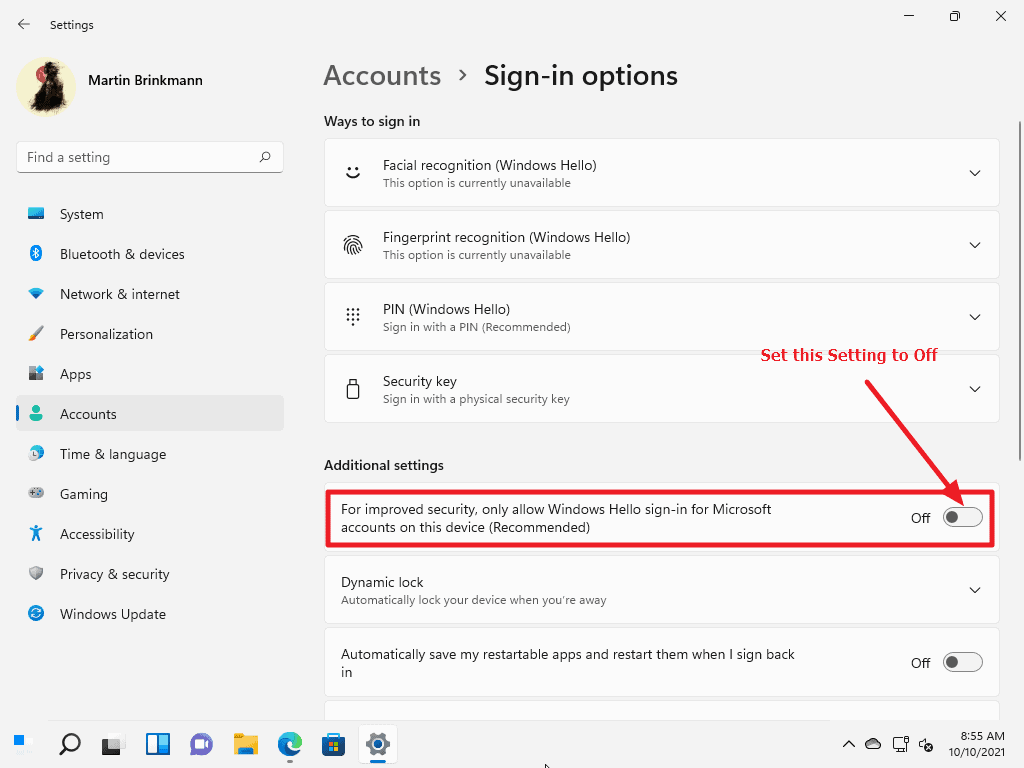
- Go to Accounts > Sign-in options.
- Disable "For improved security, only allow Windows Hello sign-in for Microsoft accounts in this device (Recommended)". It should read off once you have done so.
- Expand the current sign-in method under "Ways to sign in", and select the Remove option.
Tip: if Remove is grayed out under PIN, select the forgot PIN link that is displayed. You are asked to sign-in using the Microsoft account password and then set a new PIN. Instead of adding a new PIN, select Cancel on the dialog and close the window.
Now that this is out of the way, it is time to configure Windows 11 for automatic logins.
- Use the shortcut Windows-R to open the run box of the system.
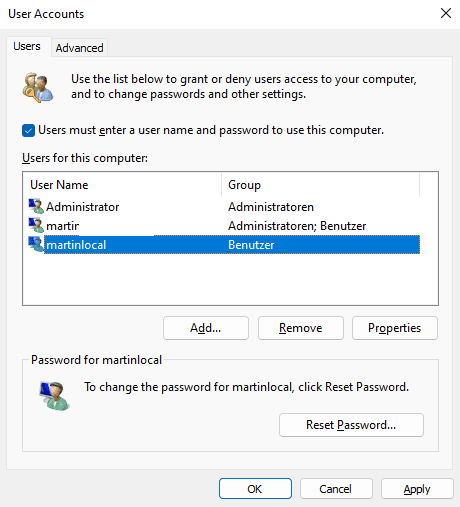
- Type netplwiz and hit Enter; this opens the User Account management page.
- Select the account that you want to sign-in automatically on the PC.
- Uncheck the box that says "Users must enter a user name and password to use this computer".
- Select Apply and confirm the account password.
- Click OK.
- Restart the computer.
Windows 11 should sign you in to the selected account automatically from that moment on.
Recommended Comments
Join the conversation
You can post now and register later. If you have an account, sign in now to post with your account.
Note: Your post will require moderator approval before it will be visible.