Do you want to check the health of your PC's SSD? Here's how on Windows 11.
On Windows 11, you can check the health state of the system (or any other) Solid-State Drive (SSD) installed on your computer, and in this guide, I'll show you how. In the past, you needed to source a third-party tool to check the health of the drives connected to your device, but now, you can check this information from the Settings app.
However, it's worth noting that the "Drive health" feature is only available for modern Non-Volatile Memory (NVMe) SSDs, not traditional Serial AT Attachment (SATA) or Hard Disk Drives (HDDs). If you have a non-supported media type, it's still possible to check the health with the "Performance Monitor" app, but the information won't be as rich.
In this how-to guide, I will walk you through the steps to check the health of your computer's hard drive.
How to determine health of modern SSDs on Windows 11
To check the SSD health on Windows 11, use these steps:
- Open Settings.
- Click on System.
- Click the Storage page on the right side.
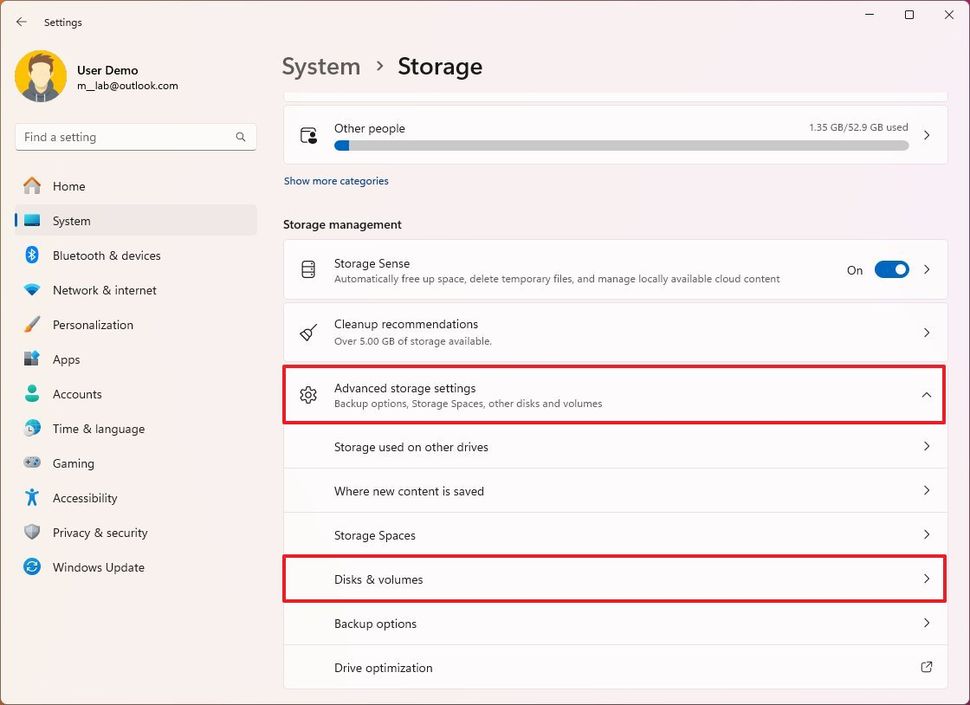
- Click on Advanced storage settings.
- Click the Disks & volumes setting.
(Image credit: Mauro Huculak)
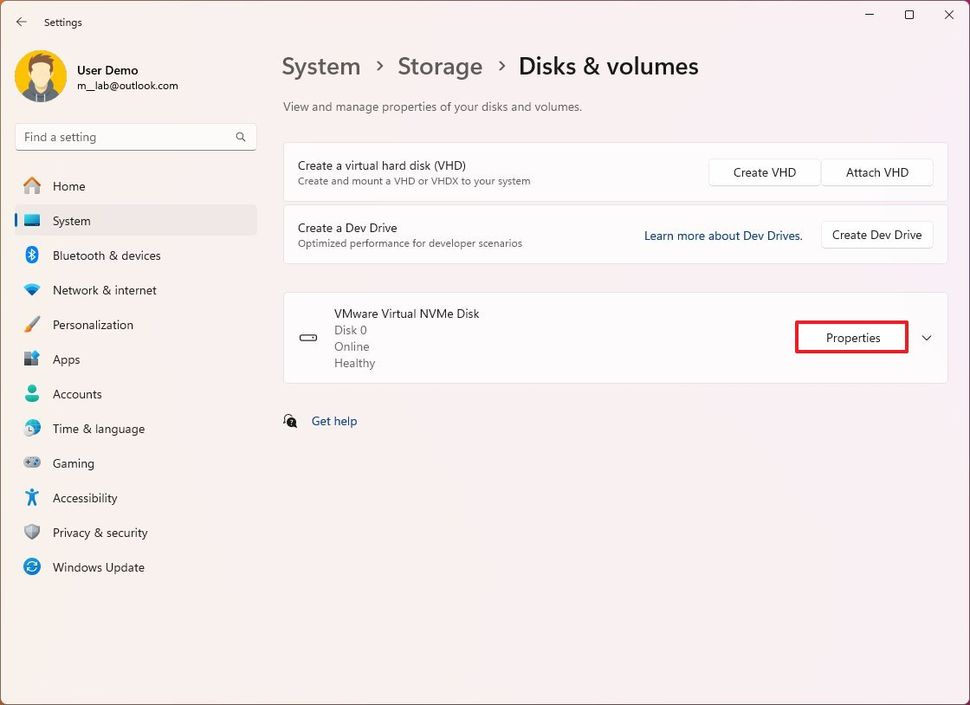
- Choose the SSD and click the Properties button.
(Image credit: Mauro Huculak)
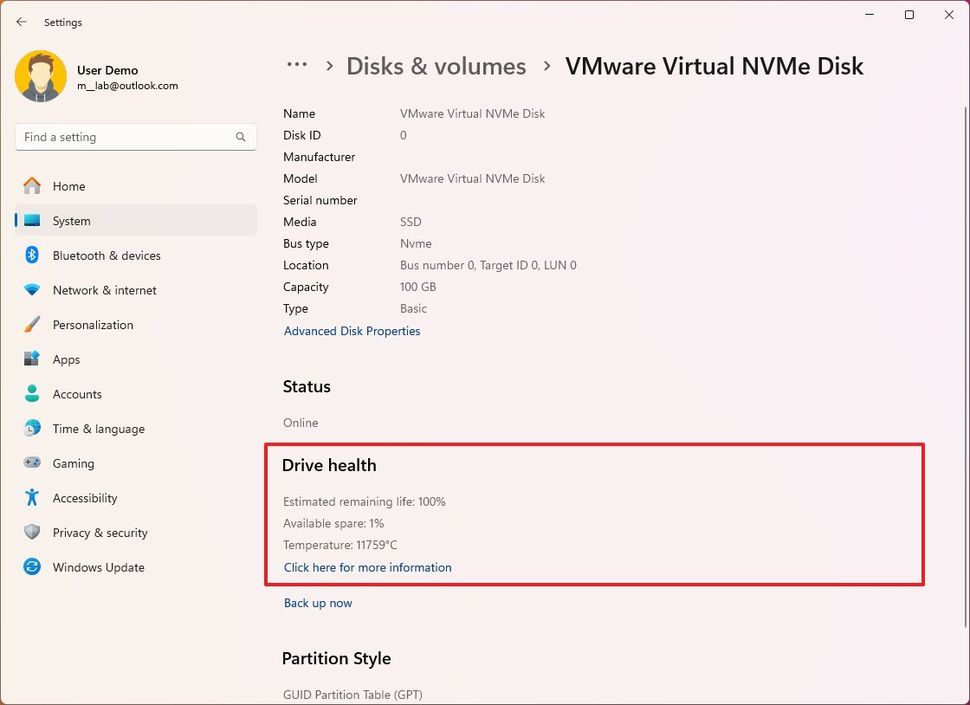
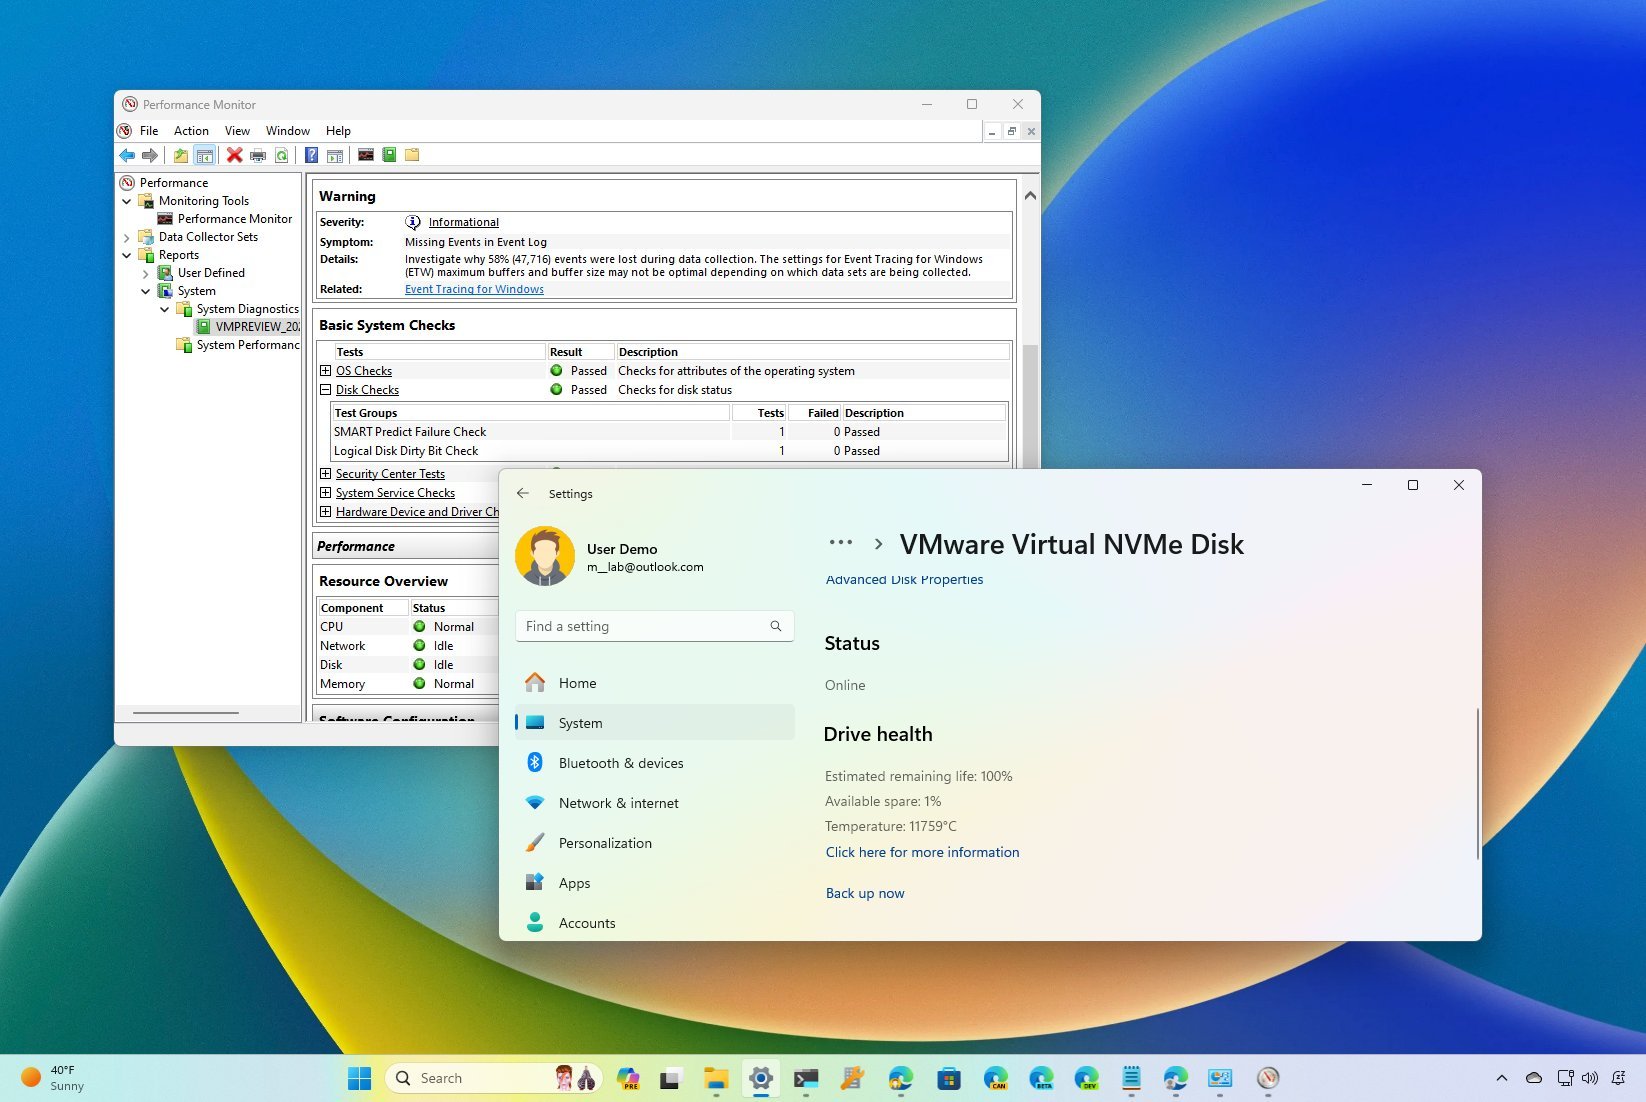
- Confirm the health state under the "Drive health" section, including the remaining life span, available spare space, and temperature.
(Image credit: Mauro Huculak)
Once you complete the steps, you will better understand the health of your device's Solid-State Drive.
The "Estimated remaining life" attribute shows an estimate of the life remaining on the drive. The percentage is an estimate based on the prediction set by the manufacturer. This estimation doesn't necessarily mean the drive will fail once it reaches 0 percent. In fact, sometimes, you may find a number below 0 percent.
The "Available spare" attribute refers to the "spare capacity," which is the amount of storage that the manufacturer reserves in the drive for failures.
For example, if you purchase an SSD of 100GB, you will notice storage before formatting and partitioning is roughly 100GB. However, in reality, the drive comes with some extra storage. The extra space remains hidden, and the drive will use this storage to compensate for those sectors that can no longer hold data to help span the life of the media.
It's important to note that when I say 10 percent, I refer to an estimate. Usually, drive manufacturers won't disclose how much spare capacity is available on the storage media.
Also, the 10 percent represents 100 percent of the available spare.
Finally, the "Temperature" attribute will show you the device's current temperature estimate in Celsius.
The "Device health" feature can also show different critical warnings depending on the state of the drive:
- Spare capacity is low: The spare space is lower than the recommended capacity.
- Reliability is degraded: The drive is losing performance significantly due to media or internal errors.
- Drive is set to read-only: You can access data, but it's not possible to commit data to the drive.
When you receive a warning notification or notice the drive's health degrading, you should immediately create a backup of the data to another physical drive. Also, this should be a good time to replace the drive before a critical failure may cause data loss.
How to determine health of traditional SSDs on Windows 11
Although the "Drive health" feature doesn't support traditional drives, such as SATA SSDs and HDDs, it's still possible to use Command Prompt to check the Self-Monitoring, Analysis, and Reporting Technology (SMART) built into most drives to determine if the storage is still healthy or failing due to hardware issues.
To check the hard drive failure status through Performance Monitor, use these steps:
- Open Start.
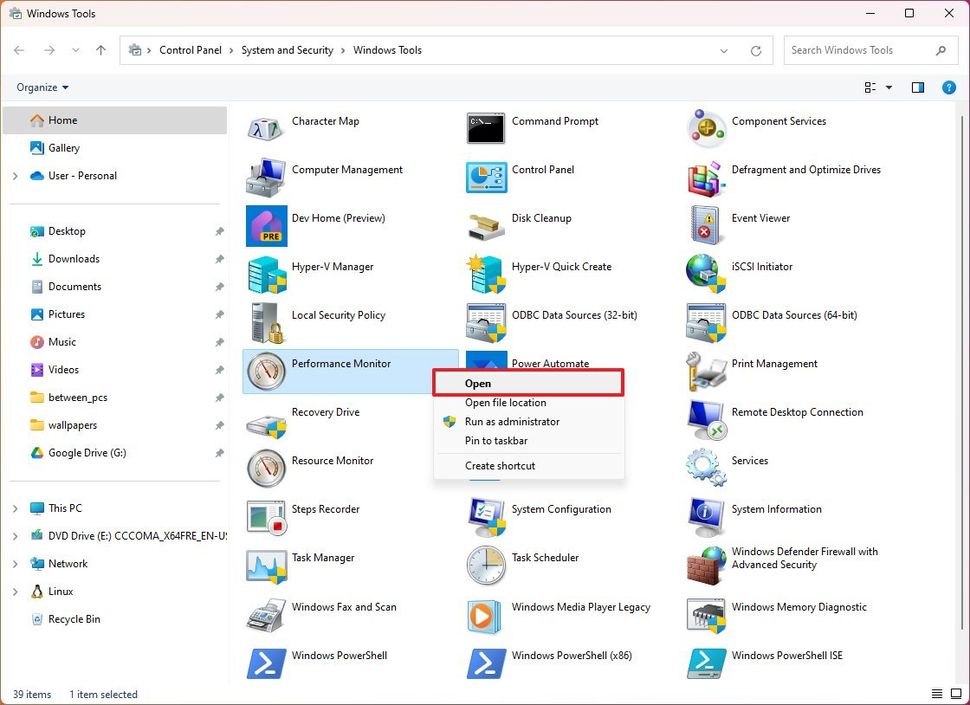
- Search for Windows Tools and click the top result to open the app.
- Right-click the Performance Monitor icon and choose the Open option.
(Image credit: Mauro Huculak)
- Expand the "Data Collector Sets" branch.
- Expand the System sub-branch.
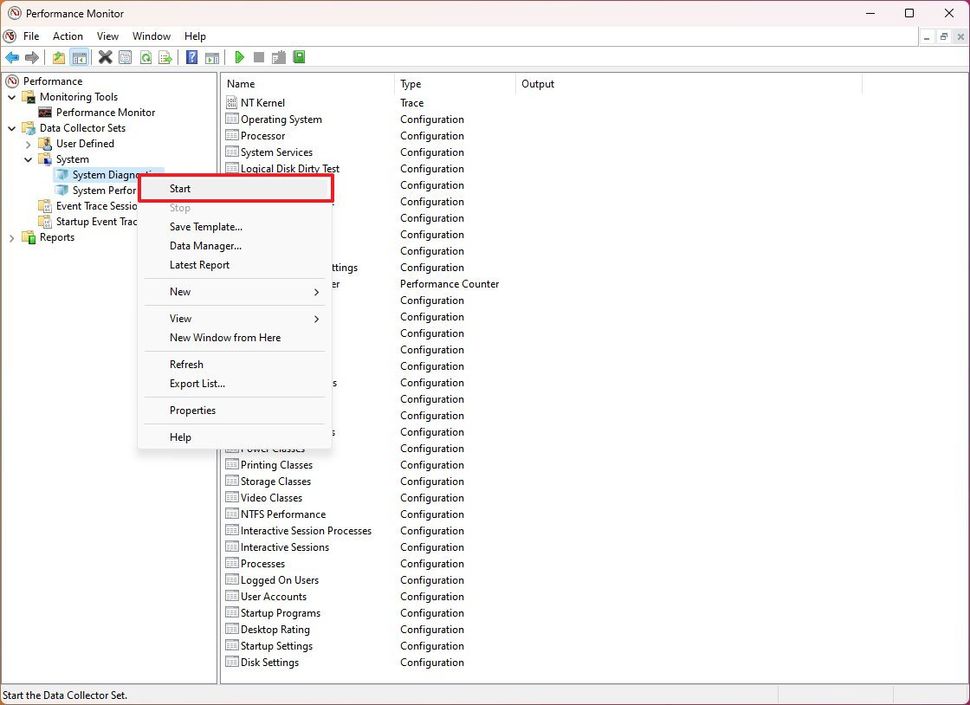
- Right-click the System Diagnostics item and select the Start option.
(Image credit: Mauro Huculak)
- Expand the Reports branch.
- Expand the System sub-branch.
- Expand the System Diagnostics sub-branch.
- Select the diagnostic report from the list.
- Quick note: Allow some time for the system to perform the diagnostic.
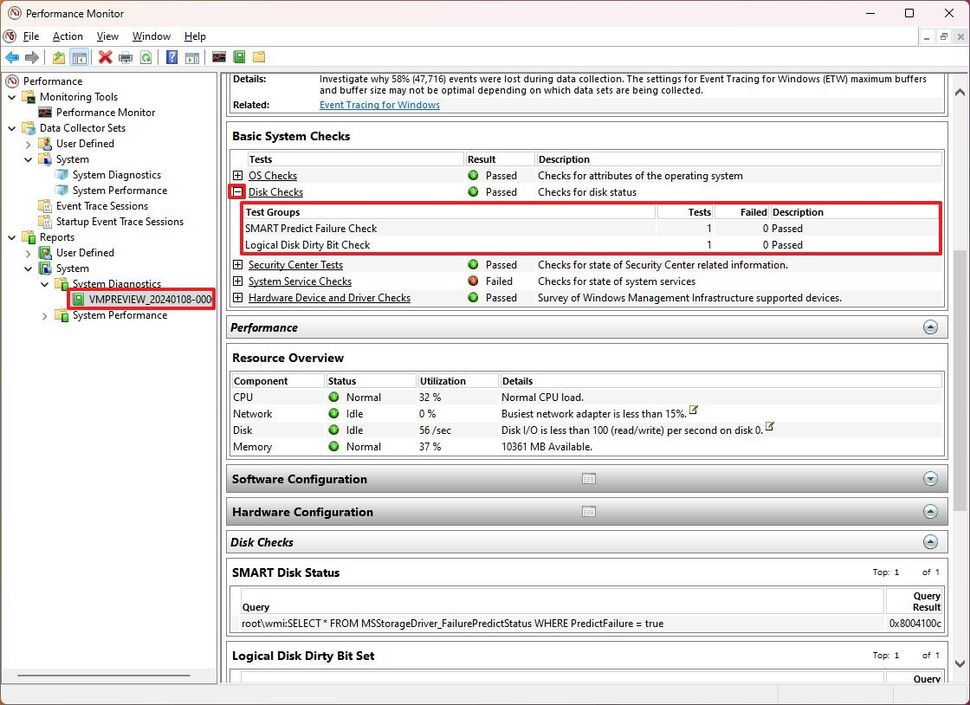
- Under the "Basic System Checks" section, click the plus (+) button next to Disk Checks.
- Confirm the "SMART Predict Failure Check" values. If "Failed" has a value of "0" and "Description" is set to "Passed," then the hard drive is working without issues.
(Image credit: Mauro Huculak)
After you complete these steps, you'll be able to find out if the hard drive is healthy or whether it has problems that are likely to fail at any time.


3175x175(CURRENT).thumb.jpg.b05acc060982b36f5891ba728e6d953c.jpg)
Recommended Comments
There are no comments to display.
Join the conversation
You can post now and register later. If you have an account, sign in now to post with your account.
Note: Your post will require moderator approval before it will be visible.