Desktop Stickers is a new hidden feature in Windows 11 22H2 (and newer). It allows you to personalize the desktop with variously-themed stickers, similar to how people customize the lids of their laptops.
Some users will find this feature questionable or even useless, but others will enjoy using it. Here is how to enable Desktop Stickers in Windows 11.
Important: Microsoft is yet to announce Desktop Stickers for Windows 11, and future changes might remove the feature or enable it by default. We will update the article when necessary. Meanwhile, you can turn it on with a simple registry hack.
Note: Use this guide to enable Desktop Stickers on Windows 11 build 22621 (version 22H2) or newer, but note that it will not work on Windows 11 build 22000. To check your Windows 11 version, press Win + R and type winver.
Enable Desktop Stickers in Windows 11 22H2
- Press Win + R and type regedit. Press Enter, then Windows 11 will open Registry Editor.
- Copy and paste the following path into the address bar in Registry Editor: HKEY_LOCAL_MACHINE\SOFTWARE\Microsoft\PolicyManager\current\device.
-
Right-click the device key and select New > Key.

- Rename the new key to Stickers.
-
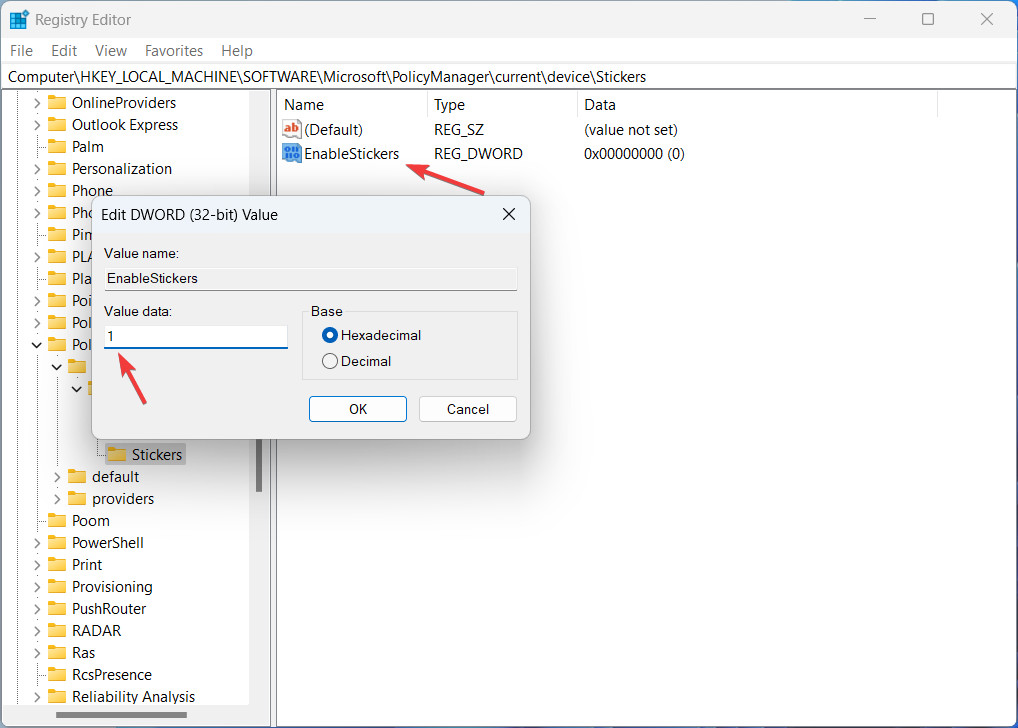
Right-click the right side of Registry Editor and select New > DWORD (32-bit) Value.

- Rename the new value to EnableStickers.
-
Open the EnableStickers value and change its value data to 1. Click OK to save the changes.

- Restart your computer.
Now you can add desktop stickers in Windows 11.
How to add, edit, or delete Desktop Stickers in Windows 11 22H2
Note: The button to add stickers will not work if you use slideshows to change the background on your desktop. Switch to a single picture or Windows Spotlight to enable Desktop Stickers in Windows 11.
-
Right-click anywhere on the desktop and select Add or edit stickers.

-
Alternatively, pick another route: Press Win + I, go to Personalization > Background, and click Add Stickers.

-
Windows 11 will open the Stickers editor. You can scroll the list of available stickers or find the one you need using keywords.

-
Click or tap the sticker you want to add. Now you can click the sticker and resize or reposition it on the screen.

- You can add as many stickers as you want, and to add another one, click the Stickers button at the top of the screen.
- To delete a sticker, click it, then hit the delete button below the sticker.
- To exit Stickers Editor, click the X button at the top of the screen.
How to disable Desktop Stickers in Windows 11 22H2
- Launch Registry Editor by pressing Win + R and using the regedit command. There are many other ways to launch Registry Editor, so you can pick whatever is more convenient for you.
- Go to HKEY_LOCAL_MACHINE\SOFTWARE\Microsoft\PolicyManager\current\device\Stickers.
- Open the EnableStickers value and change its value data to 0. Alternatively, you can delete the value.
- Restart your computer to apply the changes.
Note that disabling Desktop Stickers in Windows 11 does not remove existing stickers. You need to remove stickers before disabling the feature or changing the desktop background afterward.
Do you like the idea of adding virtual stickers to the desktop in Windows 11?


3175x175(CURRENT).thumb.jpg.b05acc060982b36f5891ba728e6d953c.jpg)
Recommended Comments
There are no comments to display.
Join the conversation
You can post now and register later. If you have an account, sign in now to post with your account.
Note: Your post will require moderator approval before it will be visible.