3175x175(CURRENT).thumb.jpg.b05acc060982b36f5891ba728e6d953c.jpg)
Do you want to fully automate the Windows 11 installation process? If yes, you can create an answer file, and here's how.
On Windows 11, you can create an answer (or autounattend.xml) file to install the operating system without going through every step during the setup and Out-of-box Experience (OOBE), and in this guide, I'll show you how.
When you want to perform a clean installation of Windows 11, you typically have to complete the Windows Setup process, which takes care of the installation settings, including language preferences, product key, and partition layout. Also, after the installation, you have to complete the Out-of-box Experience to configure settings like keyboard layout, account, and privacy settings.
Although this process is relatively straightforward, you still have to spend time managing the installation and answering questions. If you want to automate the process, you can create an answer file with instructions to complete every on-screen prompt, which you can integrate onto a bootable media. Then, during the setup, the system can automatically read the answers to install Windows 11.
In this how-to guide, I'll explain the steps to create an answer file to install Windows 11 on your computer.
Create an answer file for an unattended install of Windows 11
Creating an answer file to do an unattended installation of Windows 11 isn't complicated. You have to install the DISMTools app, use the easy-to-use wizard to create the unattended file, and finally, integrate the ".xml" file into the Windows 11 bootable media.
It's important to note that you can use different tools to complete this process, but I have found that using the DISMTools offers the simplest experience for creating this file. However, it's a third party, non-Microsoft tool. As such, use it at your own risk.
Install DISMTools
To install DISMTools on Windows 11, use these steps:
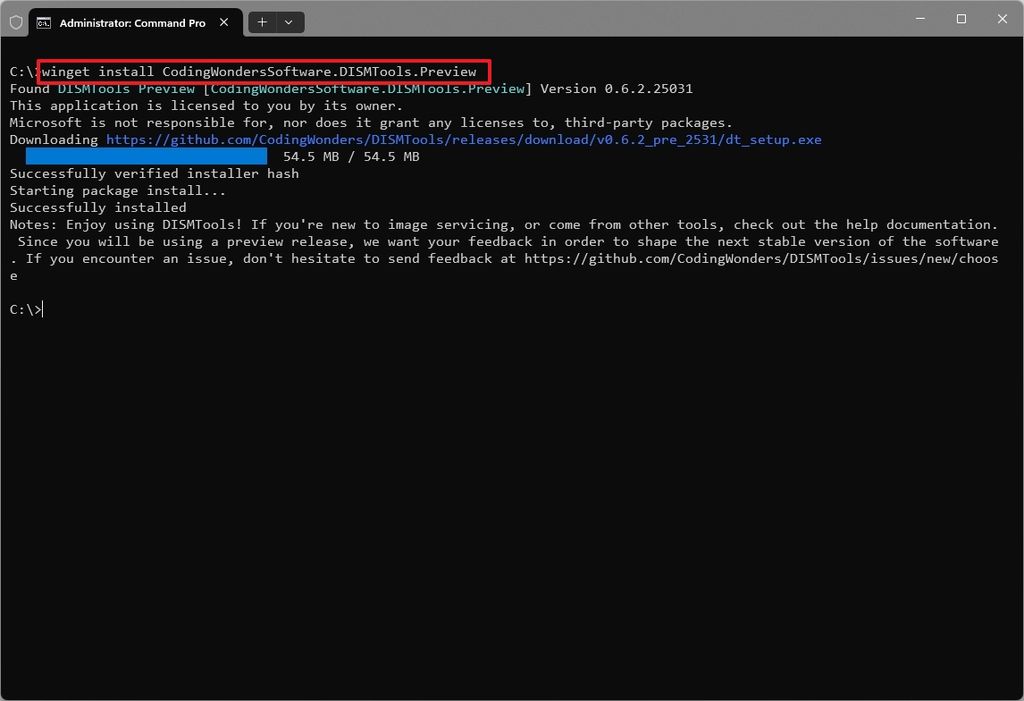
- Open Start.
- Search for Command Prompt, right-click the top result, and choose the Run as administrator option.
- Type the following command to install the tool (preview) and press Enter: winget install CodingWondersSoftware.DISMTools.Preview
(Image credit: Mauro Huculak)
Once you complete the steps, you can use the tool's wizard to create an answer file to do an unattended installation of Windows 11 without tedious steps.
Create answer file
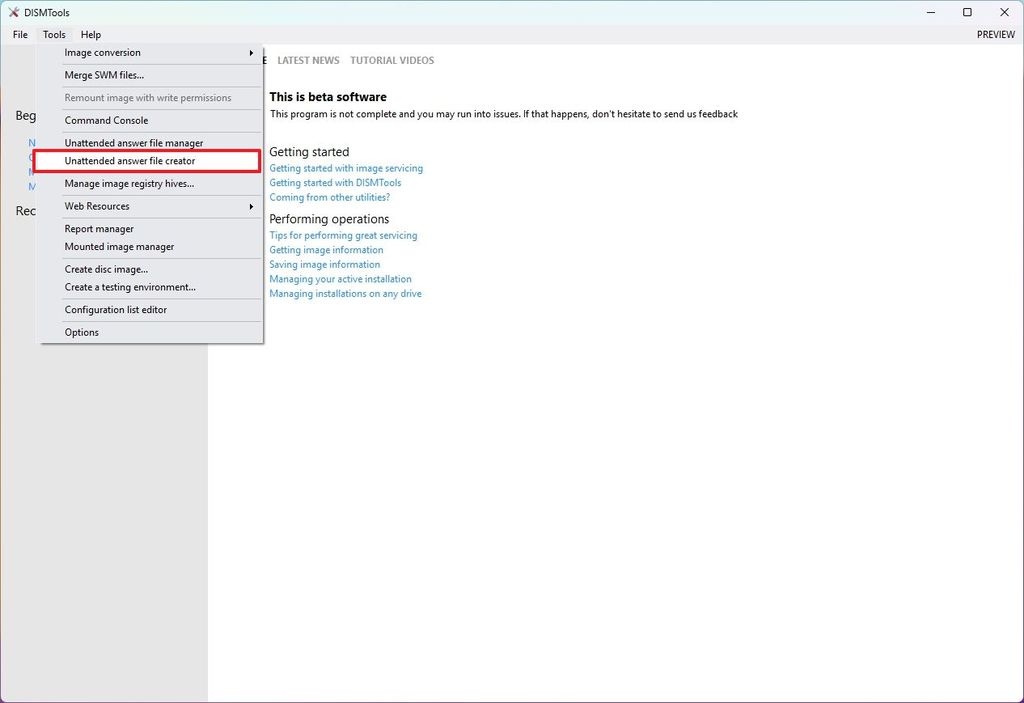
To create an unattended file to install the operating system, use these steps:
- Open Start.
- Search for DISMTools and click the top result to open the app.
- Click the Next, Next, and Finish buttons to process the initial setup.
- Click on Tools and choose the "Unattended answer file creator" option.
(Image credit: Mauro Huculak)
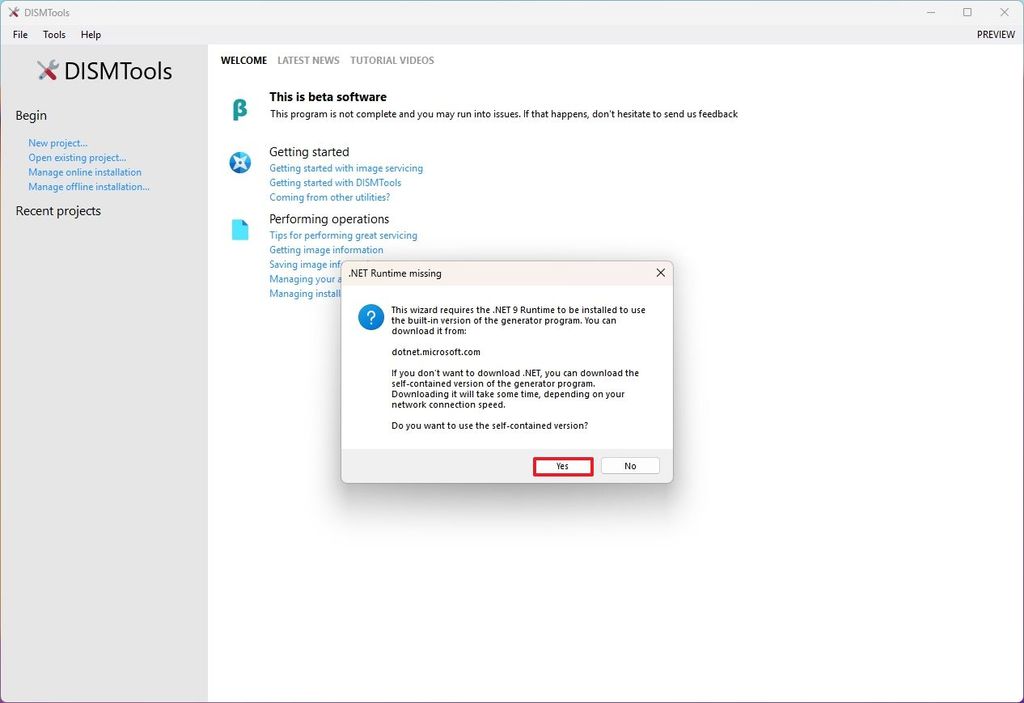
- Click the Yes button to download the .NET 9 Runtime (if applicable).
(Image credit: Mauro Huculak)
- Click the Next button to start the wizard.
- Select the "Configure these settings now" option.
- Choose the system language, locale, keyboard layout, and location.
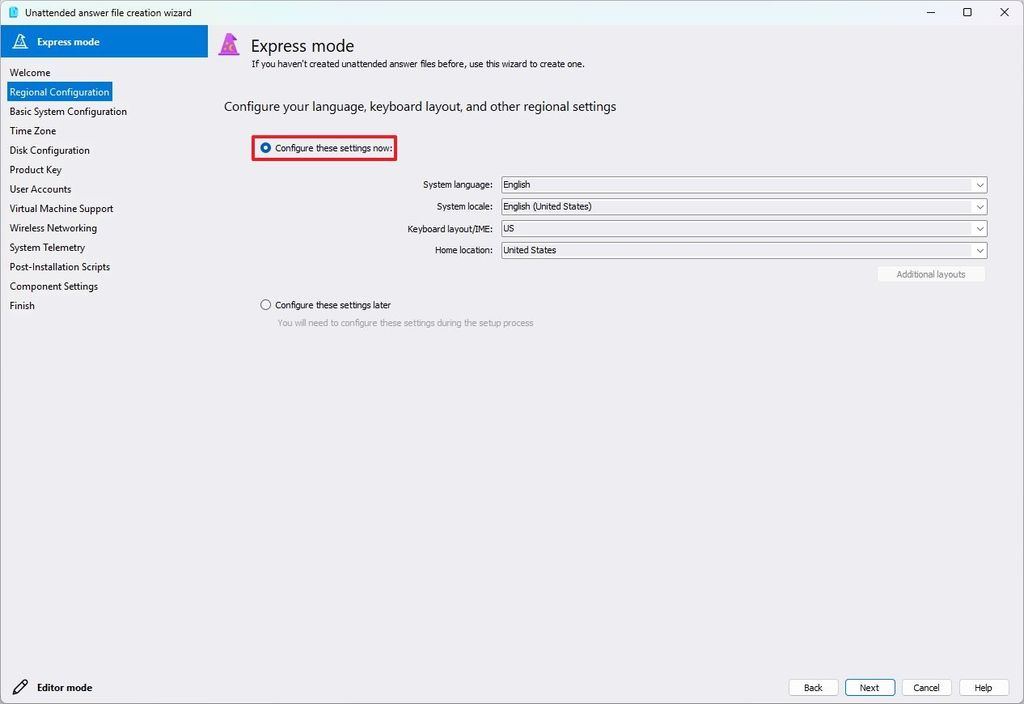
(Image credit: Mauro Huculak)
- Click the Next button.
- Choose the "x64" option for processor architecture, since that's the only supported architecture for Windows 11.
- (Optional) Check the "Bypass System Requirements" option in the "Windows 11 settings" to create a file to install the operating system on unsupported hardware.
- (Optional) Check the "Bypass Network Connection" option in the "Windows 11 settings" to create a local account during the setup.
- Check the "Let Windows set a random computer name" option because if you're using the same file on different devices, you will avoid conflicts with the same computer name.
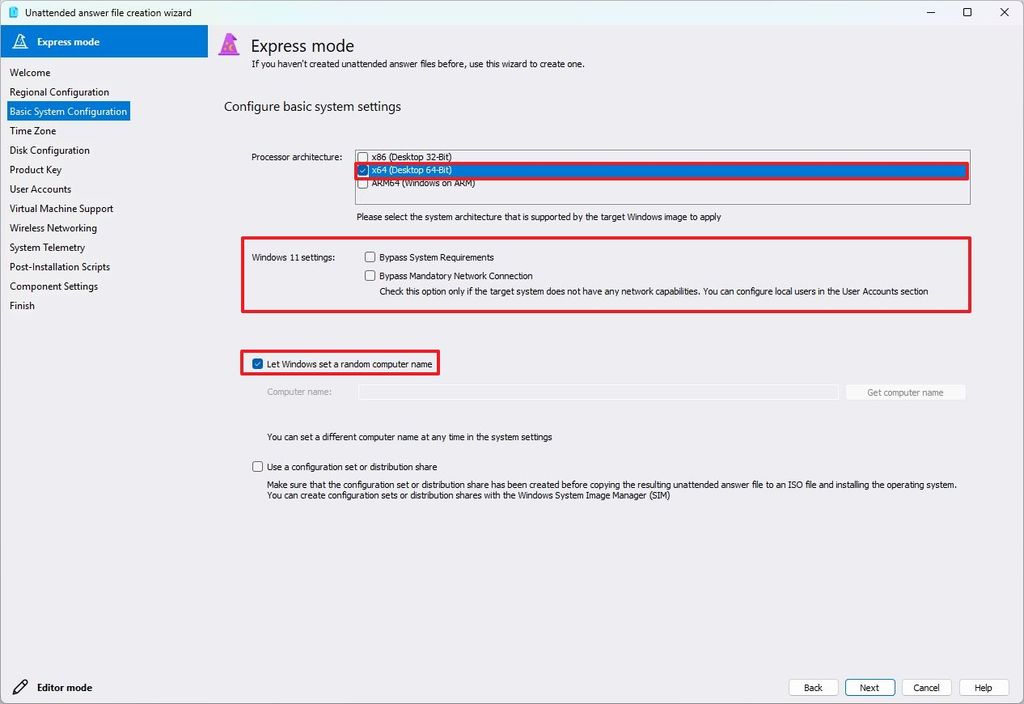
(Image credit: Mauro Huculak)
- Click the Next button.
- Choose the "Set a time zone manually" option.
- Select your current time zone.

(Image credit: Mauro Huculak)
- Click the Next button.
- Clear the "I want to configure these settings during the installation" option to manually configure the EFI and Recovery Partition.
- Choose the "Configure settings for disk 0" option and use the default configuration.
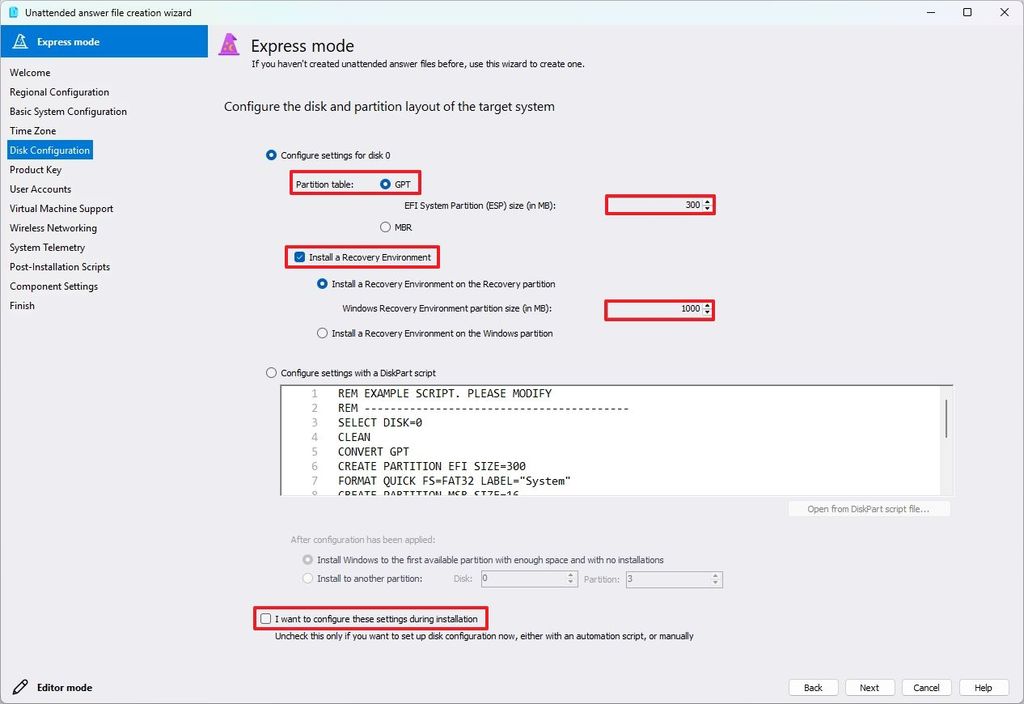
(Image credit: Mauro Huculak)
- Quick note: The default configuration will create a 300MB EFI partition using GPT and a 1GB Recovery Partition.
- Click the Next button.
- Choose the "Use a generic product key option to skip this" option.
- Select the product key for the edition of Windows 11.
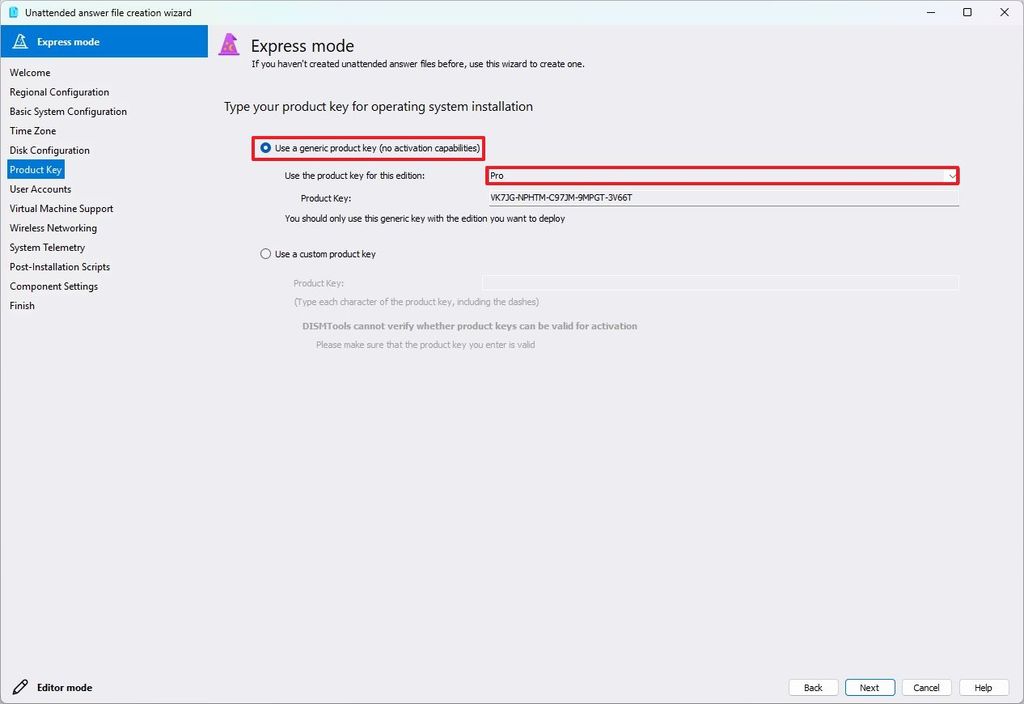
(Image credit: Mauro Huculak)
- Quick note: If you're installing the operating system on a device that previously had Windows 10 or 11, the installation will reactivate automatically. Otherwise, you will have to activate the system after the installation.
- Click the Next button.
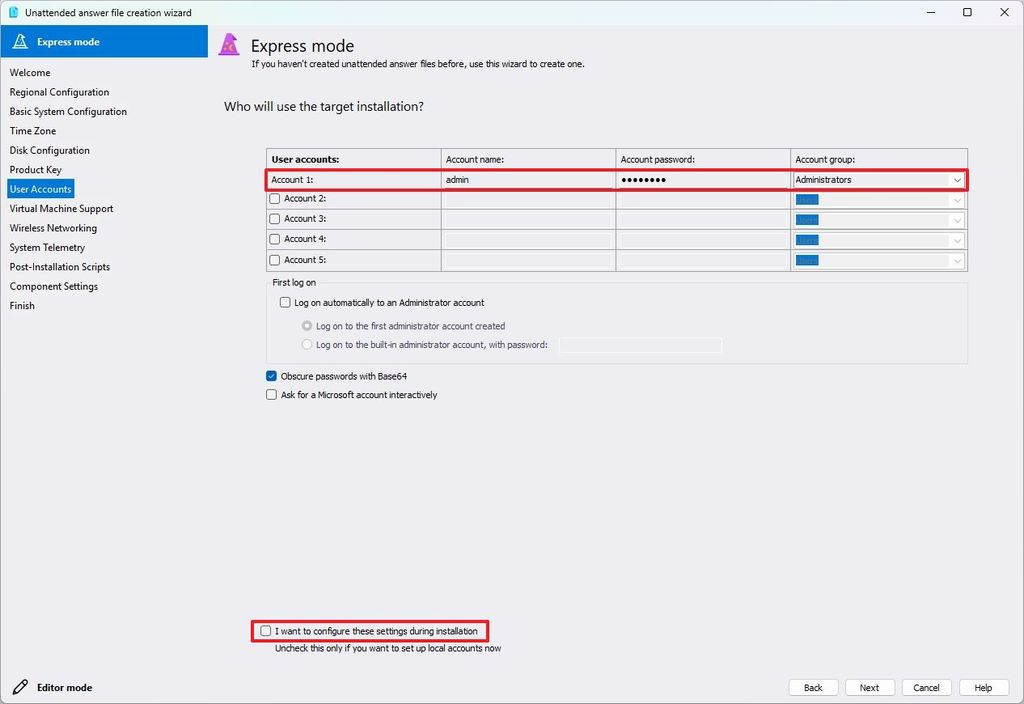
- Clear the "I want to configure these settings during installation" option.
- Confirm the local account name and password.
(Image credit: Mauro Huculak)
- Quick tip: You can always check the "Ask for a Microsoft account interactively" option to configure a Microsoft account during setup. However, to make the experience totally automated, it's best to create a local account and then link it to a Microsoft account after the installation.
- Choose the Administrators option from the "Account group" setting.
- Click the Next button.
- Select the "Passwords should never expire" option.

(Image credit: Mauro Huculak)
- Click the Next button.
- Check the Disable policy option.

(Image credit: Mauro Huculak)
- Click the Next button.
- Select the "No, I plan on using the target installation on a real system" option.
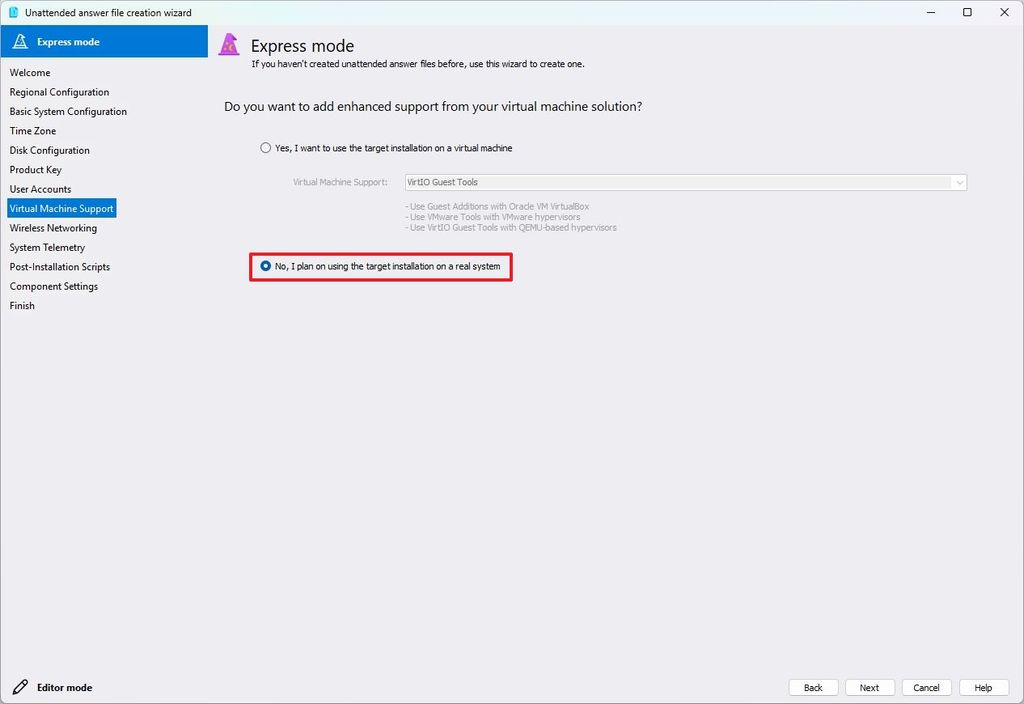
(Image credit: Mauro Huculak)
- Quick note: If you choose the Yes option, you can select the option to support VMware, VirtualBox, etc.
- Click the Next button.
- Clear the "I want to configure the settings installation" option.
- (Option 1) Select the "Configure settings for wireless network now" option.
- Confirm the wireless network settings, including SSID and password.
- (Option 2) Select the "Skip configuration" option if the device will connect using the Ethernet connection.
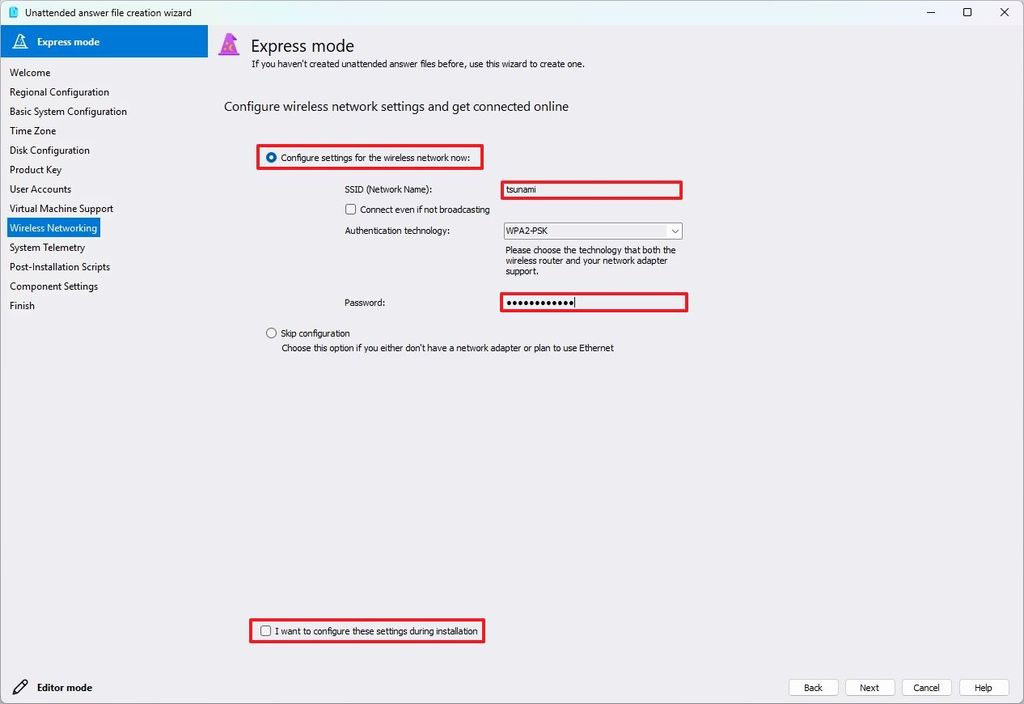
(Image credit: Mauro Huculak)
- Click the Next button.
- Clear the "I want to configure the settings installation" option.
- Select the Disable telemetry option.
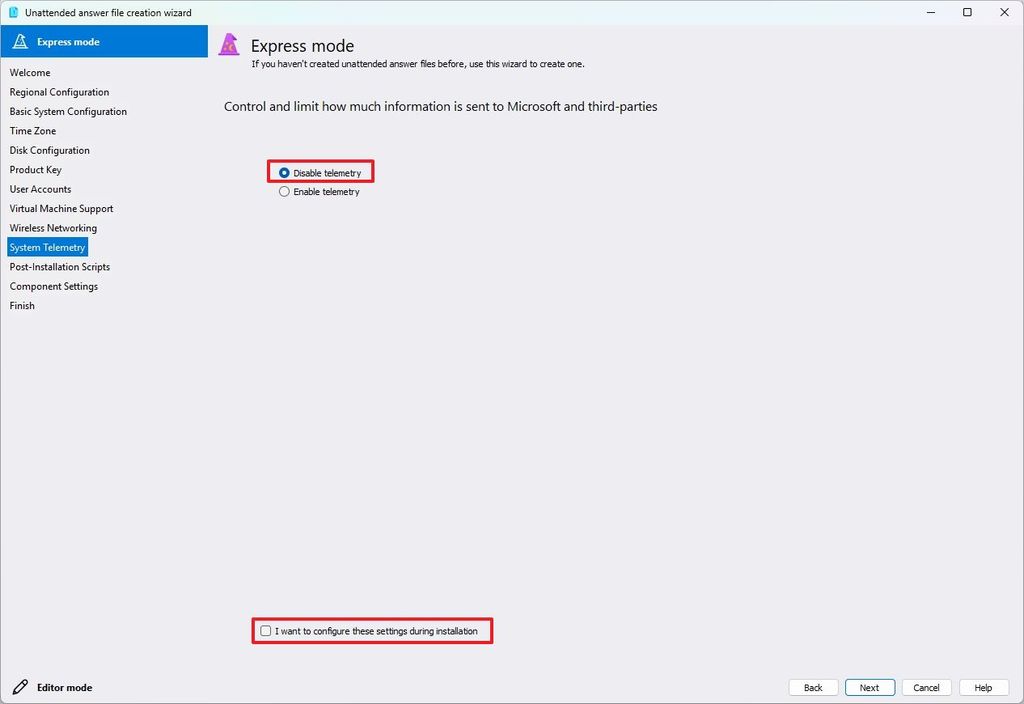
(Image credit: Mauro Huculak)
- Click the Next button.
- Click the Next button again to skip the script configuration.
- Click the Next button one more time to skip the configuration of additional components.
- Click the Next button one last time.
- Save the unattended file on your computer as autounattend.xml.
- Click the Close button.
After you complete the steps, you will end up with an answer that you have to integrate into the Windows 11 installation media to perform an unattended setup.
Integrate file to Windows 11
To integrate the answer to Windows 11 installation media, use these steps:
- Open the Windows 11 download page.
- Click the "Download now" button to save the file on the device under the "Create Windows 11 Installation Media" section.
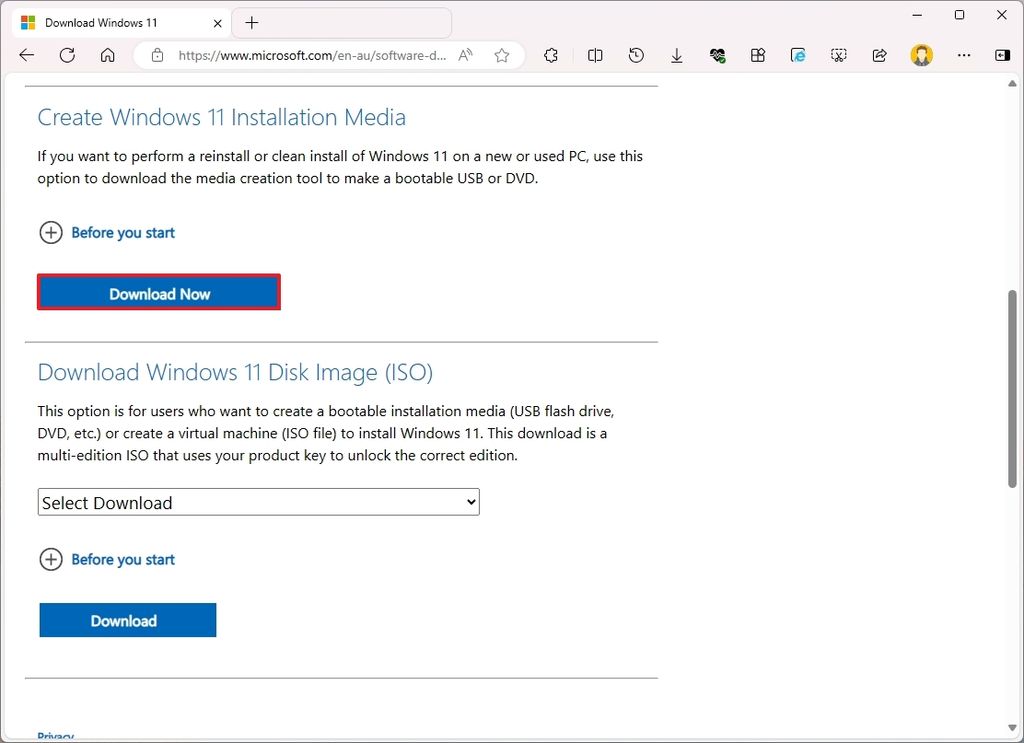
(Image credit: Mauro Huculak)
- Double-click the MediaCreationTool.exe file to launch the tool.
- Click the Accept button to agree to the terms.
- (Optional) Clear the "Use the recommended options for this PC" option.
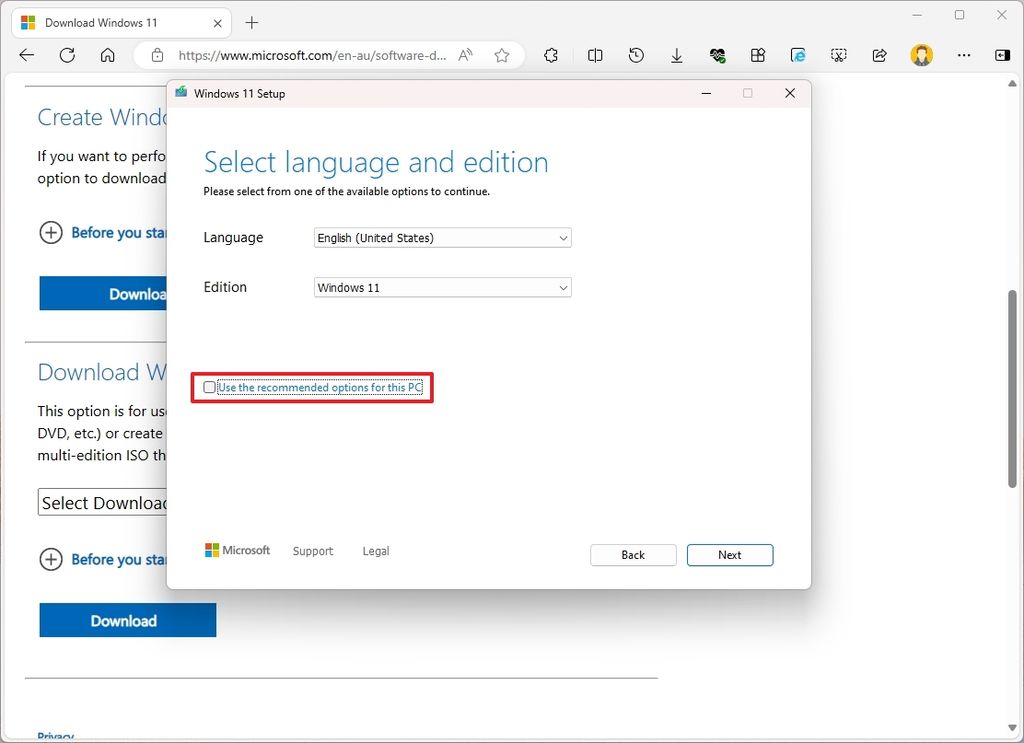
(Image credit: Mauro Huculak)
- Select the correct language and edition of Windows 11.
- Click the Next button.
- Select the "USB flash drive" option.
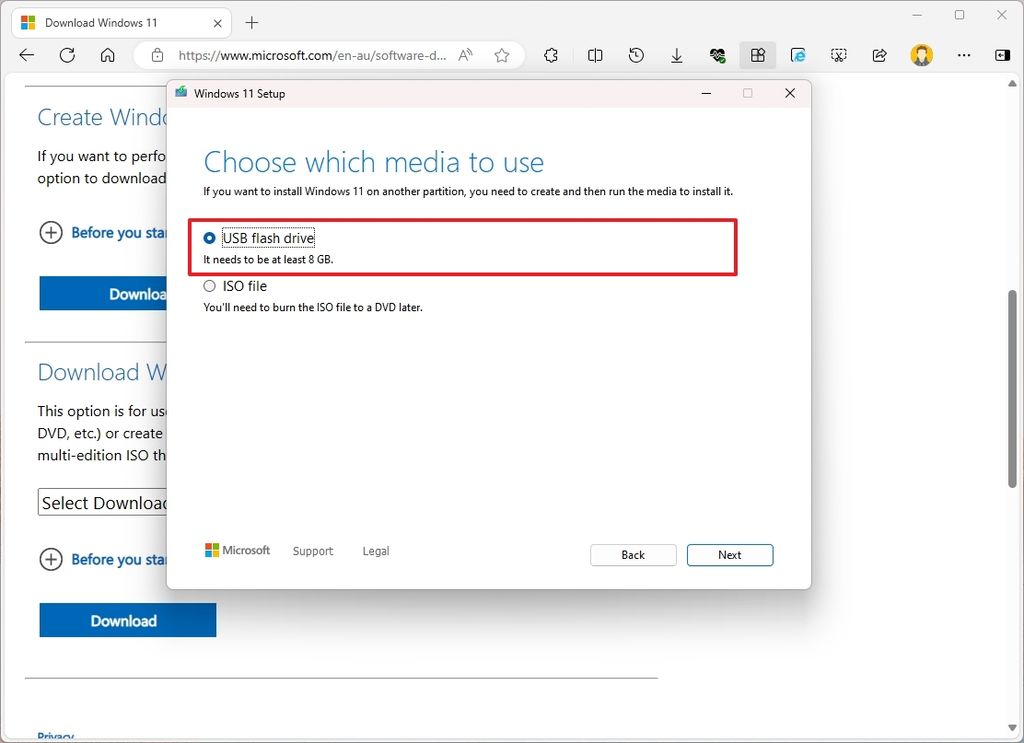
(Image credit: Mauro Huculak)
- Click the Next button.
- Select the removable storage from the list.
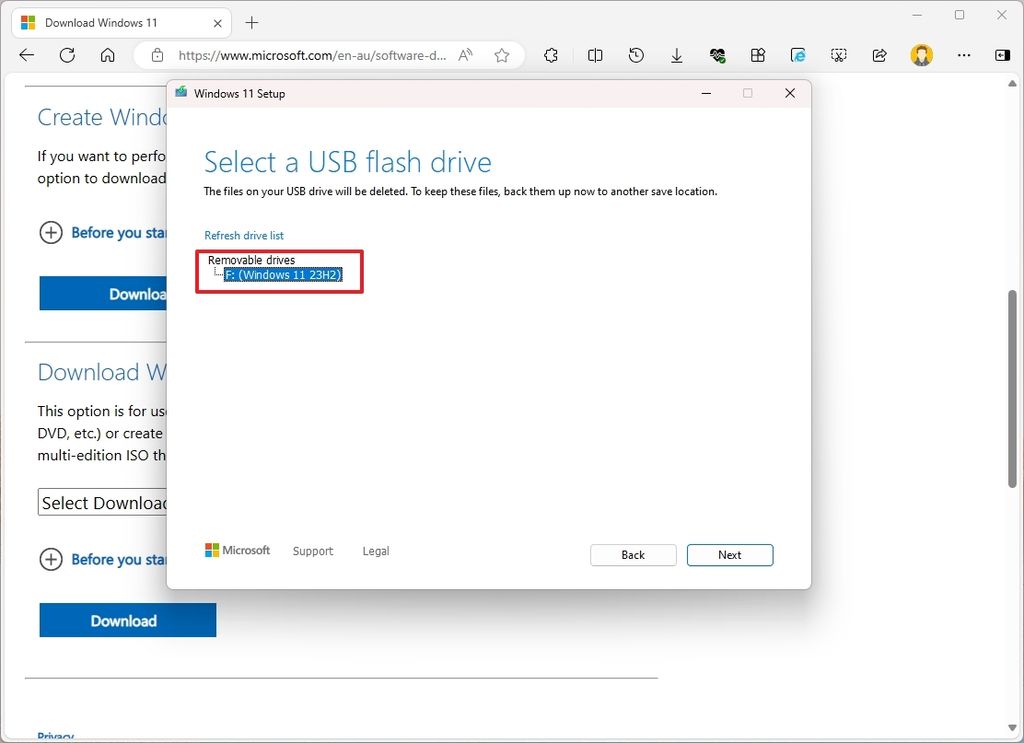
(Image credit: Mauro Huculak)
- Quick tip: If the device is not on the list, click the "Refresh drive list" option to make it available.
- Click the Next button.
- Click the Finish button.
- Open File Explorer.
- Open the autounattend.xml file location.
- Right-click the file and select the Copy option.
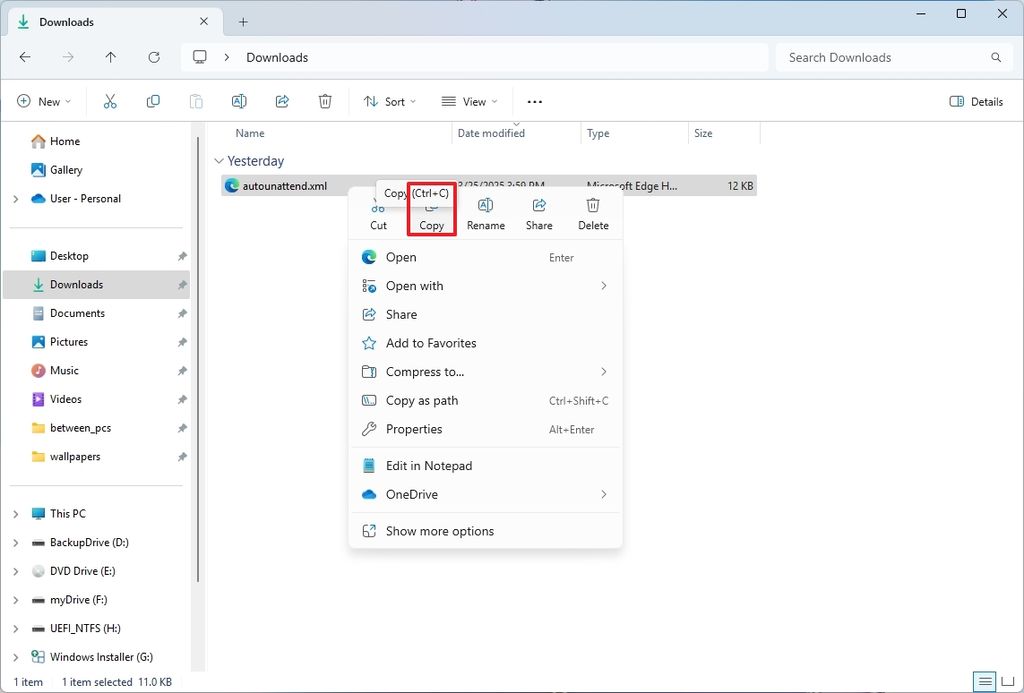
(Image credit: Mauro Huculak)
- Open the Windows 11 USB location from File Explorer.
- Right-click the Paste to copy the autounattend.xml to the installation media.
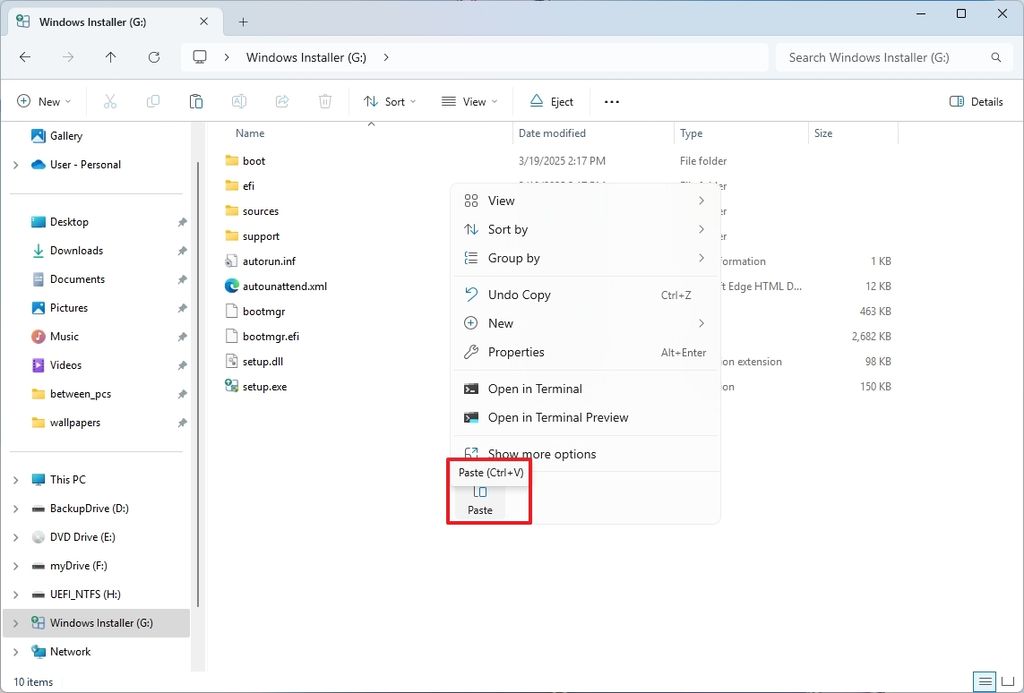
(Image credit: Mauro Huculak)
Once you complete the steps, you can now use the USB bootable media to perform an unattended installation of the operating system.
It's important to note that you may come across two names for the XML file, including "autounattend.xml" and "unattend.xml."
The "autounattend.xml" file is usually the name of the answer file that you would integrate inside the Windows 11 USB flash drive within the root directory.
On the other hand, the "unattend.xml" file is used to automate deployments. Also, it's usually placed inside the "C:\Windows\Panther\Unattend" folder.
Hope you enjoyed this news post.
Thank you for appreciating my time and effort posting news every day for many years.
News posts... 2023: 5,800+ | 2024: 5,700+ | 2025 (till end of February): 874
RIP Matrix | Farewell my friend 


Recommended Comments
Join the conversation
You can post now and register later. If you have an account, sign in now to post with your account.
Note: Your post will require moderator approval before it will be visible.