Here are nearly two dozen lesser-known features you should try in Windows 11.
Windows 11 has a slew of features designed to enhance your productivity, creativity, and overall computer experience. While many of these features are well-known, there are hidden gems that most users overlook.
In this guide, I will uncover (or remind you of) some lesser-used but handy features to help you get the most out of the operating system. From the enhanced version of the clipboard that can sync content across devices to writing tools that probably forgot existed to new security features, to features that make your experience a little easier, such as "End Task."
In this how-to guide, I will highlight a number of less common features you should be using on Windows 11.
Windows 11 lesser features you should try out on your computer
Check out these 20 features you probably didn't know or knew about but then forgot about (not shown in any particular order.)
1. Clipboard history
Although you have been able to cut (and copy) and paste text and images for a long time, this has been a limited experience since you can only store one piece of content at a time and without an interface to view the content of the clipboard.
The clipboard history is another take to the clipboard feature that allows you to upload multiple pieces of content to the clipboard, as well as an interface to view the contents and choose the item you want to paste. You can even pin those pieces of content you paste more frequently.
In addition, this feature works with your Microsoft account, meaning that the contents in the clipboard can sync across devices.
To get started with the clipboard history on Windows 11, use these steps:
- Open Settings.
- Click on System.
- Click the Clipboard page on the right side.
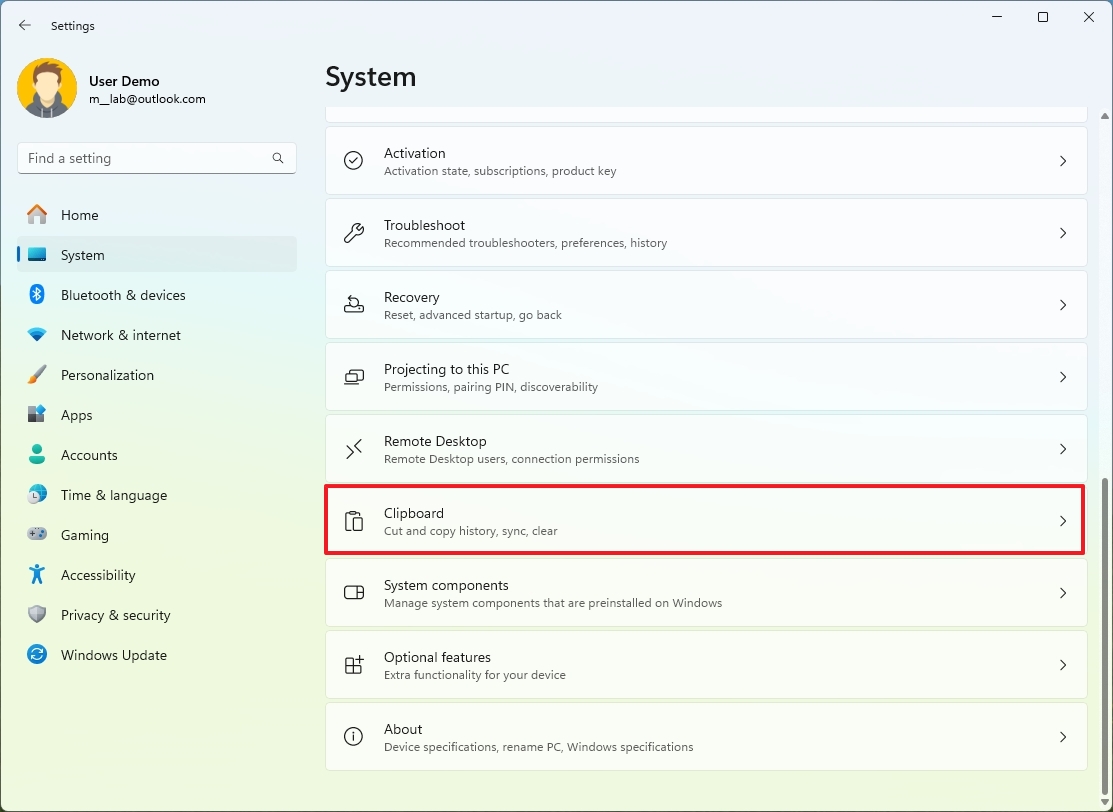
(Image credit: Mauro Huculak)
- Turn on the "Clipboard history" toggle switch.
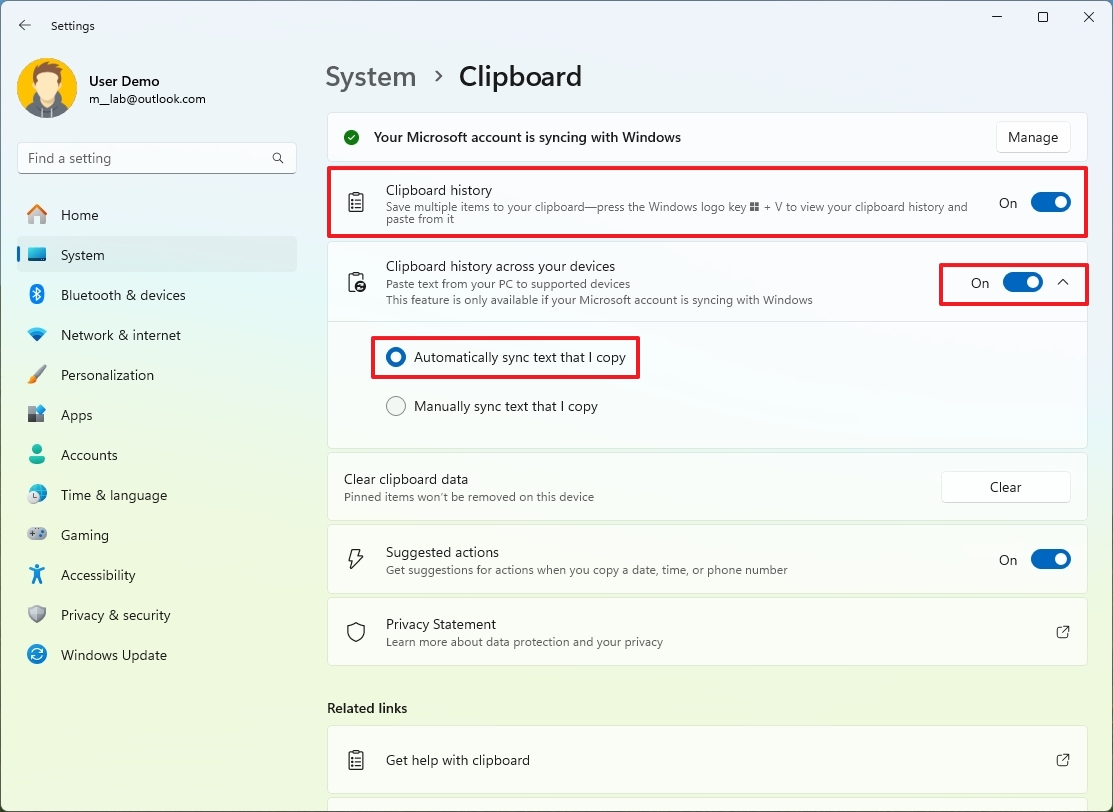
(Image credit: Mauro Huculak)
- (Optional) Turn on the "Clipboard history across devices" toggle switch.
- Choose the option to automatically or manually sync text across devices.
Once you complete the steps, you can select and copy or cut text or images as you would normally do through the "Ctrl + C" and "Ctrl + X" or using the "Copy" or "Cut" options from the context menu, and then use the "Windows key + V" to open the clipboard interface.
In the clipboard history, you can choose from the most recent copies to paste on your application and pin items to reuse content.
2. Live Captions
Live Captions is an accessibility feature that can produce captions in real-time from virtually any audio content, including online videos, to allow anyone to understand audio by viewing captions for spoken content.
To enable Live Captions on Windows 11, use these steps:
- Open Settings.
- Click on Accessibility.
- Click the Captions page on the right side.
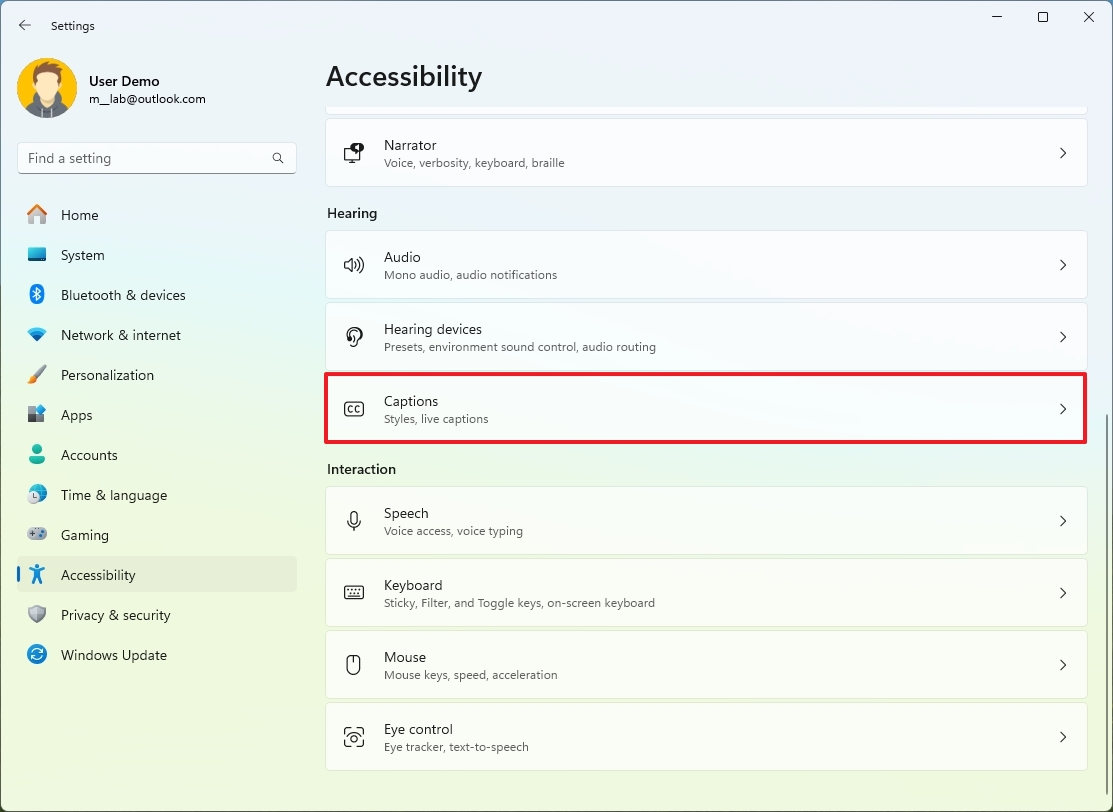
(Image credit: Mauro Huculak)
- Turn on the Live Captions toggle switch.
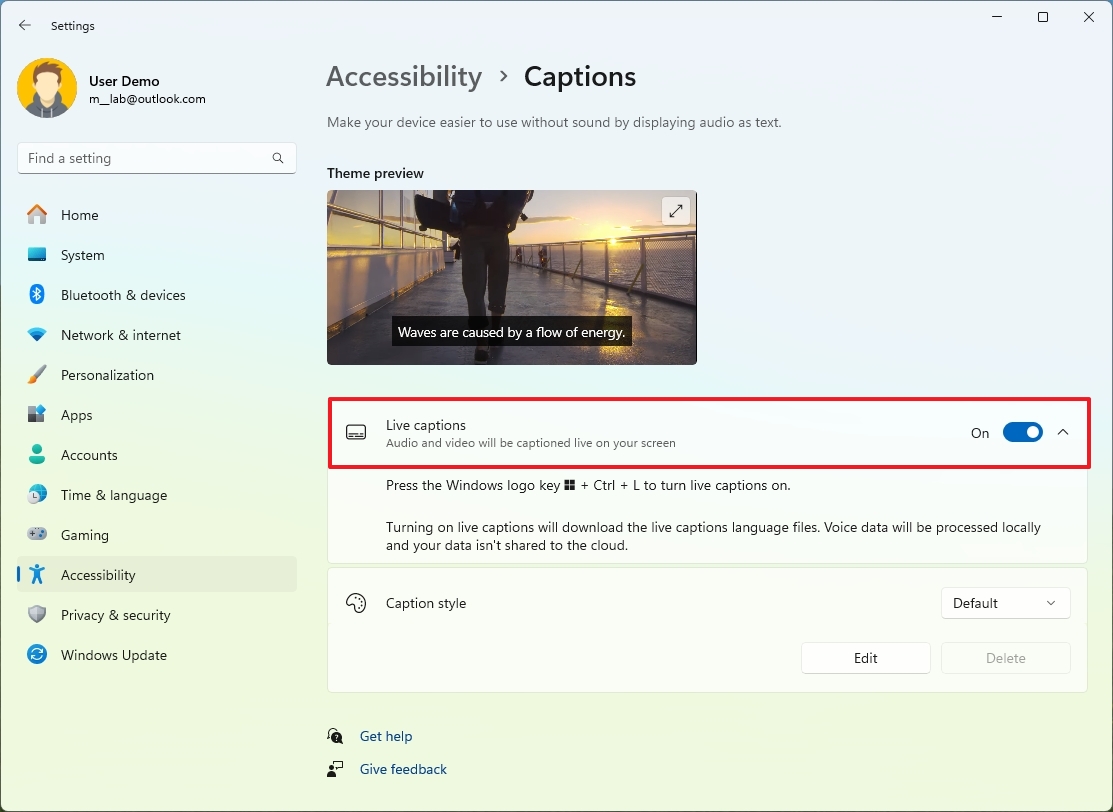
(Image credit: Mauro Huculak)
- Quick note: If this is the first time loading the feature, you may be prompted to download an additional package.
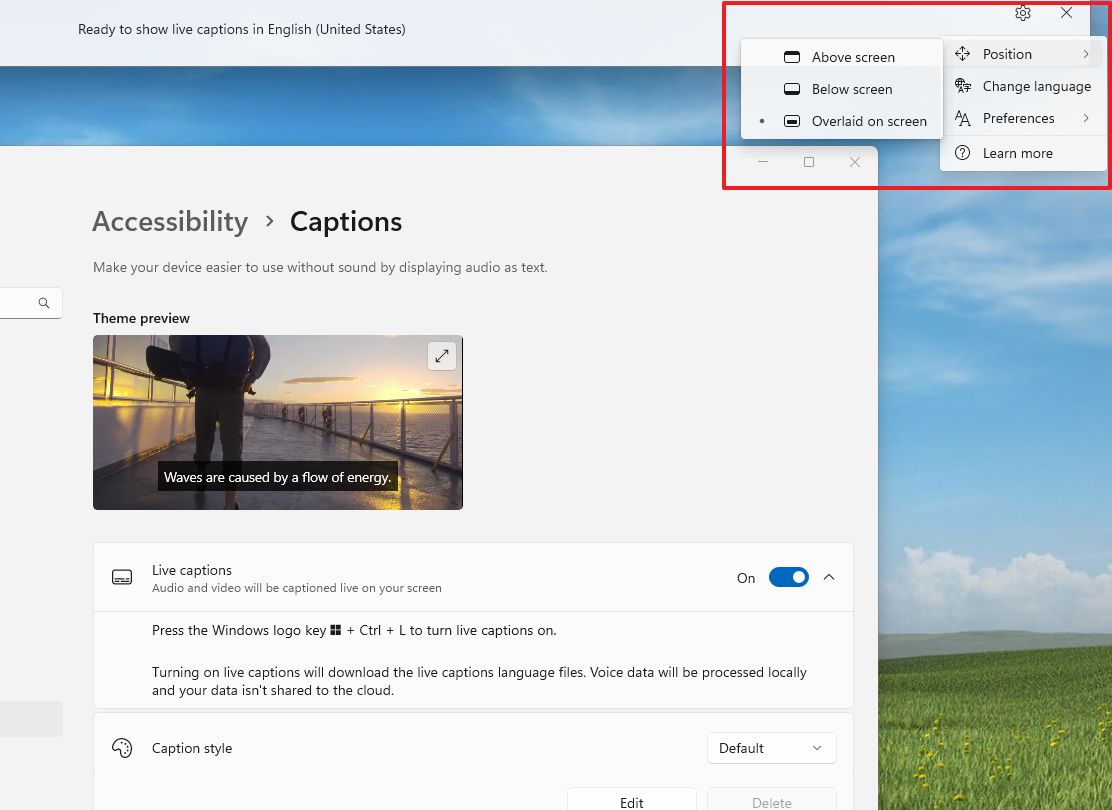
- (Optional) Click the Settings (gear) button to access the menu and change the position, caption language, style, and filters.
(Image credit: Mauro Huculak)
Once you complete the steps, the captions will appear at the bottom of the screen. You can test the feature with any content with audio, including YouTube videos (even though the video streaming service also includes its own captions).
3. Voice Access
Voice Access is an accessibility feature that allows you to control your computer with only your voice. This feature uses on-device speech recognition software without an internet connection.
To enable Voice Access on Windows 11, use these steps:
- Open Settings.
- Click on Accessibility.
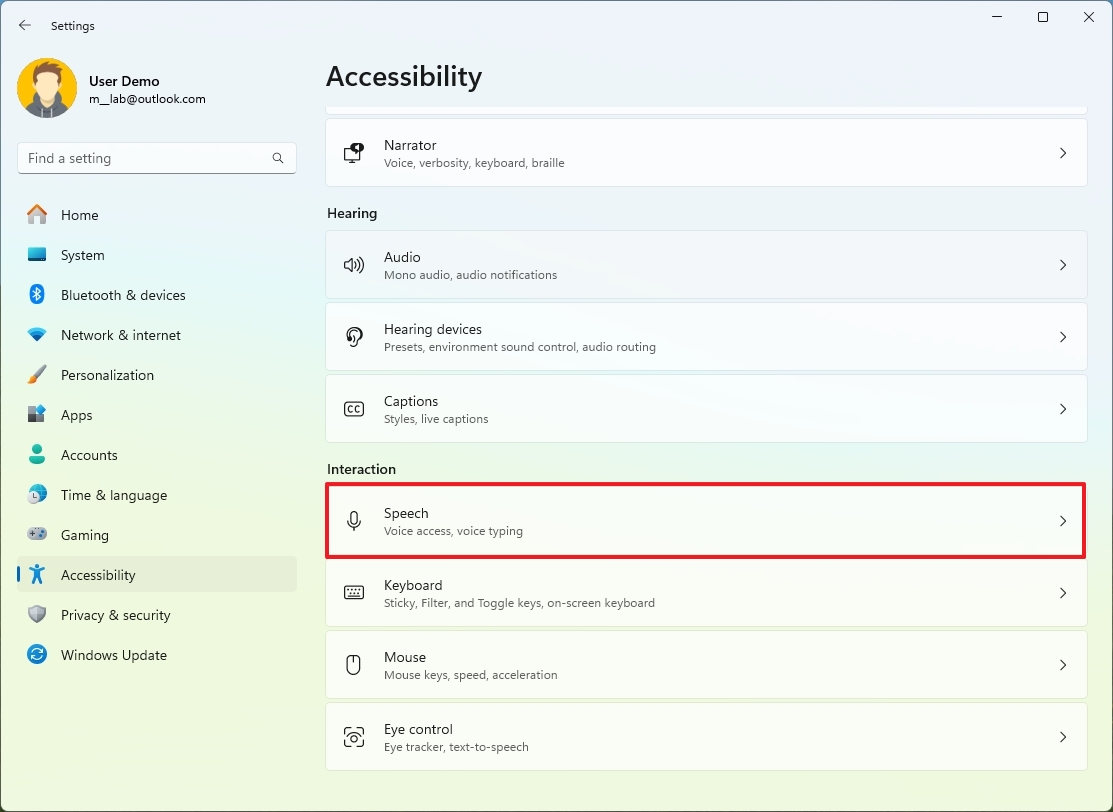
- Click the Speech page on the right side.
(Image credit: Mauro Huculak)
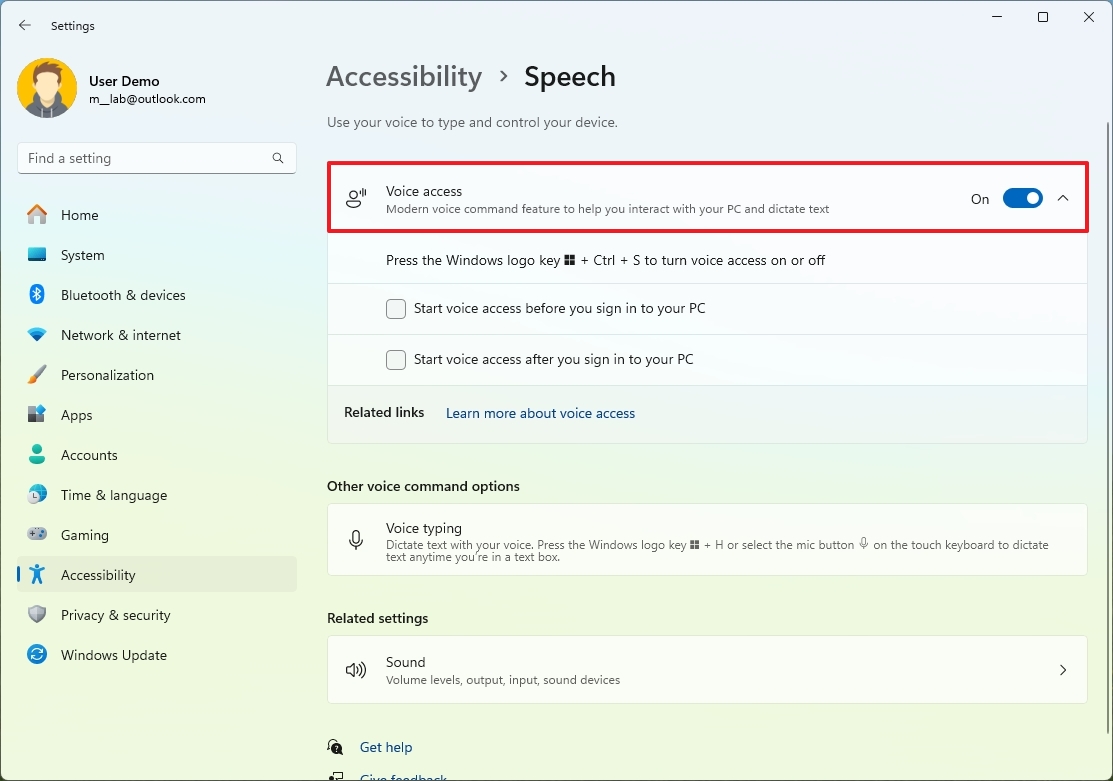
- Turn on the Voice Access toggle switch.
(Image credit: Mauro Huculak)
- (Optional) Check the "Start voice access before you sign in to your PC" option.
- (Optional) Check the "Start voice access after you sign in to your PC" option.
After you complete the steps, you can use the "Voice Access" command or click the "microphone" icon on the top left to control the feature.
This feature includes a lot of commands, so I recommend checking the "Voice access commands" app to learn more about the commands needed to get started using Voice Access. However, you can start with the "Voice access wake up" command to wake up the feature in listening mode, and you can use the "Voice access sleep" command to prevent the feature from listening. Also, you can say "What can I say?" to have the feature help you with the commands you can use.
4. Focus sessions
Focus Sessions is a feature that helps you focus on specific tasks by reducing distractions, such as badge and toast notifications and flashing apps in the Taskbar. In addition, this feature works with the Clock app to configure a timer and the Microsoft To Do app.
To get started with Focus sessions on Windows 11, use these steps:
- Open Settings.
- Click on System.
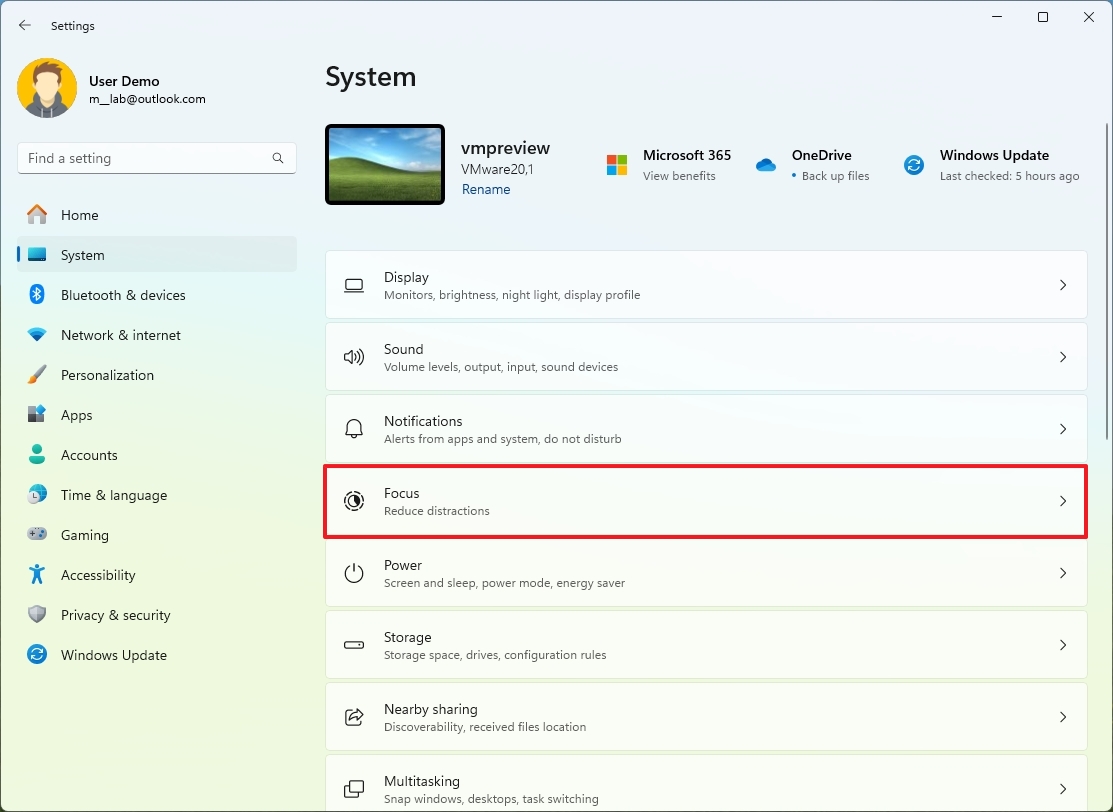
- Click the Focus page on the right side.
(Image credit: Mauro Huculak)
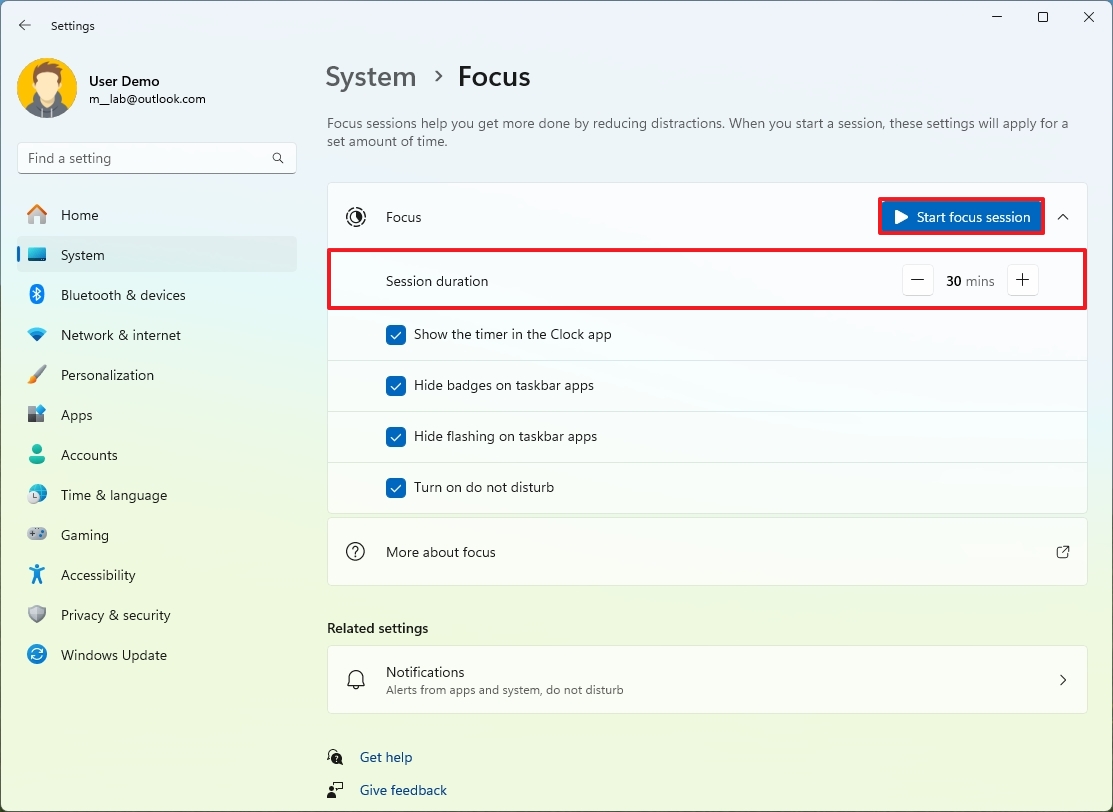
- Set the time for the session using the "Session duration" setting.
- Click the "Start focus session" button.
(Image credit: Mauro Huculak)
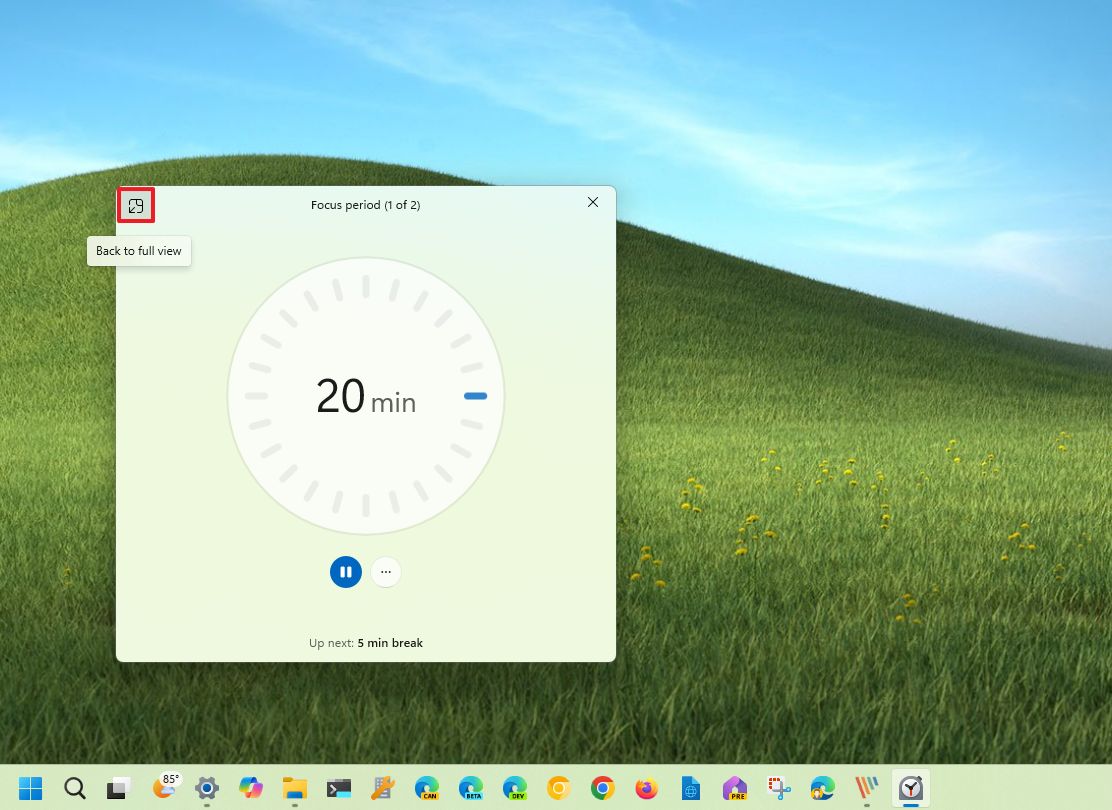
Once you complete the steps, the session will start, and a compact version of the Clock app will appear on the screen.
It's important to note that from the "Focus" settings, you can also control the feature that will be enabled during the session to keep you focused. For example, by default, the feature will enable the timer on the screen, hide badges and flashing notifications, and turn on "Do not disturb."
You can always click the "Back to full screen" button in the Clock app to configure the different options.
(Image credit: Mauro Huculak)
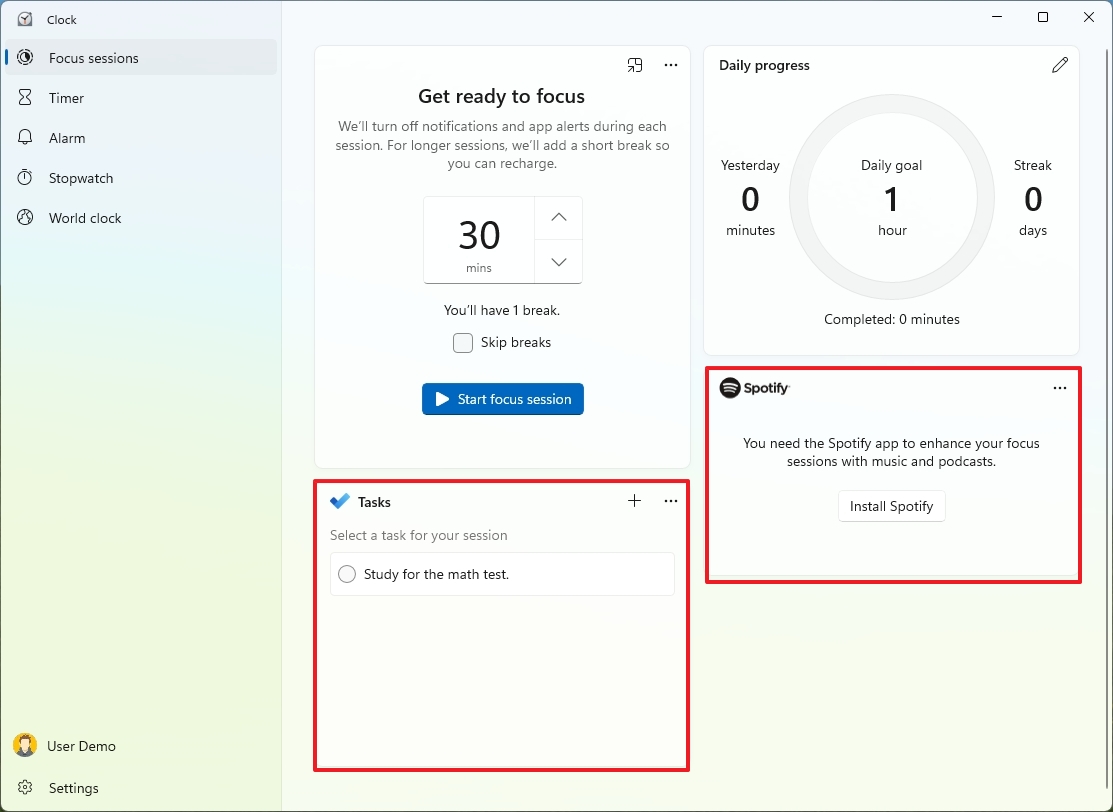
From the Clock app, on the "Focus sessions" page, you can connect to the Microsoft To Do app to select the task for your session.
(Image credit: Mauro Huculak)
Furthermore, if you use Spotify, you can connect it to this feature to get into your session with some music. (If you don't have the Spotify app, you can click the "Install" button to download it on your computer. You will also need to connect your account.)
5. Mouse Pointer Color
If you are still using the white mouse pointer, you should know that Windows 11 includes a feature that lets you change the color scheme to make the mouse easier to identify on the screen.
To change the mouse pointer color, use these steps:
- Open Settings.
- Click on Accessibility.
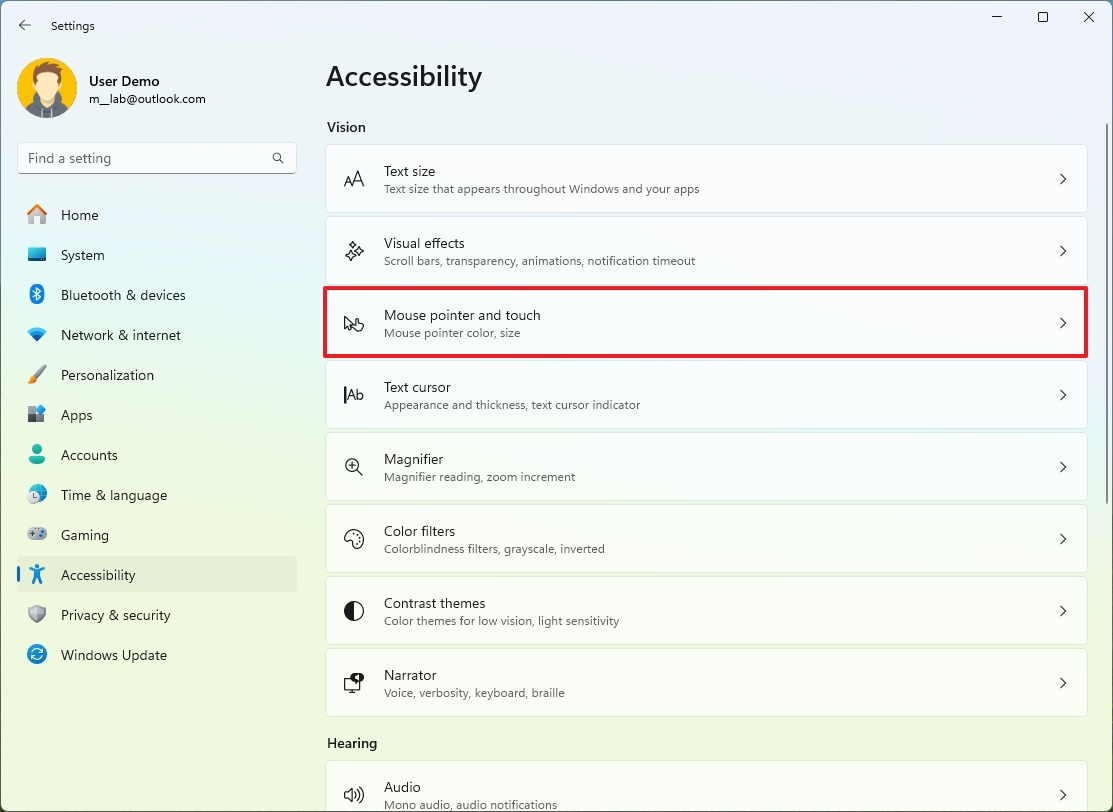
- Click the "Mouse pointer and touch" page on the right side.
(Image credit: Mauro Huculak)
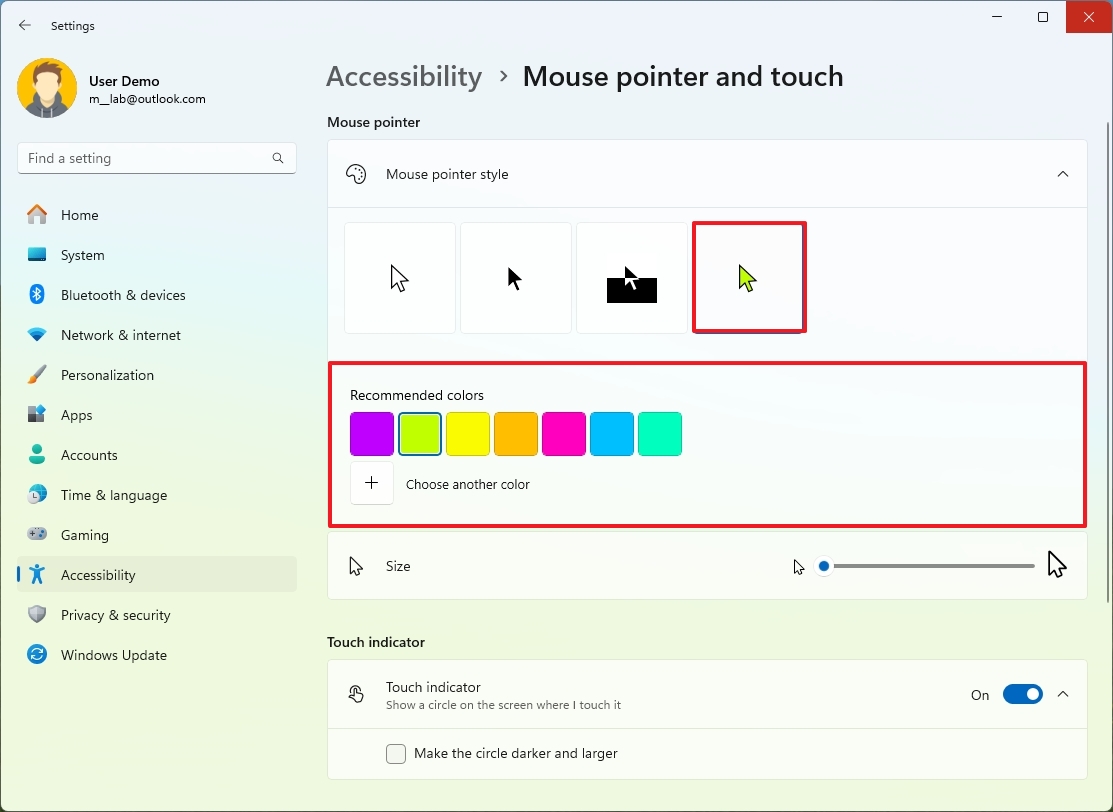
- Click the Custom option inside the "Mouse pointer style" setting.
- Choose the color scheme for the pointer.
(Image credit: Mauro Huculak)
- Quick tip: You can also choose the "Black" and "Inverted" schemes from this setting.
- (Optional) Click the "Choose another color" option to create a custom color.
After you complete the steps, the new scheme will apply to the pointer and text cursor.
6. Text cursor color
If you often find it a little difficult to find the text cursor on the screen, you can use the text cursor indicator that allows you to make the cursor stand out in the text area.
To enable the text cursor indicator, use these steps:
- Open Settings.
- Click on Accessibility.
- Click the Text cursor page on the right side.
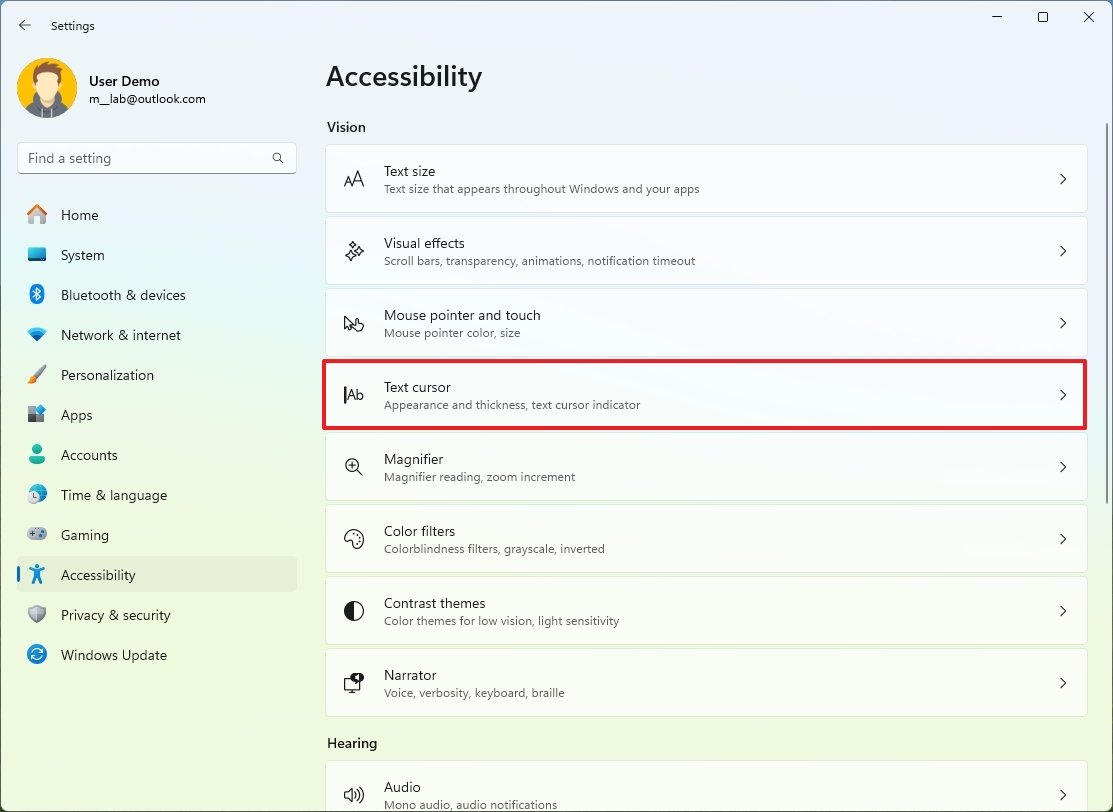
(Image credit: Mauro Huculak)
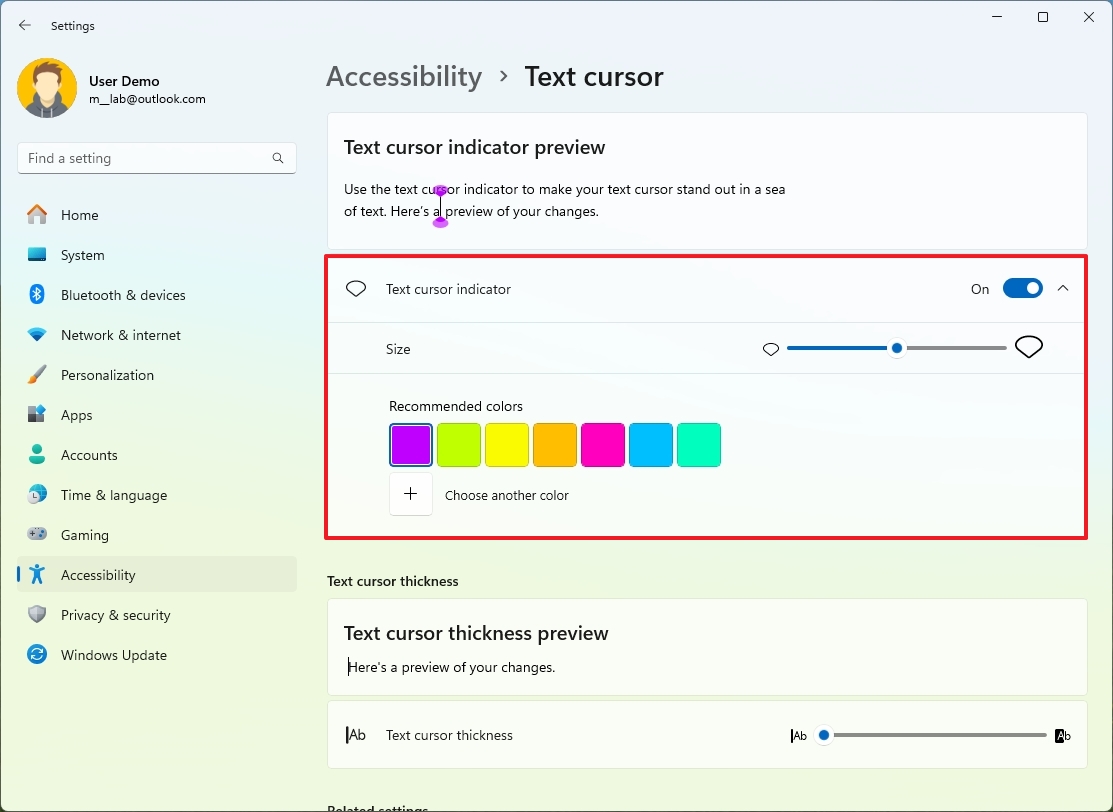
- Turn on the "Text cursor indicator" toggle switch.
(Image credit: Mauro Huculak)
- Choose the color scheme for the cursor.
- (Optional) Use the Size slider to change the size of the text cursor.
- (Optional) Click the "Choose another color" option to create a custom color.
After you complete the steps, when clicking a text box or using an application, the indicator will make it easier to find the cursor.
7. Random MAC address
If you have a laptop or tablet, even if you're not connected to a wireless network, the device will continue to broadcast a signal to discover nearby networks. The concern is that the network adapter will send the Media Access Control (MAC) address that can allow services or malicious individuals to track your location, especially in public networks.
The random MAC address feature generates random hardware addresses to mask your real MAC and make it more difficult to track your device.
To enable random MAC feature for a Wi-Fi connection, use these steps:
- Open Settings.
- Click on Network & internet.
- Click the Wi-Fi page on the right side.
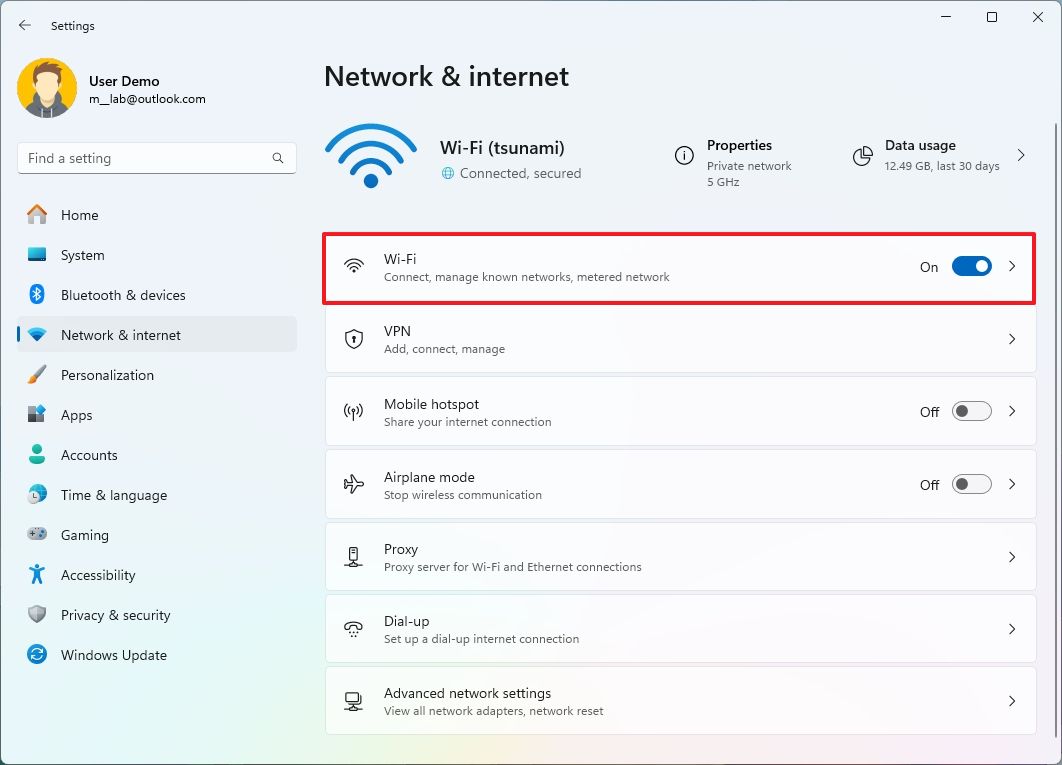
(Image credit: Mauro Huculak)
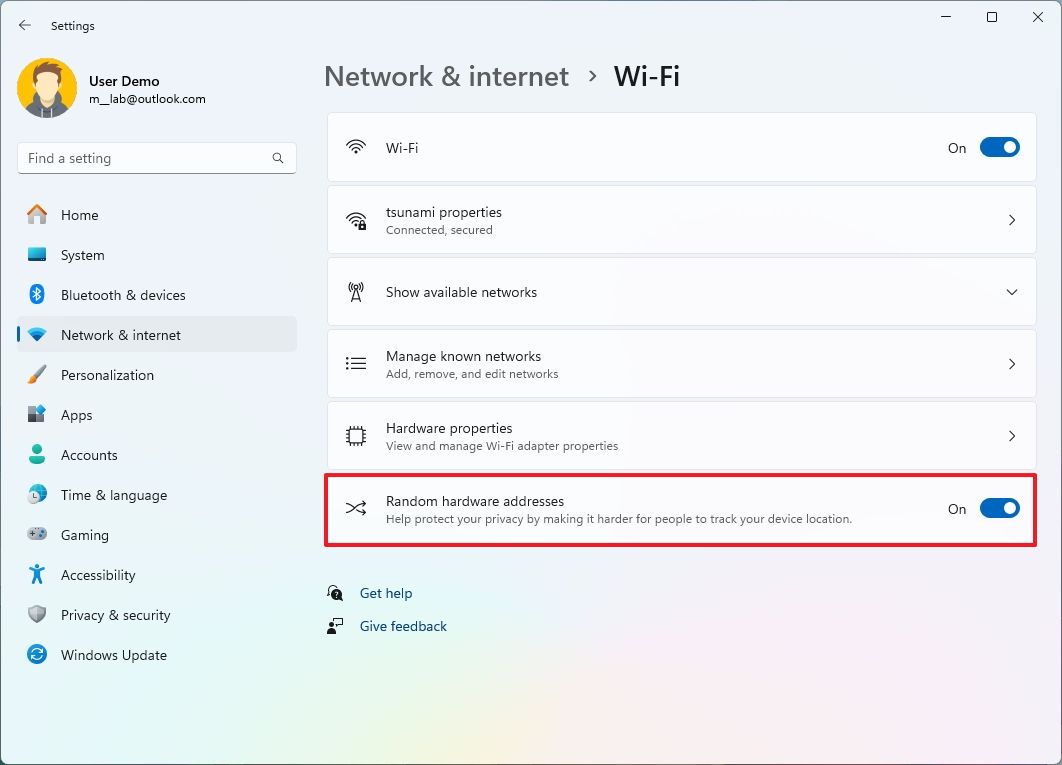
- Turn on the "Random hardware addresses" toggle switch (if applicable).
(Image credit: Mauro Huculak)
Once you complete the steps, the wireless adapter will help to protect your privacy by assigning random MAC addresses to make it more difficult to track your device location.
If you don't have the option, the network adapter doesn't support this feature.
8. Mobile Hotspot
On Windows 11, you can share your internet connection with other devices using the mobile hotspot feature without additional apps.
To create a Wi-Fi hotspot on Windows 11 to share the internet with other devices, use these steps:
- Open Settings.
- Click on Network & internet.
- Click the Mobile hotspot page on the right side.
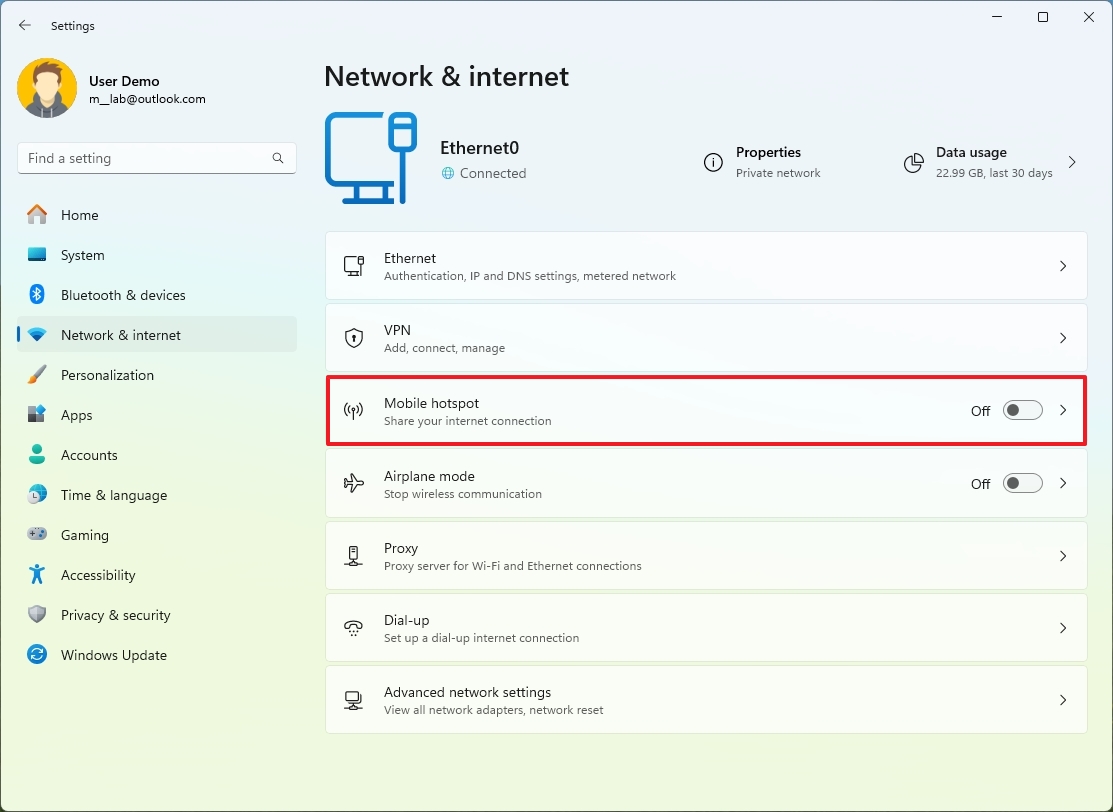
(Image credit: Mauro Huculak)
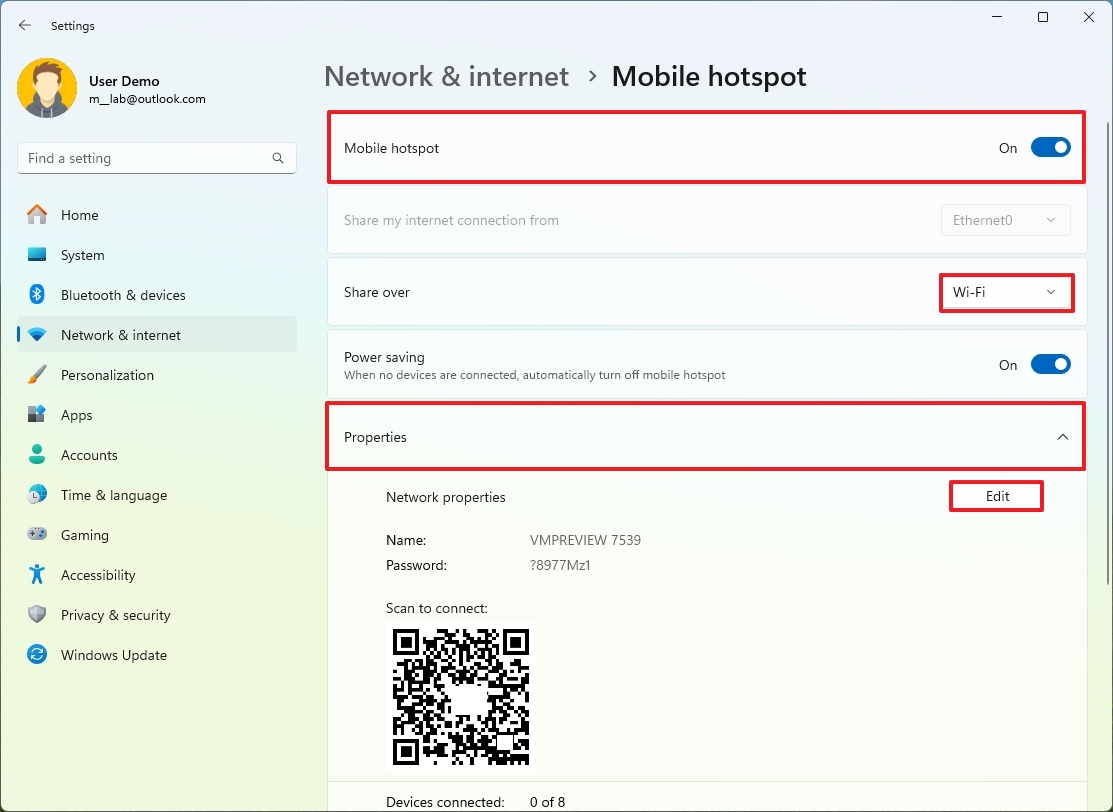
- Select the network adapter connected to the internet to share the connection from the "Share my internet connection from" setting (if applicable).
- Choose the Wi-Fi option in the "Share over" setting.
- Turn on the Mobile hotspot toggle switch to start sharing the internet.
- Click the Properties setting.
- (Optional) Click the Edit button.
(Image credit: Mauro Huculak)
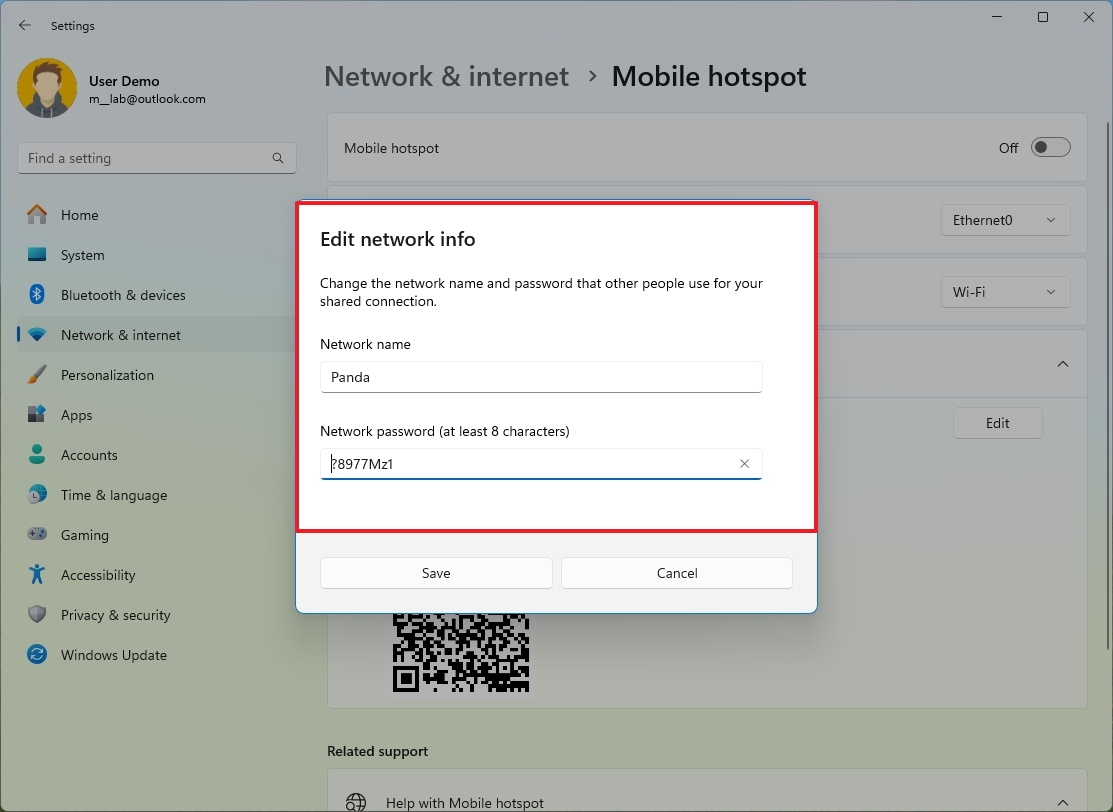
- Confirm a new name for the mobile hotspot.
- Create a new password that other devices will use to access the connection.
(Image credit: Mauro Huculak)
- Click the Save button.
After you complete the steps, share the network name and password with the devices you want to connect to the internet through your computer.
9. Night light
Night light is a feature on Windows 11 designed to reduce eye strain and help you fall asleep after long hours working on your computer at night.
To enable the Night light feature, use these steps:
- Open Settings.
- Click on System.
- Click the Display page on the right side.
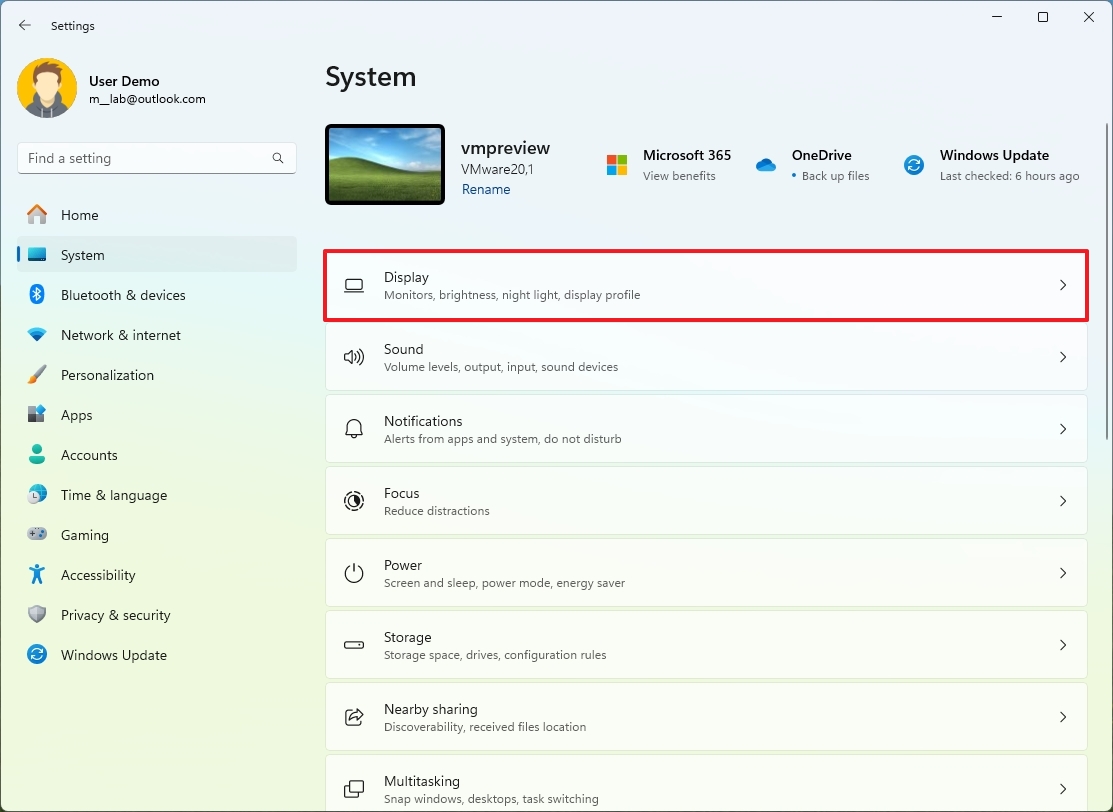
(Image credit: Mauro Huculak)
- Turn on the Night light toggle switch to enable the feature under the "Brightness & color" section.
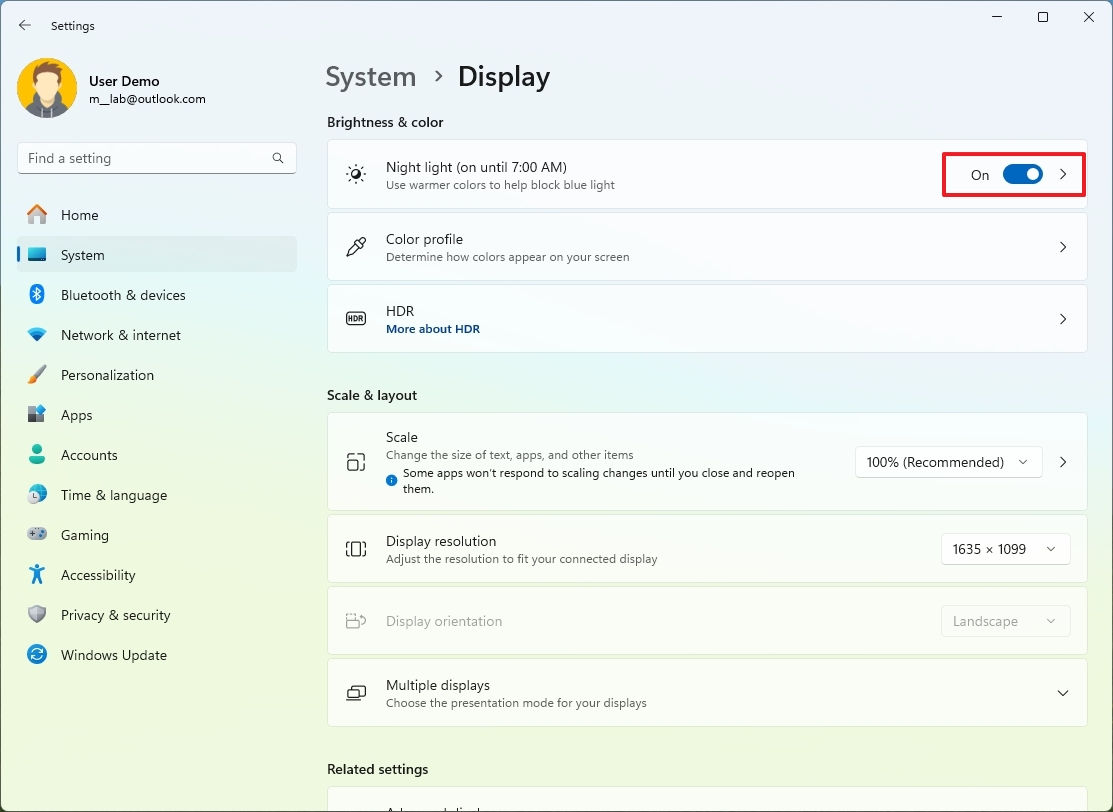
(Image credit: Mauro Huculak)
- (Optional) Click the Night Light page on the right side.
- Configure the strength with the slider.
- Turn on the Schedule night light toggle switch to configure the feature schedule.
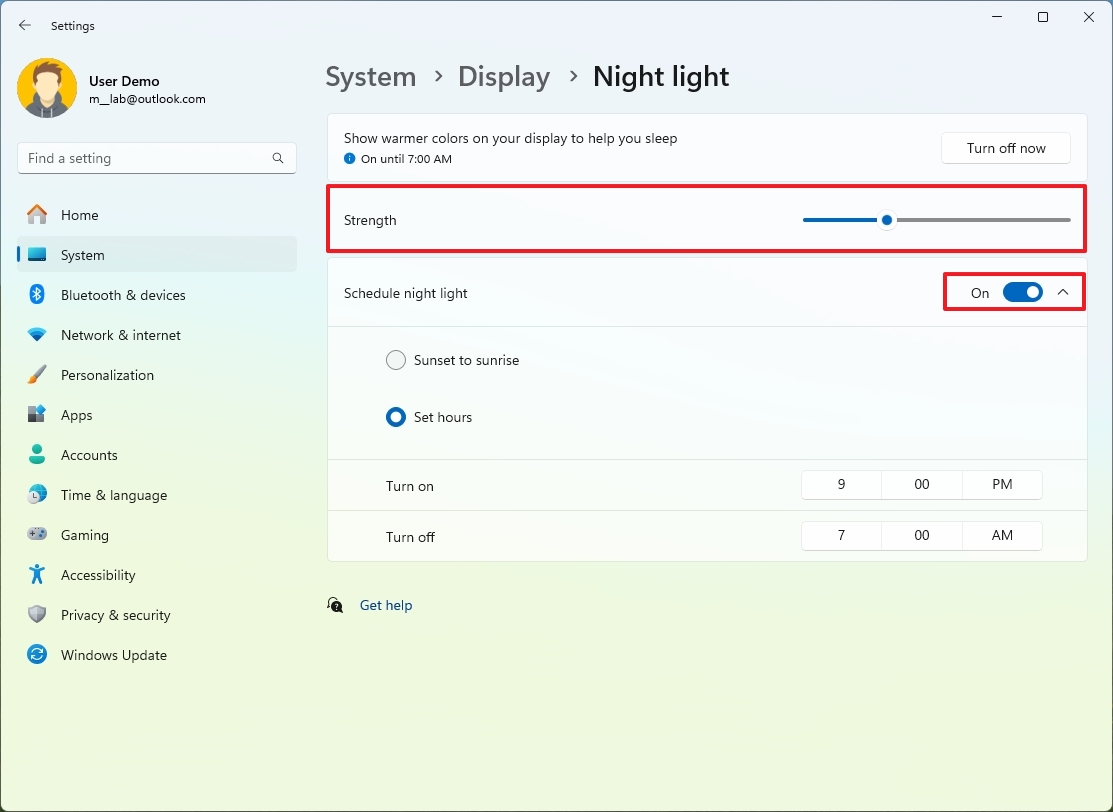
(Image credit: Mauro Huculak)
Once you complete the steps, the feature will show warm colors on the screen to minimize eye strain while working at night.
10. Find my device
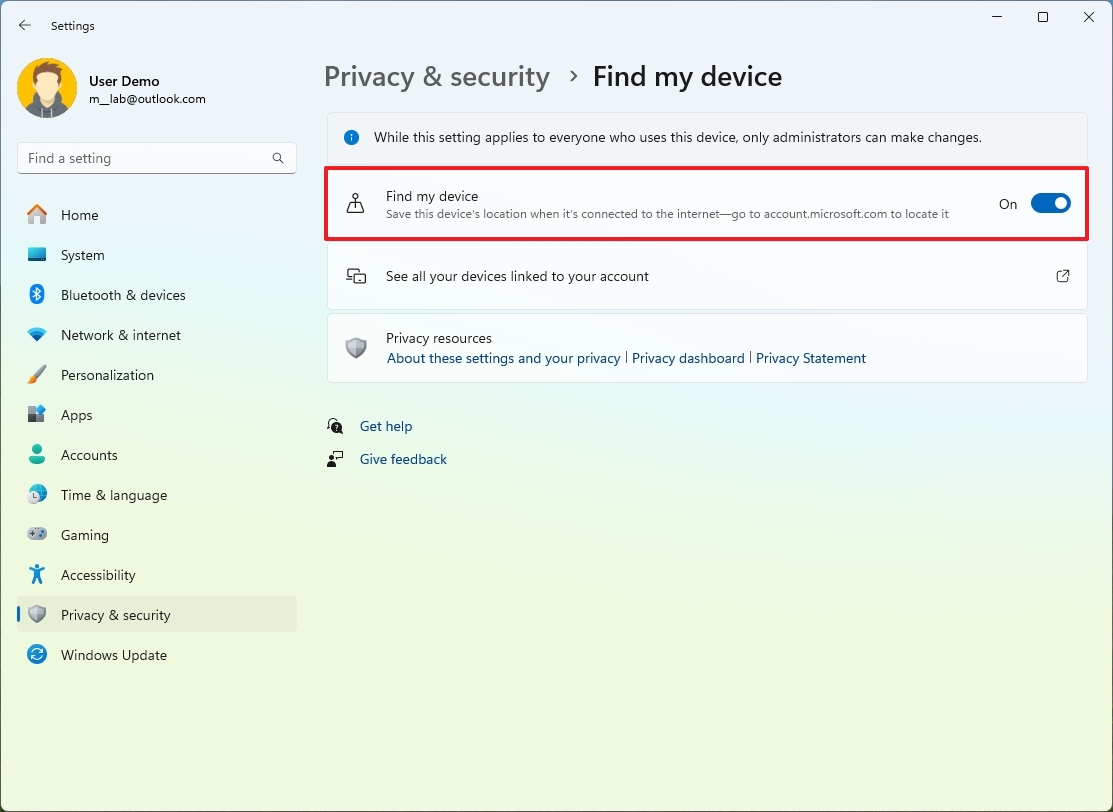
Windows 11 also includes a feature that allows you to track your computer if lost or stolen. The feature is disabled by default, but when enabled, it allows the system to send the device location to your Microsoft account periodically. In the event that your device is misplaced, you can track the last known location from your Microsoft account online from another computer.
To enable the "Find my device" feature, use these steps:
- Open Settings.
- Click on Privacy & security.
- Click the Find my device page under the "Security" section.
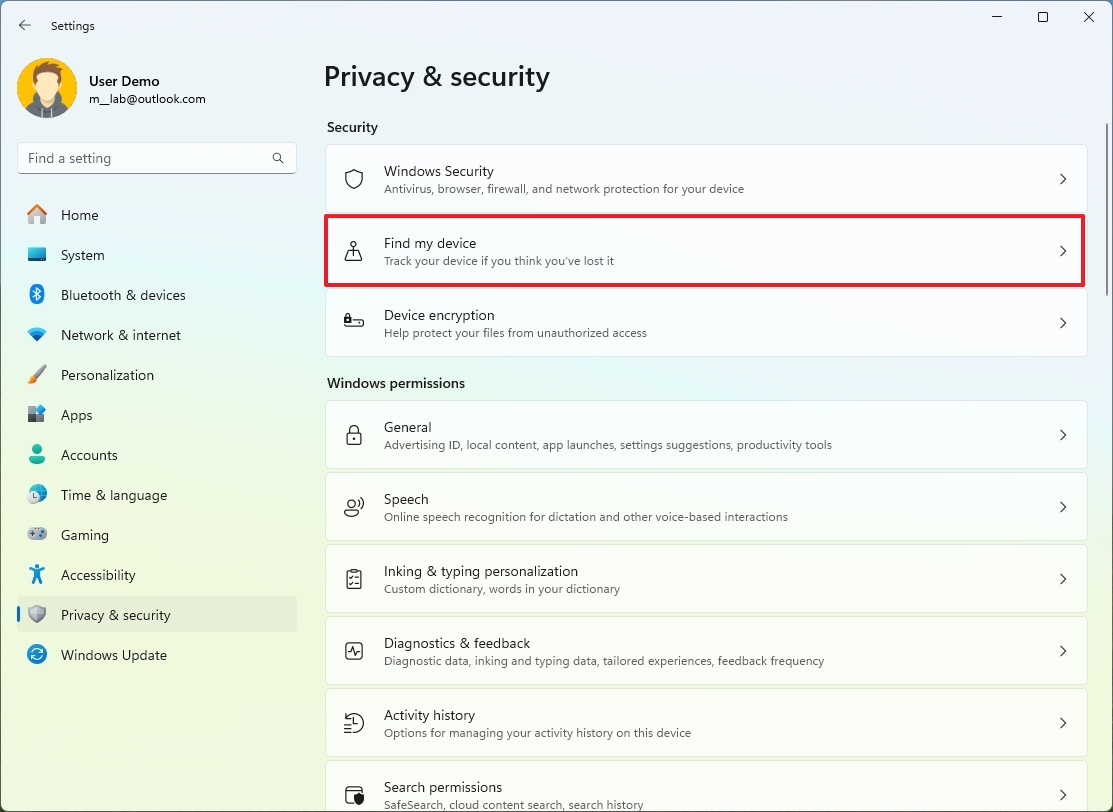
(Image credit: Mauro Huculak)
- Quick note: You must have the location turned on for the feature to work. You can always confirm the feature status on Settings > Location and turn on "Location services."
- Turn on the "Find my device" toggle switch.
(Image credit: Mauro Huculak)
Once you complete the steps, the system will proactively send the computer's approximate location to your Microsoft account.
You can track and find your devices from your Microsoft account's "Devices" page. You will have to choose the device and click the "Find my device" option.
11. Taskbar ungroup apps
On Windows 11, you can always ungroup and show labels for apps in the Taskbar, instead of grouping each instance of the app.
To ungroup apps and show labels in the Taskbar, use these steps:
- Open Settings.
- Click on Personalization.
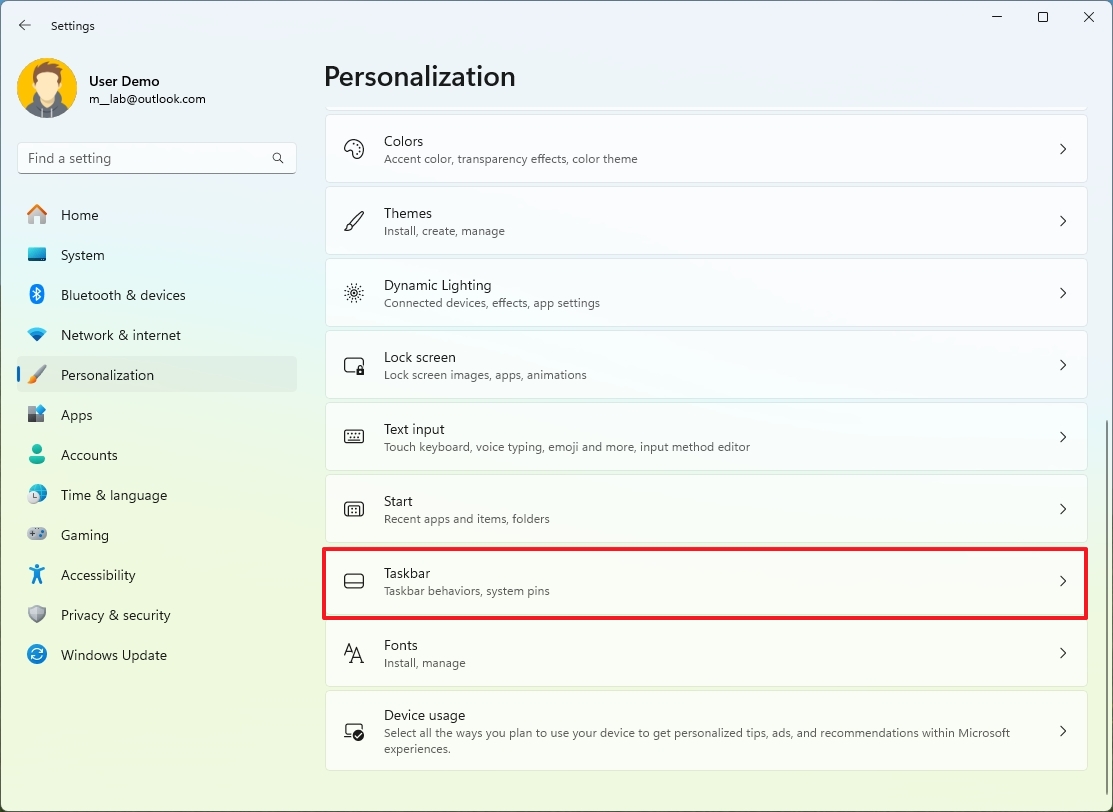
- Click the Tasbkar page on the right side.
(Image credit: Mauro Huculak)
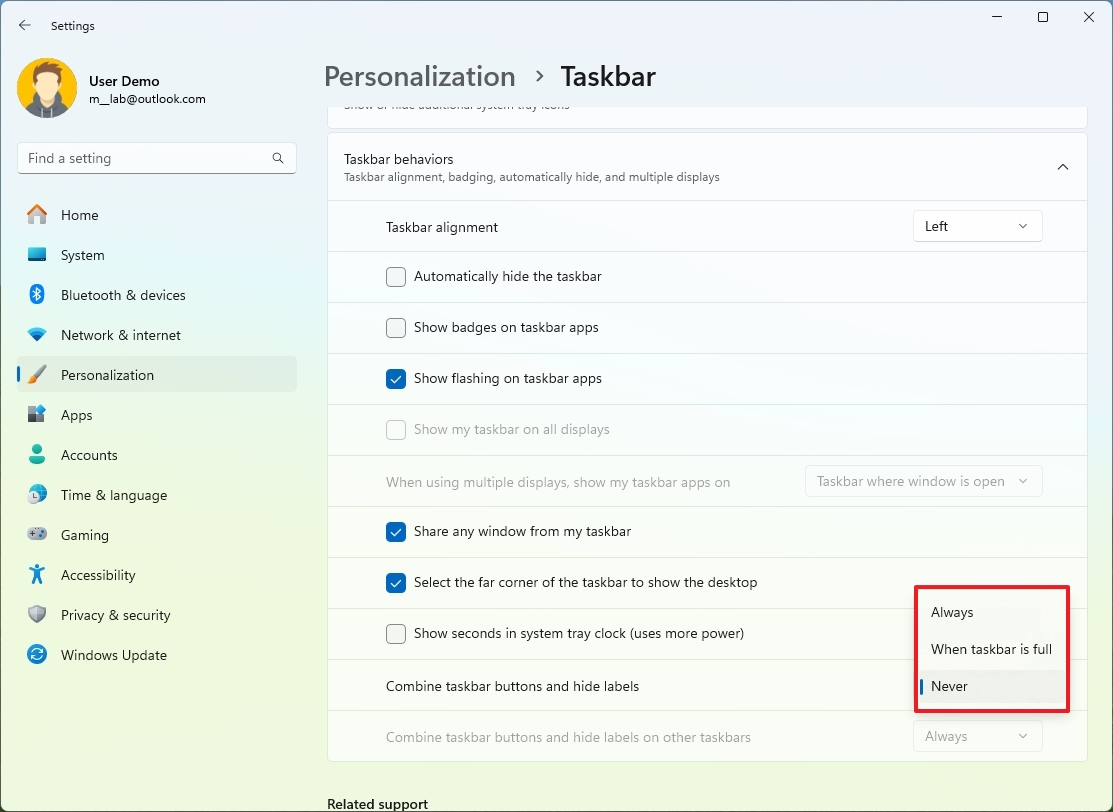
- Click the Taskbar behaviors setting.
- Choose the Never option for the "Combine taskbar buttons and hide labels" setting.
(Image credit: Mauro Huculak)
- (Optional) Choose the Never option for the "Combine taskbar buttons and hide labels for other taskbars" setting.
After you complete the steps, running apps will appear with labels, and each instance of the app will show a different process in the Taskbar.
12. Multilanguage text suggestions
If you speak more than one language, you can configure the system to show text suggestions based on your language preferences.
To enable multilingual text suggestions on Windows 11, use these steps:
- Open Settings.
- Click on Time & language.
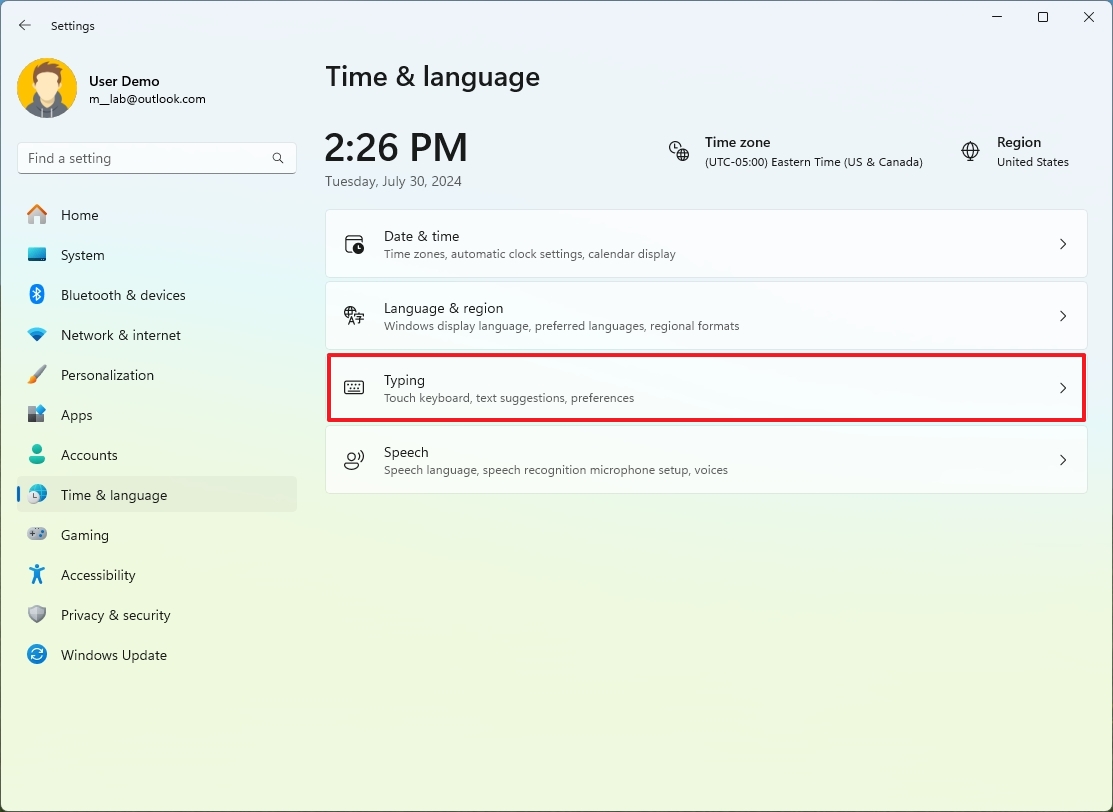
- Click the Typing page on the right side.
(Image credit: Mauro Huculak)
- Turn on the "Show text suggestions when typing on the physical keyboard" toggle switch.
- Turn on the "Multilingual text suggestions" toggle switch.
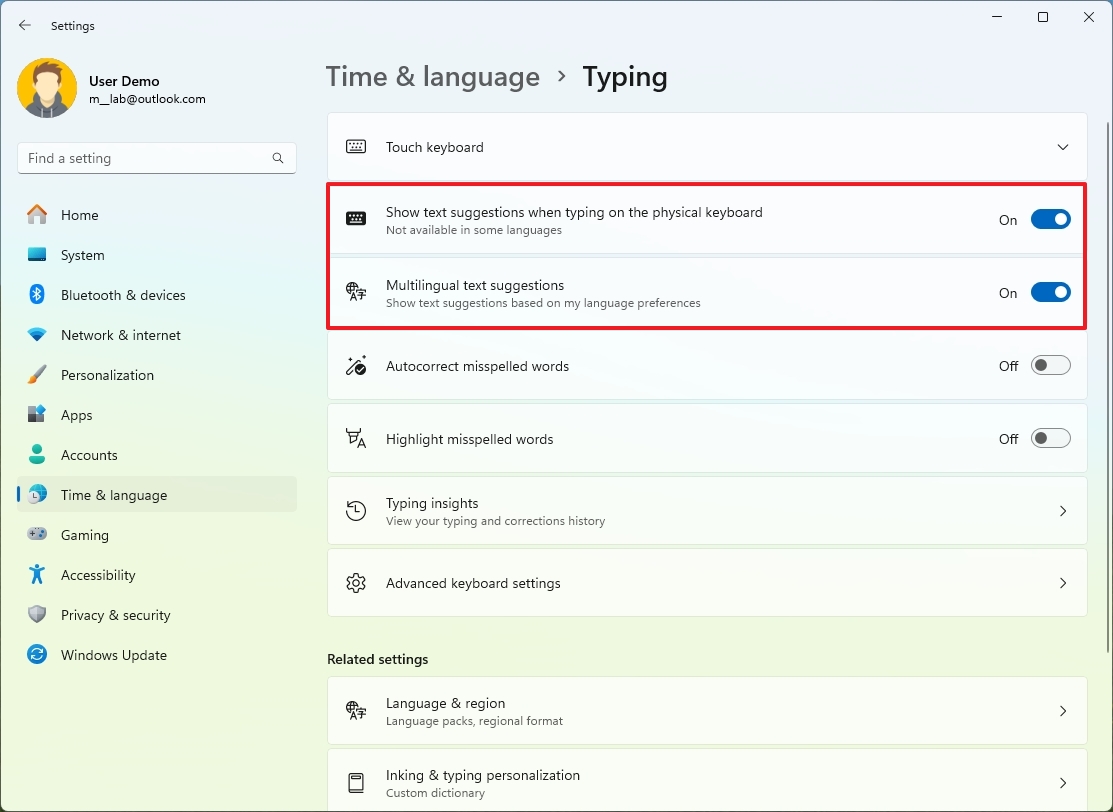
(Image credit: Mauro Huculak)
Once you complete the steps, suggestions will appear when you type in a support application, such as Microsoft Word or Teams.
If you want to insert a suggestion, either select the word with the mouse, touch, or the up, left, and right arrows.
13. Autocorrect misspelled words
Windows 11 can also correct and highlight misspelled words as you type to help you improve your writing.
To enable autocorrect (and highlight) misspelled words on Windows 11, use these steps:
- Open Settings.
- Click on Time & language.
- Click the Typing page on the right side.

(Image credit: Mauro Huculak)
- Turn on the "Autocorrect misspelled words" toggle switch.
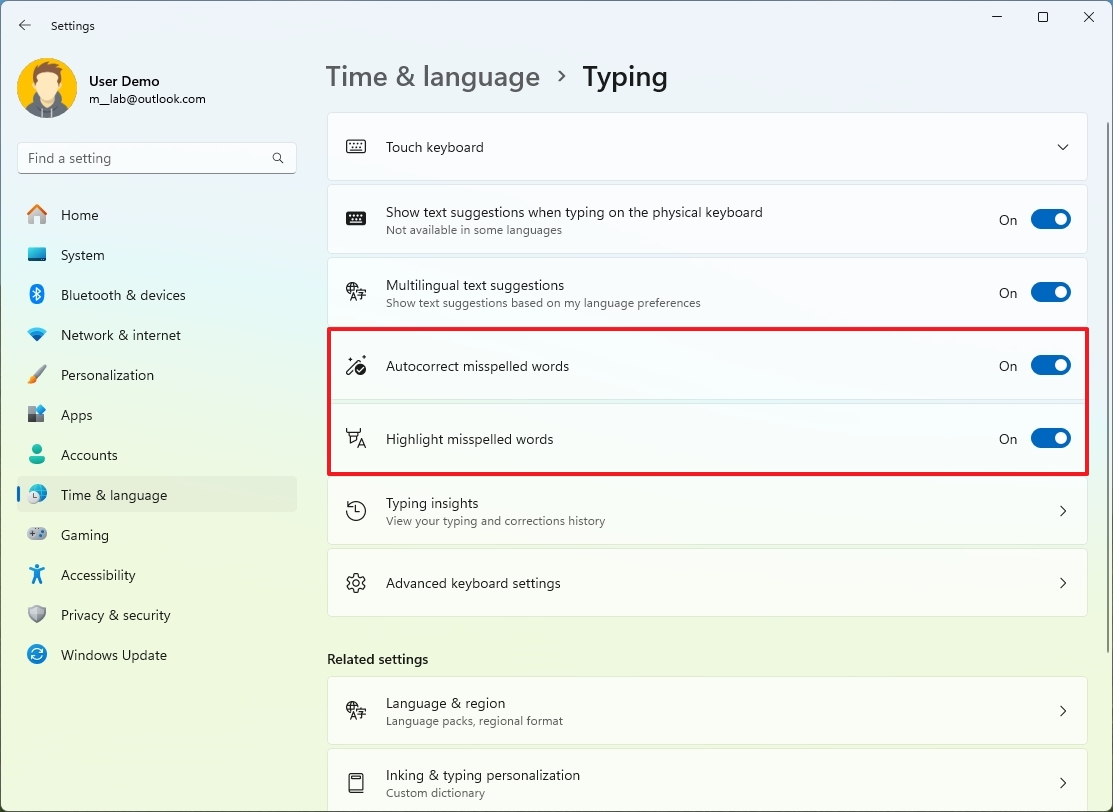
(Image credit: Mauro Huculak)
- (Optional) Turn on the "Highlight misspelled words" toggle switch.
After you complete the steps, depending on the settings you have enabled, Windows 11 will correct misspelled words and highlight those it wasn't able to correct.
14. End Task
On Windows 11, "End Task" makes it easier to terminate apps when they're not responding directly from the Taskbar without opening Device Manager. The feature is specifically designed for developers, but this is one of those features that should be enabled for everyone since apps can freeze at any time for anyone.
To enable the End Task option on Windows 11, use these steps:
- Open Settings.
- Click on System.
- Click the For developers page on the right side.
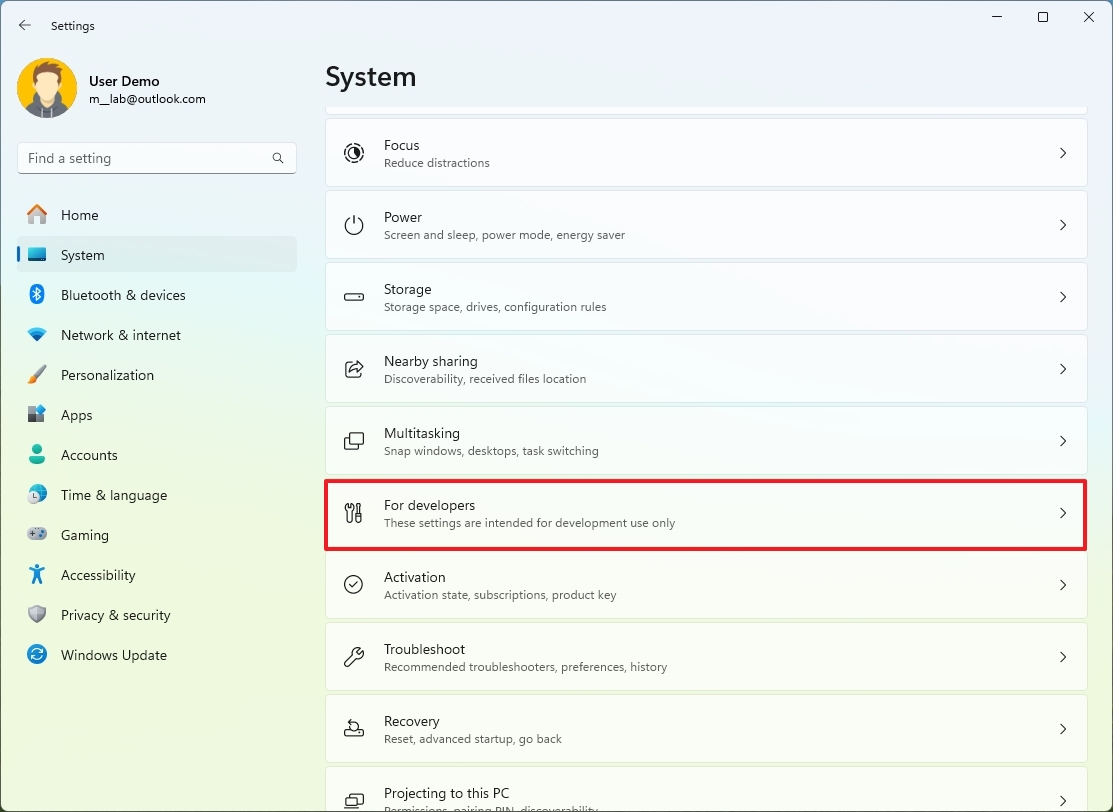
(Image credit: Mauro Huculak)
- Turn on the End Task toggle switch.
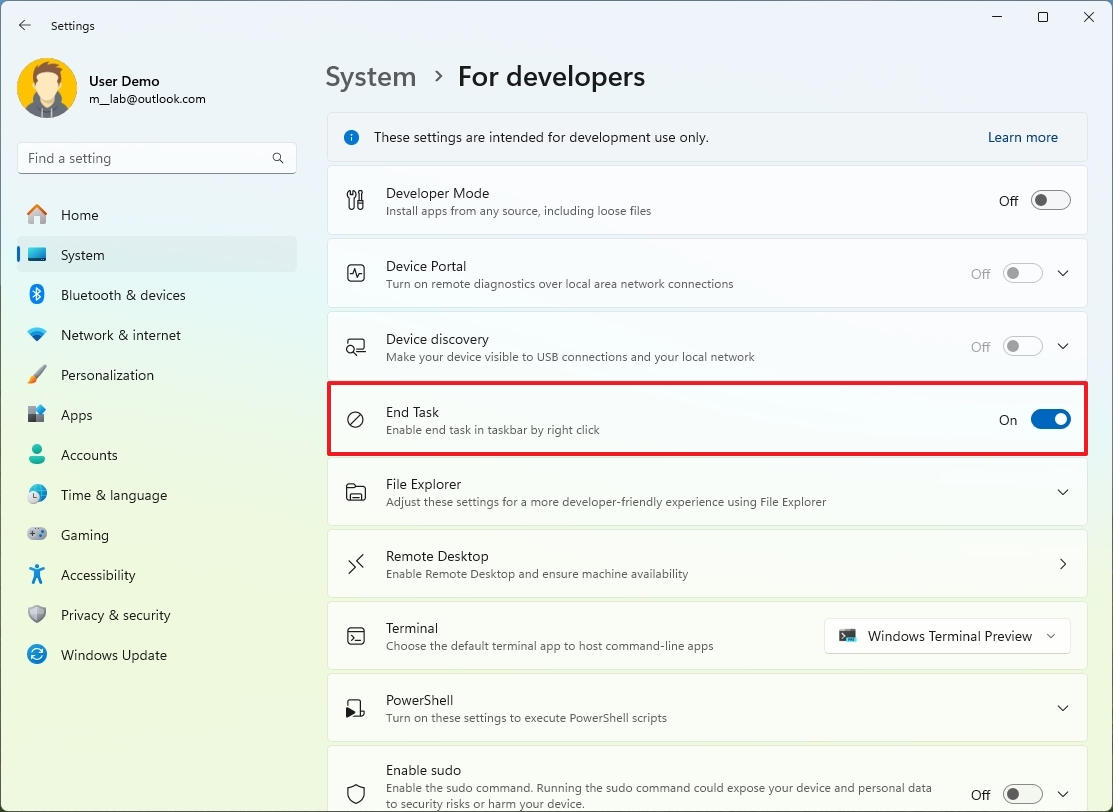
(Image credit: Mauro Huculak)
Once you complete the steps, when an app isn't responding, you can right-click the app in the Taskbar and choose the End Task option to terminate its processes.
It's important to note that forcibly exiting an app will not save any work that wasn't already saved before the app stopped responding.
15. Title bar window shake
On Windows 10 and previous versions, you were able to grab and shake the title bar of a window to minimize all other windows by default. However, on Windows 11, Microsoft made that feature optional, and no many users still remember that it exists.
To enable title bar window share on Windows 11, use these steps:
- Open Settings.
- Click on System.
- Click the Multitasking page on the right side.
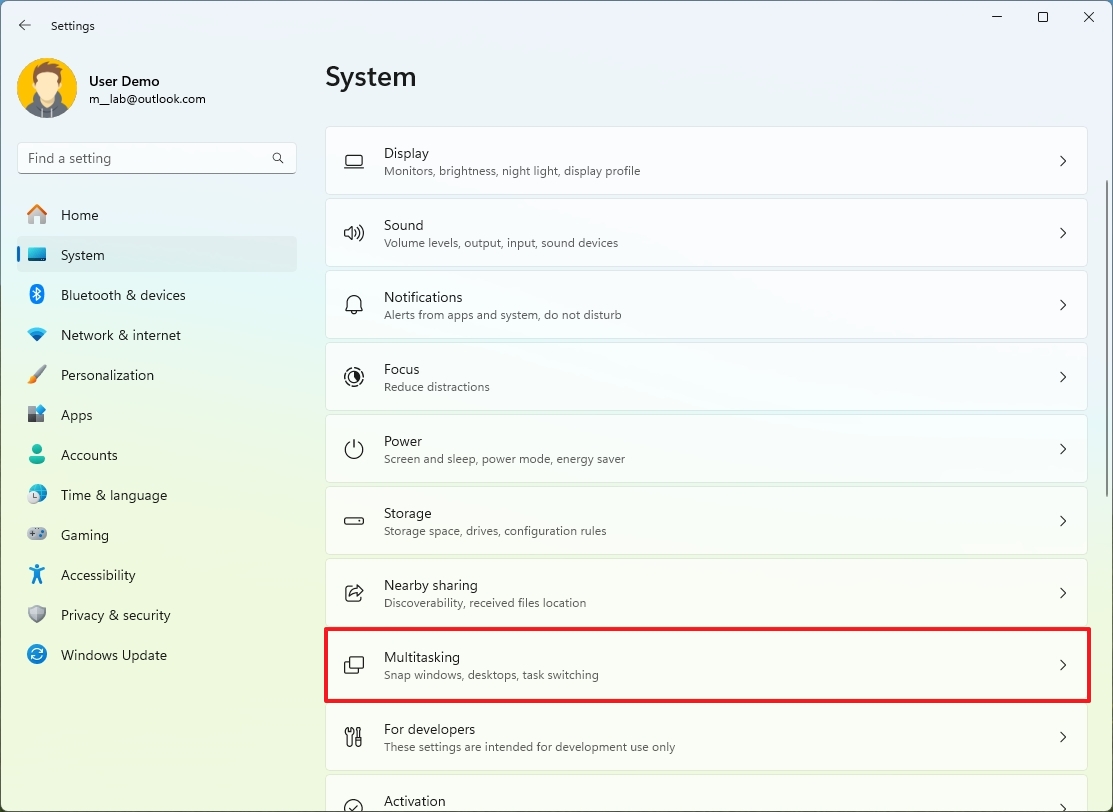
(Image credit: Mauro Huculak)
- Turn on the "Title bar window share" toggle switch.
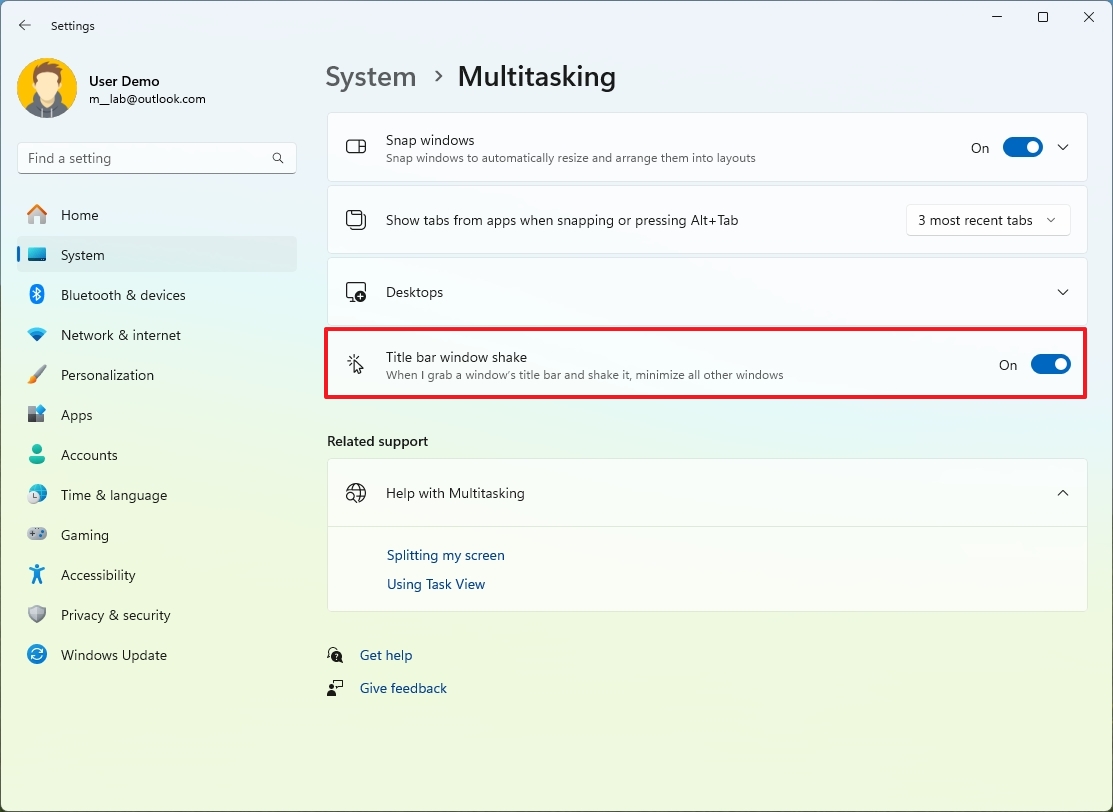
(Image credit: Mauro Huculak)
After you complete the steps, if you have multiple windows open, you can grab and shake the title bar for the window you want to open while minimizing all the others.
16. Dynamic Refresh Rate
If you have a device with a monitor that supports high refresh rate settings, you can use the "Dynamic Refresh Rate" (DRR) feature to lower or increase the refresh rate of the display to save energy depending on the content on the screen.
This feature is hardware-depending, meaning it's only available for displays with a Variable Refresh Rate (VRR) and support for at least 120Hz of refresh rate.
To turn on the Dynamic Refresh Rate feature on Windows 11, use these steps:
- Open Settings.
- Click on System.
- Click the Display page on the right side.

(Image credit: Mauro Huculak)
- Click the Advanced display setting under the "Related settings" section.
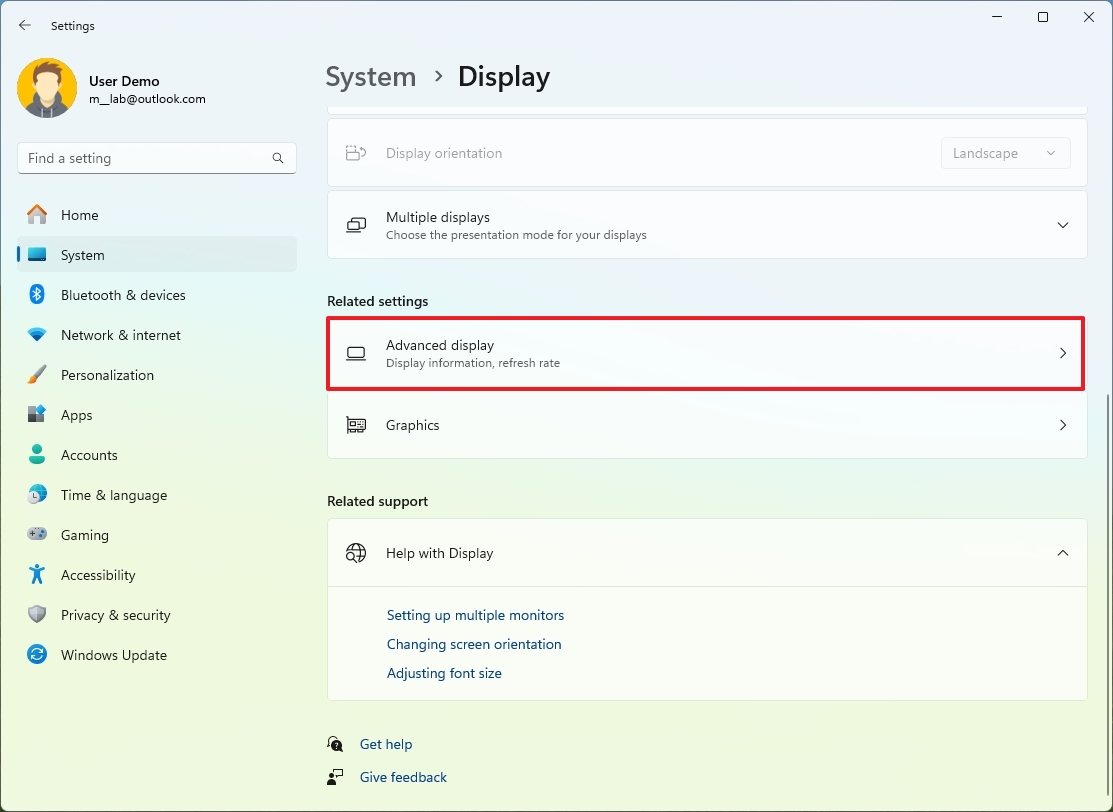
(Image credit: Mauro Huculak)
- Select the "Dynamic" option in the "Choose a refresh rate" setting.
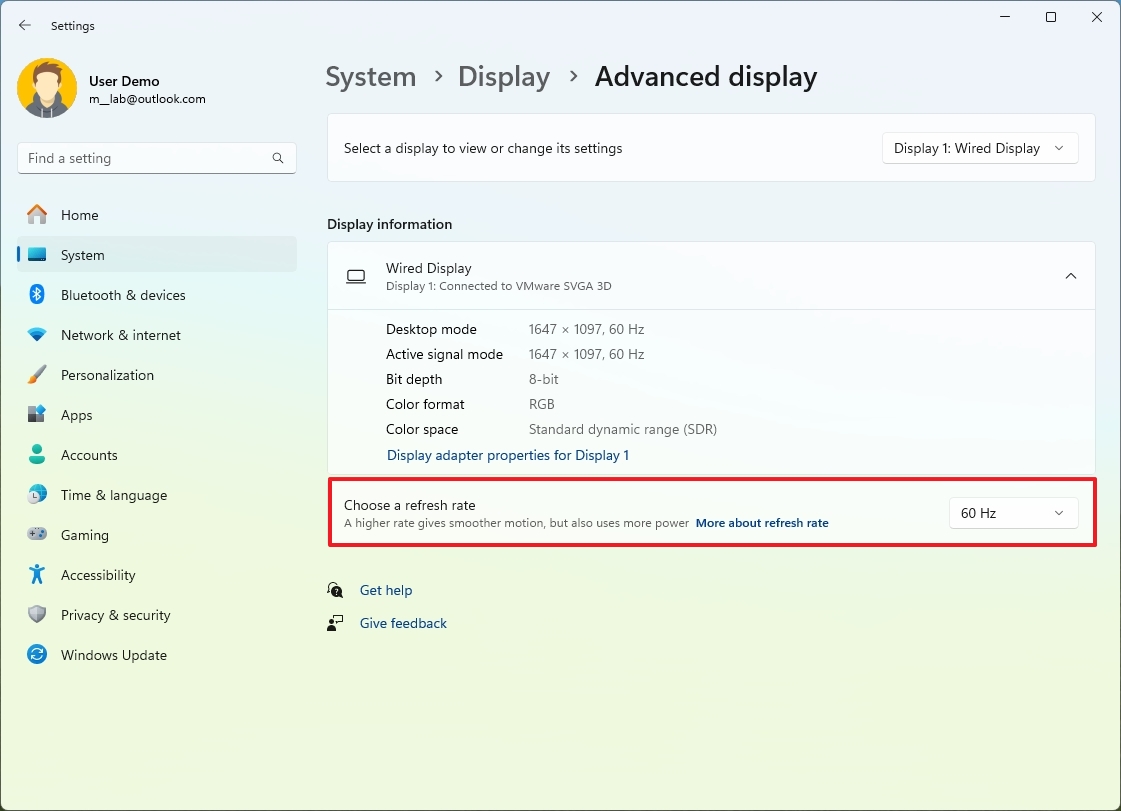
(Image credit: Mauro Huculak)
Once you complete the steps, the system will lower or increase the refresh rate based on the activity you're working on.
The only caveat with this feature is that you will be trading off image quality to save energy and extend battery life.
17. Manage default GPU per application
Nowadays, most devices, especially laptops, include more than one graphics card. Usually, systems include a less powerful integrated graphics card alongside more powerful discrete video hardware. Although the system can automatically decide which graphics card an app or game should use, it's possible to set the default card for each app or game.
To manage the graphics card preferences on Windows 11, use these steps:
- Open Settings.
- Click on System.
- Click the Display page on the right side.

(Image credit: Mauro Huculak)
- Click the Graphics setting under the "Related settings" section.
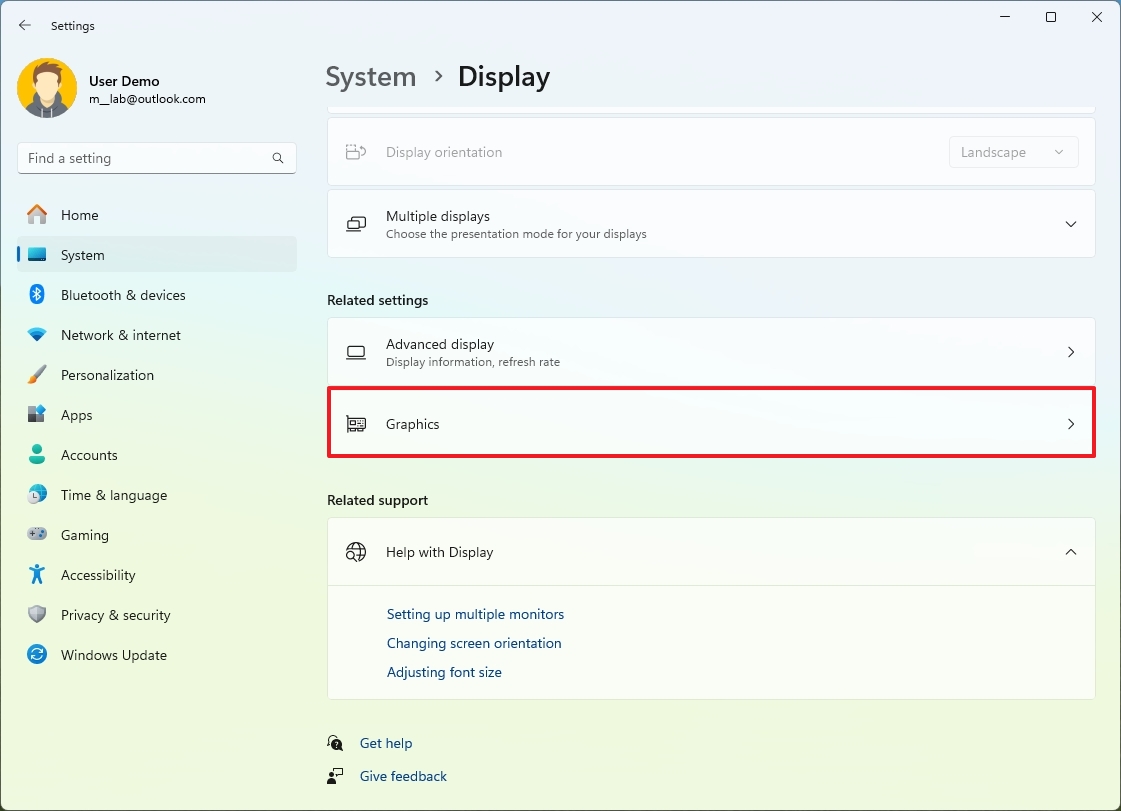
(Image credit: Mauro Huculak)
- Click on the app or game to expand the settings.
- Click the Options button.
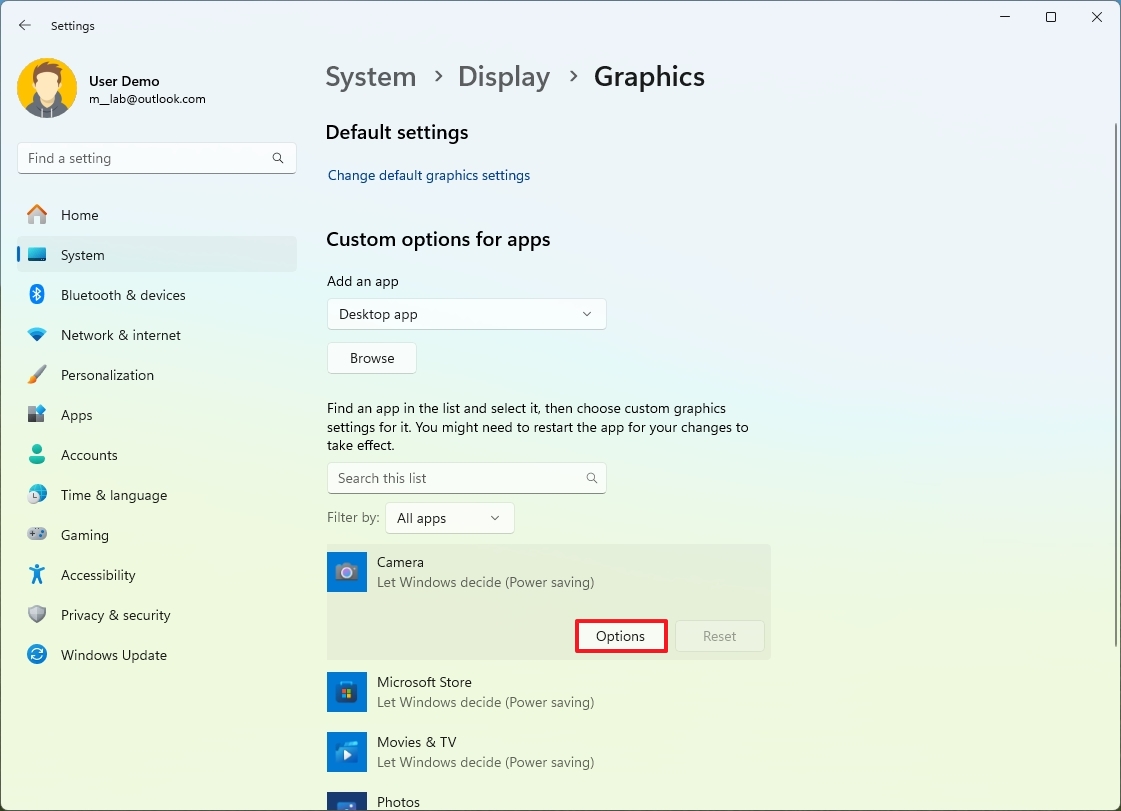
(Image credit: Mauro Huculak)
- Choose the "Power Saving" or "High performance" graphics card accordingly.
- Click the Save button.
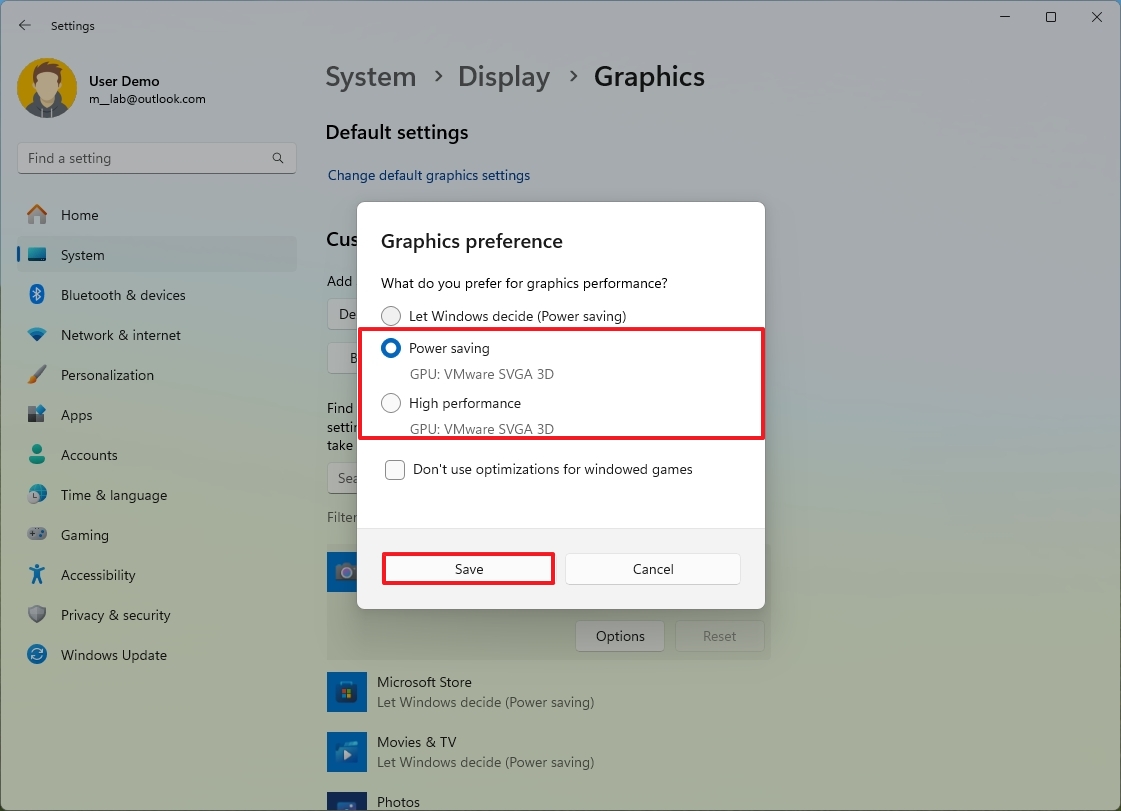
(Image credit: Mauro Huculak)
After completing the steps, the system should start using the app with the specified graphics card.
It's important to note that using Windows settings will take precedence over other applications, such as the control panel from AMD and NVidia. Although you can change the settings manually, depending on the application, the system can still decide which card to use.
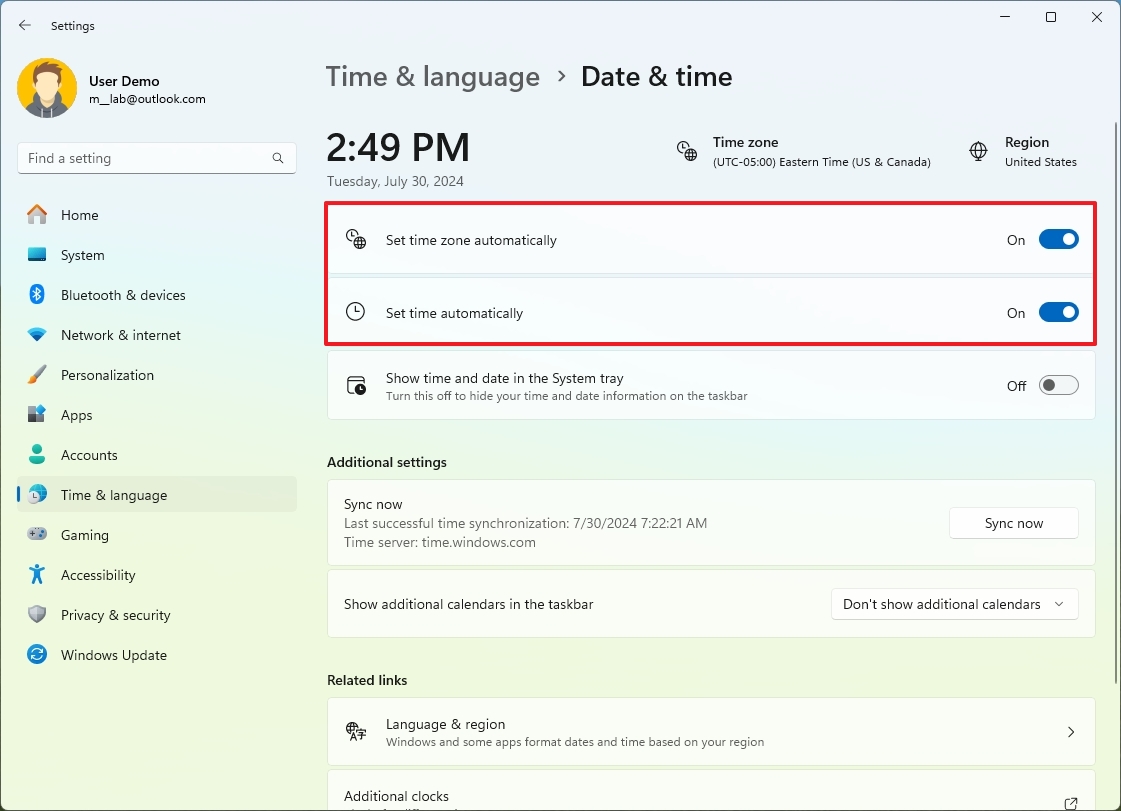
18. Set time and zone automatically
If you find yourself correcting the time again and again or you frequently travel to places with different time zones, you can enable a couple of features on Windows 11 to not only set the time automatically but also the timezone.
To set the time automatically on Windows 11, use these steps:
- Open Settings.
- Click on Time & language.
- Click the Date & time page on the right side.
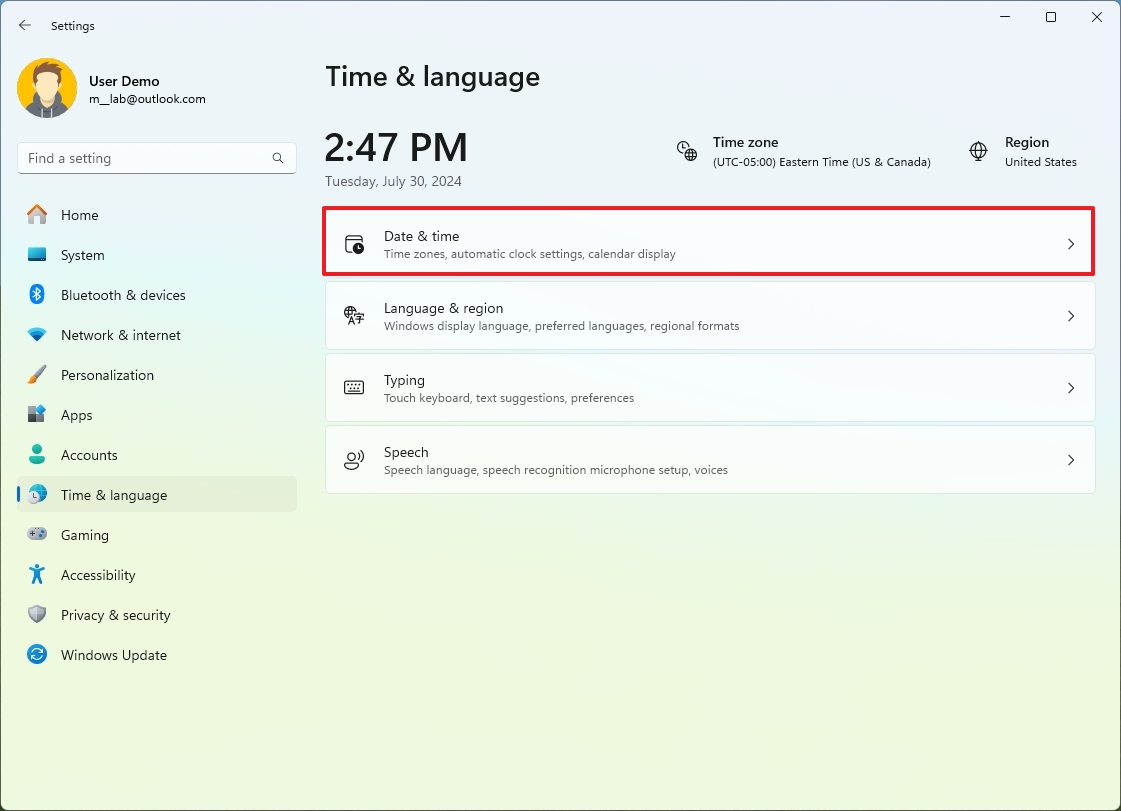
(Image credit: Mauro Huculak)
- Turn on the "Set time zone automatically" toggle switch.
- Turn on the "Set time automatically" toggle switch.
(Image credit: Mauro Huculak)
- (Optional) Click the "Sync now" button to update the time immediately.
Once you complete the steps, the system will automatically configure the time and timezone.
It's important to note that if the time keeps losing synchronization, it could also be a problem with the battery in the firmware, among other things.
19. Passkeys
On Windows 11, "Passkeys" is a security feature that allows you to create and save a token for a web service or application using Windows Hello. After you create a passkey on the app or service, it will automatically be saved on your computer, and then, the next you have to sign in, you can use Windows Hello PIN, Face, or Fingerprint to authenticate without re-entering the password.
A passkey is unique to a device, meaning you'll have to create another unique key to use the same feature on another device. Also, you can still access your account with a password, even when you have created a passkey.
This technology makes it easier to access apps and services without a password and makes it more difficult for malicious individuals to steal your credentials.
To create a passkey on Windows 11, you'll first need a service or an app that supports this standard, such as Google, and a supported web browser like Chrome or Edge, and then use these steps:
- Open Chrome or Edge browser.
- Open the Google account page.
- Sign in with your credentials (if applicable).
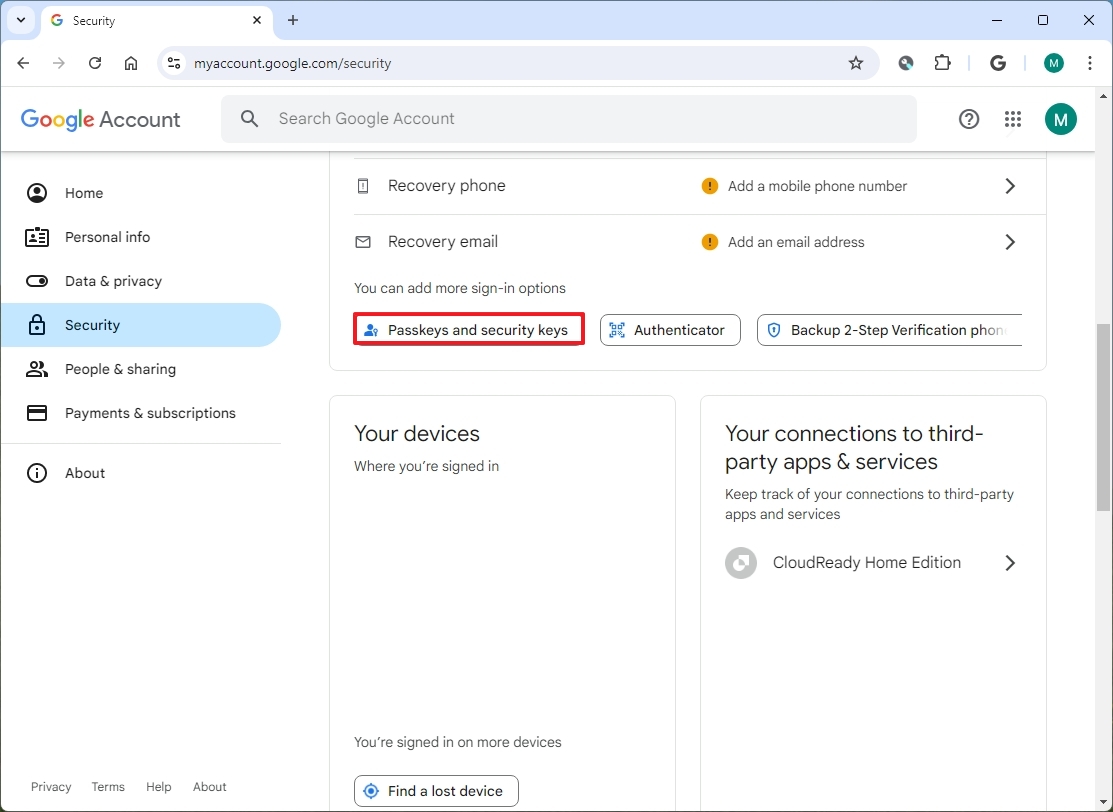
- Click on Security from the left navigation page.
- Click the "Passkeys and security keys" option under the "How you sign in to Google"
(Image credit: Mauro Huculak)
- Confirm your account credentials.
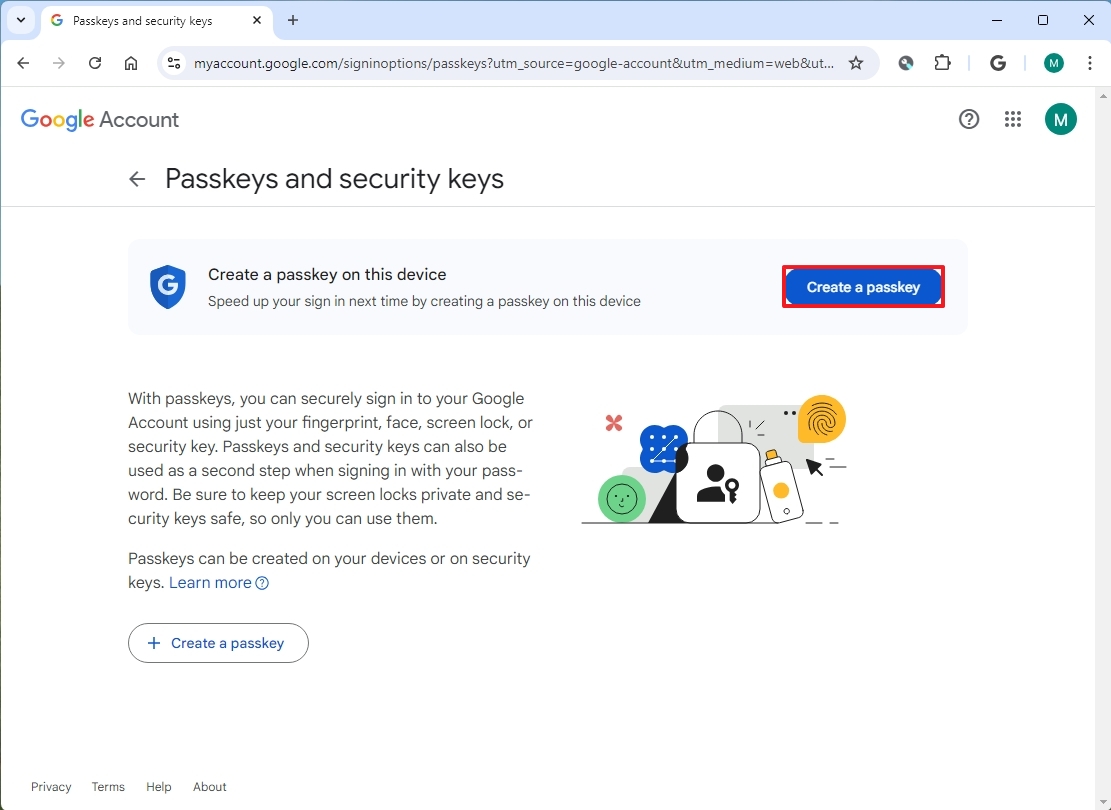
- Click the "Create a passkey" button.
(Image credit: Mauro Huculak)
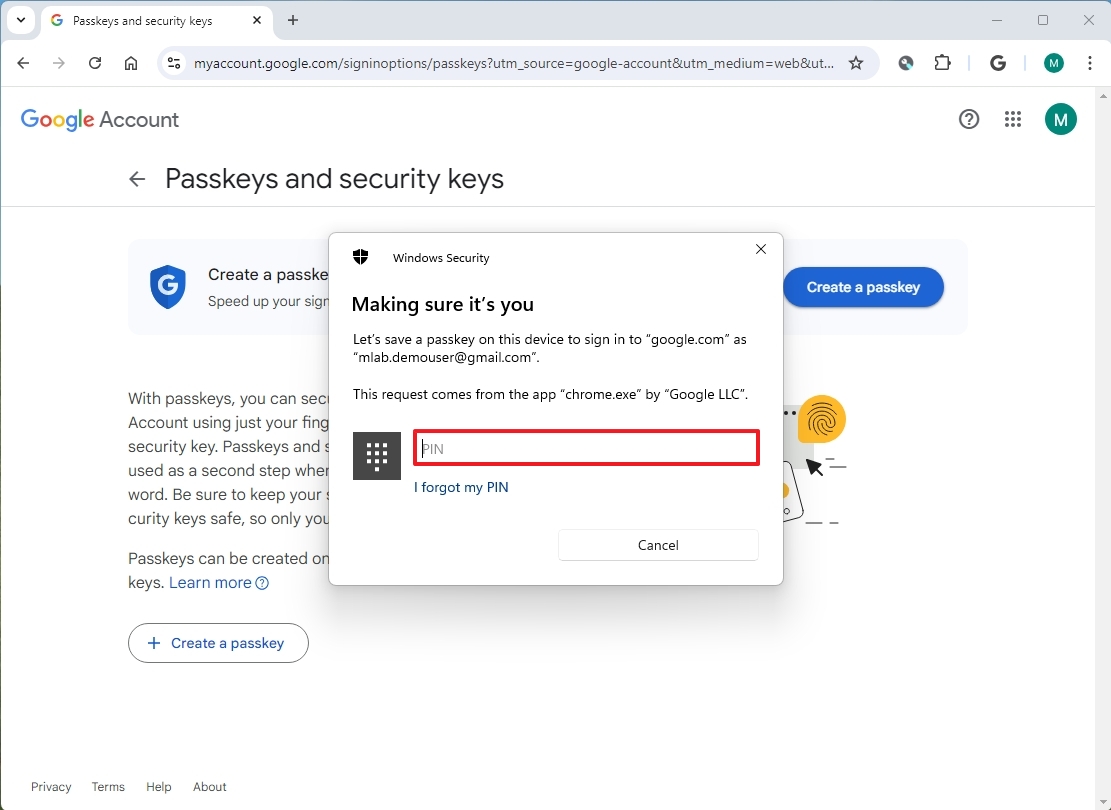
- Confirm your Windows Hello credentials.
(Image credit: Mauro Huculak)
- Quick note: You may need to confirm the credentials more than once.
- Click the OK button.
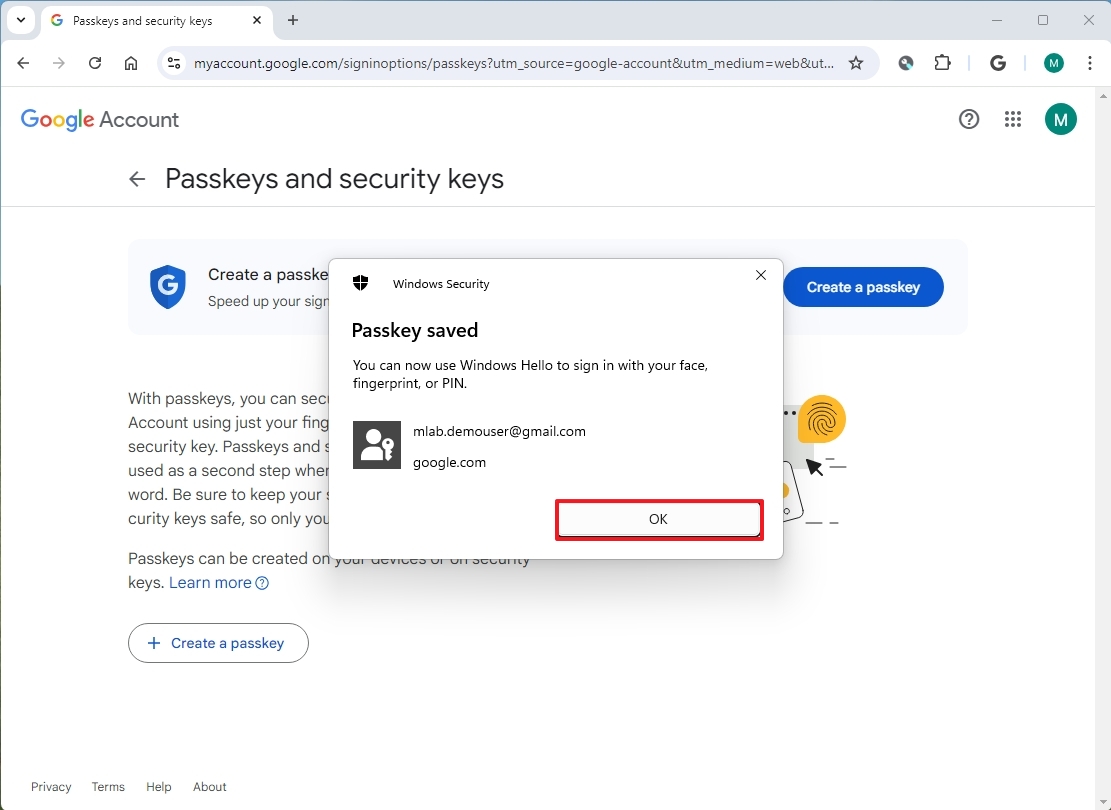
(Image credit: Mauro Huculak)
- Click the Done button.
After you complete the steps, Windows will save the passkey on the device, and the next time you have to sign in, you can use Windows Hello to authenticate.
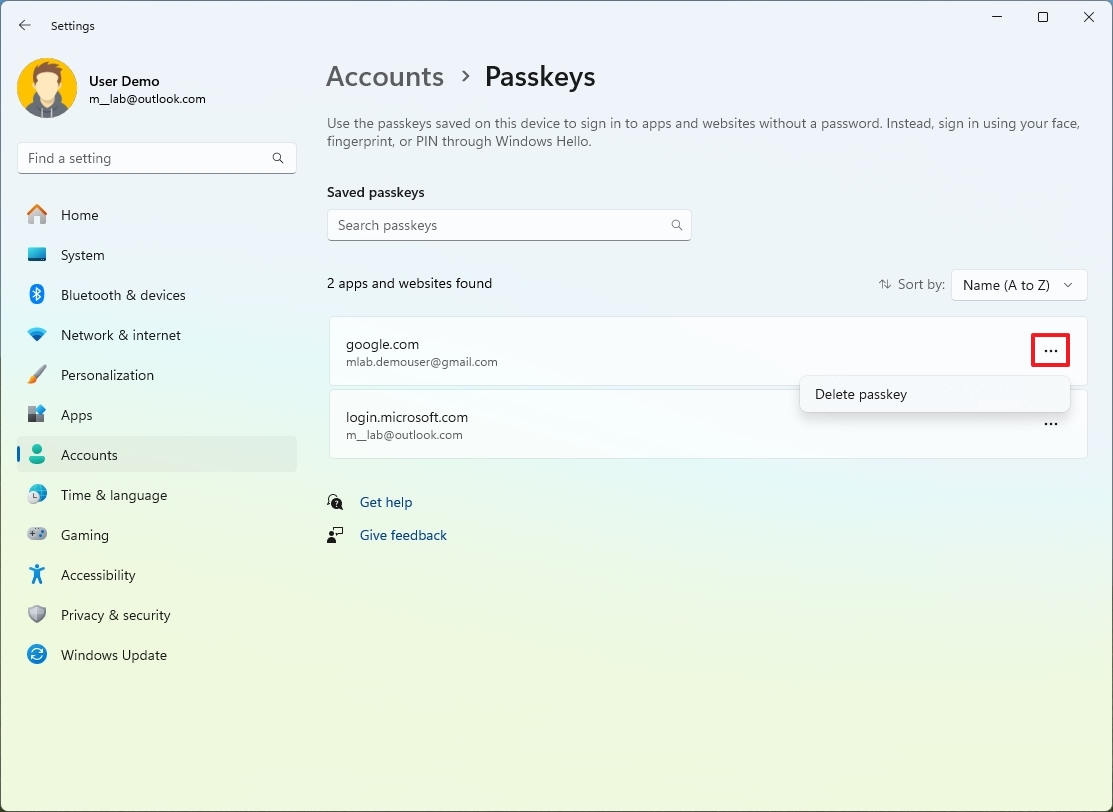
(Image credit: Mauro Huculak)
To view and delete passkeys on Windows 11, open Settings > Accounts > Passkeys, review your accounts or open the menu next to the account to delete the passkey.
20. Dynamic Lock
Dynamic Lock is a security feature that locks your computer automatically when you step away from the room. On Windows 11, the feature uses proximity technology with Bluetooth devices (such as a phone or wearable). When you step away from the computer after 30 seconds, it will lock the account automatically.
To enable Dynamic Lock on Windows 11, use these steps:
- Open Settings.
- Click on Bluetooth & devices.
- Click on Add device button.
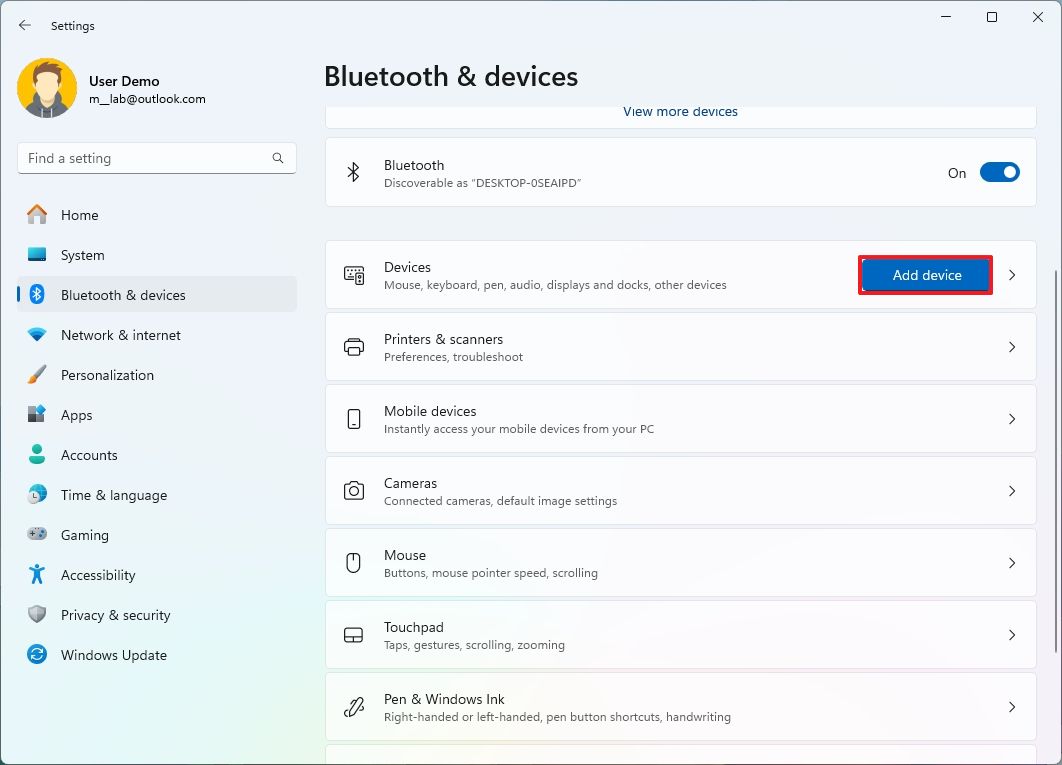
(Image credit: Mauro Huculak)
- Choose the Bluetooth option.
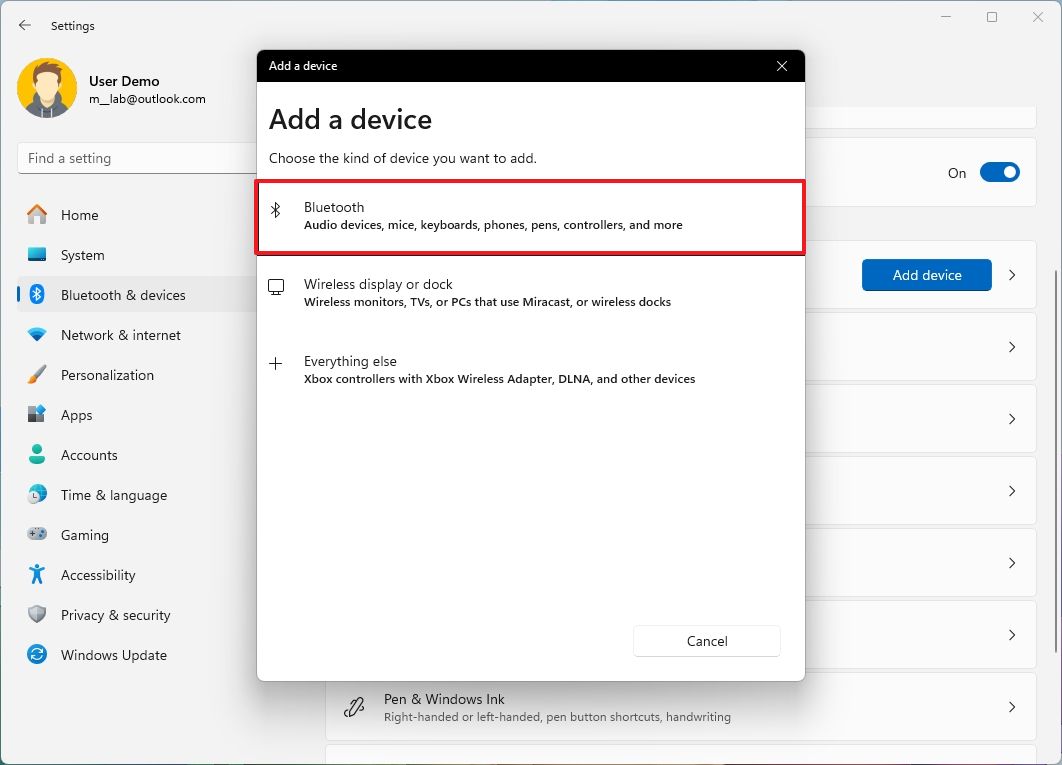
(Image credit: Mauro Huculak)
- Turn on Bluetooth on the device you want to pair.
- Select the device from the list.
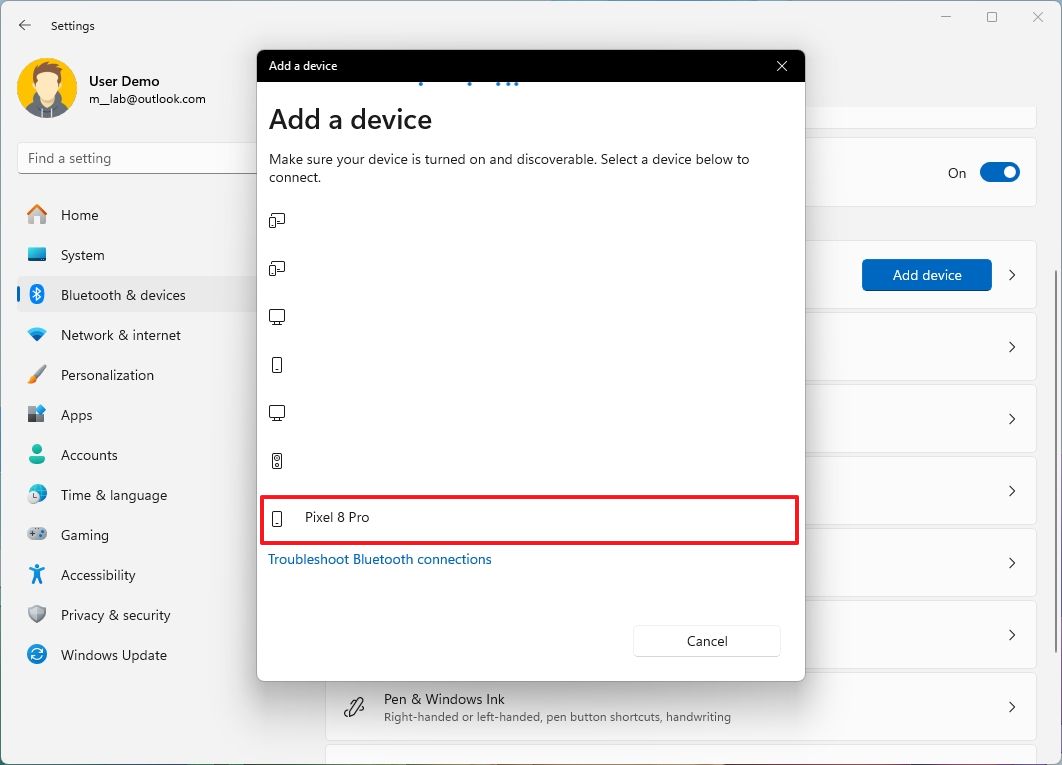
(Image credit: Mauro Huculak)
- Continue with the on-screen directions to complete the pairing.
- Click on Accounts.
- Click the Sign-in options page on the right side.
- Under the "Additional settings" section, click the Dynamic lock setting.
- Check the "Allow Windows to automatically lock the device when you're away" option.
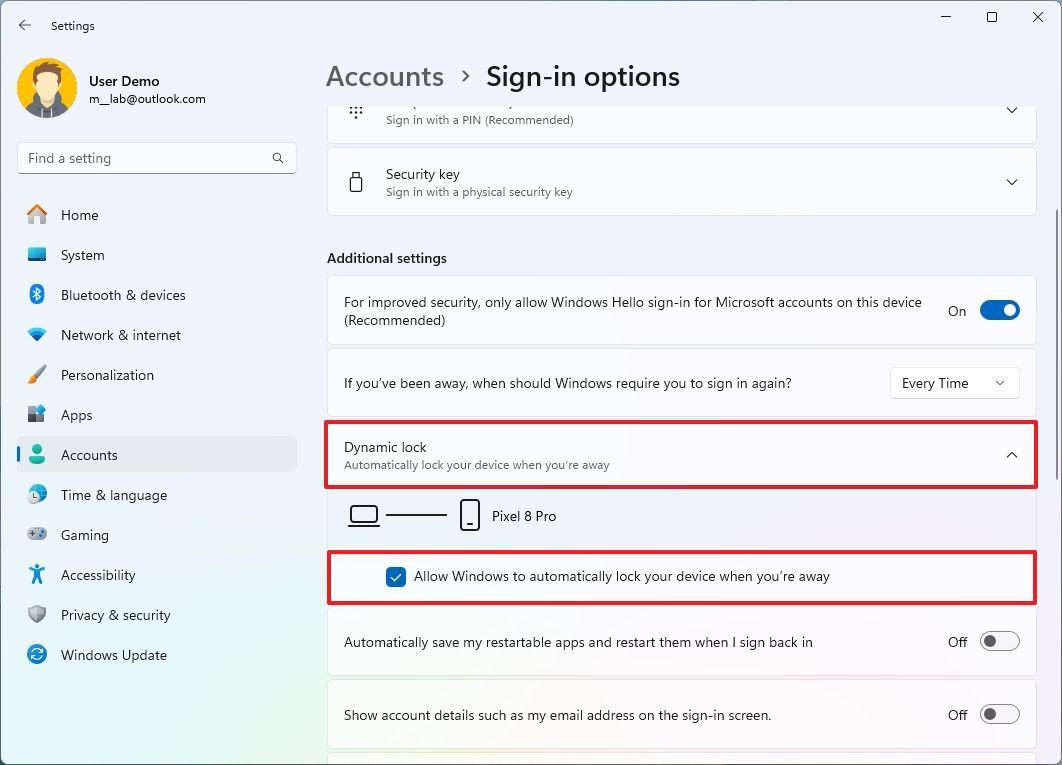
(Image credit: Mauro Huculak)
Once you complete the steps, step away from the device with the Bluetooth device, and then after half a minute, the computer will lock automatically.
Hope you enjoyed this news post.
Thank you for appreciating my time and effort posting news every single day for many years.
2023: Over 5,800 news posts | 2024 (till end of July): 3,313 news posts


3175x175(CURRENT).thumb.jpg.b05acc060982b36f5891ba728e6d953c.jpg)


Recommended Comments
There are no comments to display.
Join the conversation
You can post now and register later. If you have an account, sign in now to post with your account.
Note: Your post will require moderator approval before it will be visible.