3175x175(CURRENT).thumb.jpg.b05acc060982b36f5891ba728e6d953c.jpg)
Check out these tips to share confidential files with extra layers of security on Windows 11.
On Windows 11, at one point or another, you may have to share a file with sensitive content with someone else. While it might be daunting for many people as the file may land in the wrong hands, there are some precautions you can take to send confidential files more securely from your computer.
Although many could argue that the best way to share confidential information is to personally hand over the files to the other person, there are a few things you can do to complete this task in a more secure manner. For example, you can make sure that the files have the least amount of metadata, use encryption so only the person with the decryption key can access the contents, and use a secure medium to transmit the file.
In this how-to guide, I'll highlight some tips to share confidential information more securely on Windows 11.
How to share sensitive files on Windows 11
If you have to send sensitive information through the internet, first prepare the file and then use one or multiple secure mediums to transmit the content.
Prepare files for secure transmission
It doesn't matter the platform. When you create a document with an application, it'll be saved with various pieces of metadata information, including the author's name, modified date, computer name, and others that will depend on the file type.
If you want to keep this information private, you have to remove the metadata manually using these instructions.
- Open File Explorer.
- Open the location with the file to share.
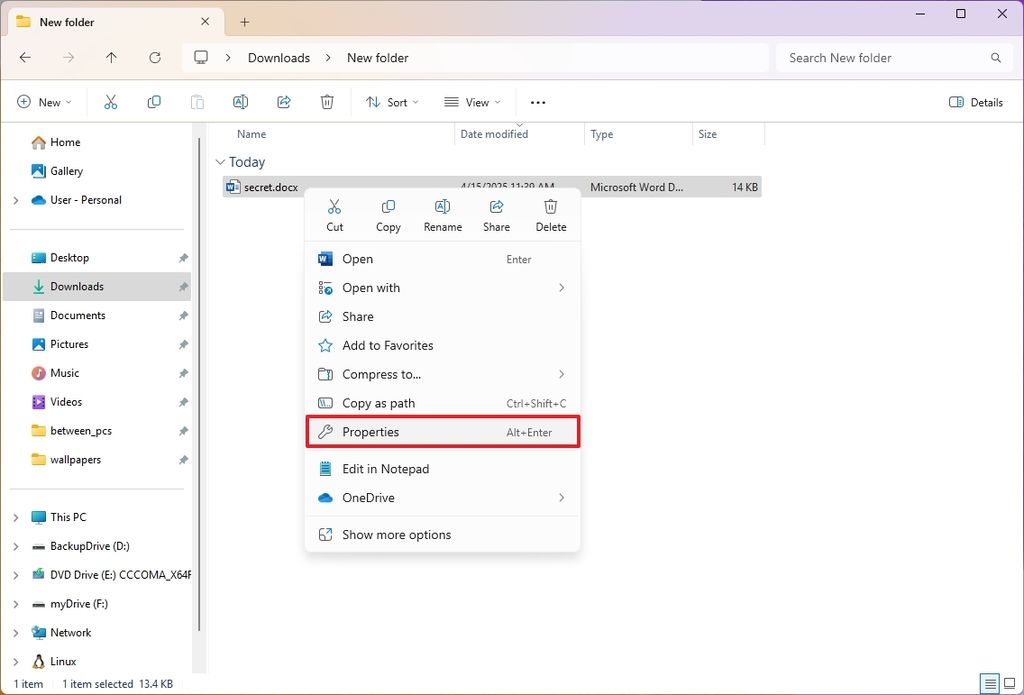
- Right-click the file and choose the Properties option.
(Image credit: Mauro Huculak)
- Quick tip: You can also select the file and use the "Alt + Enter" keyboard shortcut to open the "Properties" page.
- Click the Details tab.
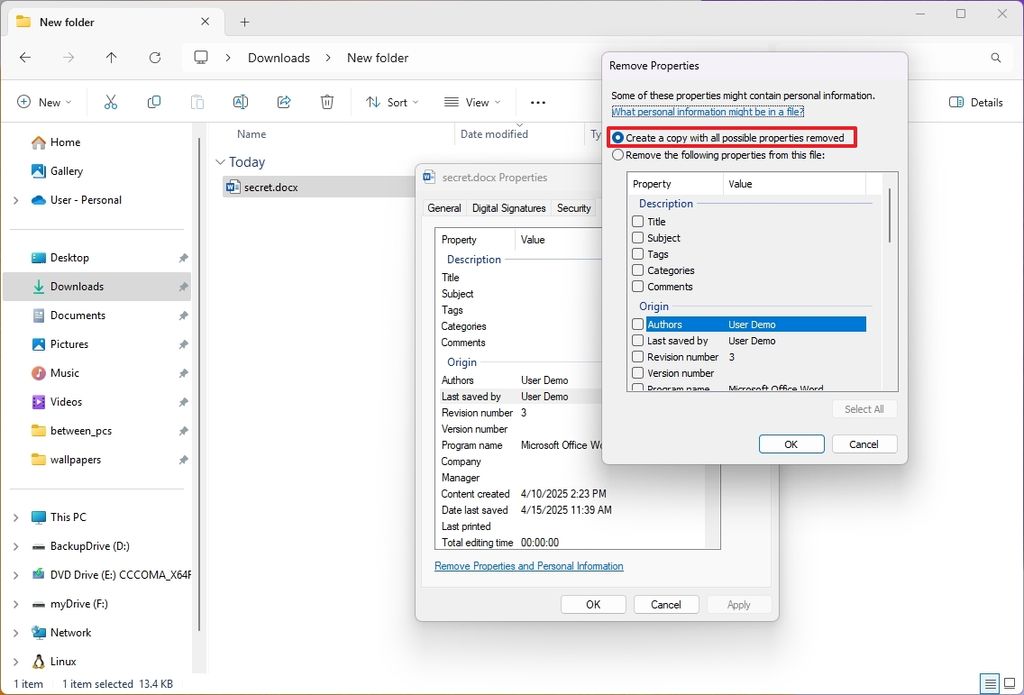
- Click the "Remove Properties and Personal Information" option.

(Image credit: Mauro Huculak)
- Choose the "Create a Copy With All Possible Properties Removed" option.
- Click the OK button.
(Image credit: Mauro Huculak)
Once you complete the steps, you will end up with a copy of the file with the least amount of information as part of the metadata.
Encrypt the file before sending
If you plan to transmit a file over the internet, you can use encryption to scramble the contents to make it virtually impossible for anyone to read it or even open the file.
Although Windows 11 comes with encryption capabilities, it's only available for the device, not for individual files that you may share with other people.
As a result, the best approach is to use a third-party tool. You may find many different tools to perform this task, but 7-Zip is free, open-source, and works well.
Install 7-Zip
If you don't have the tool installed on your computer, use these steps:
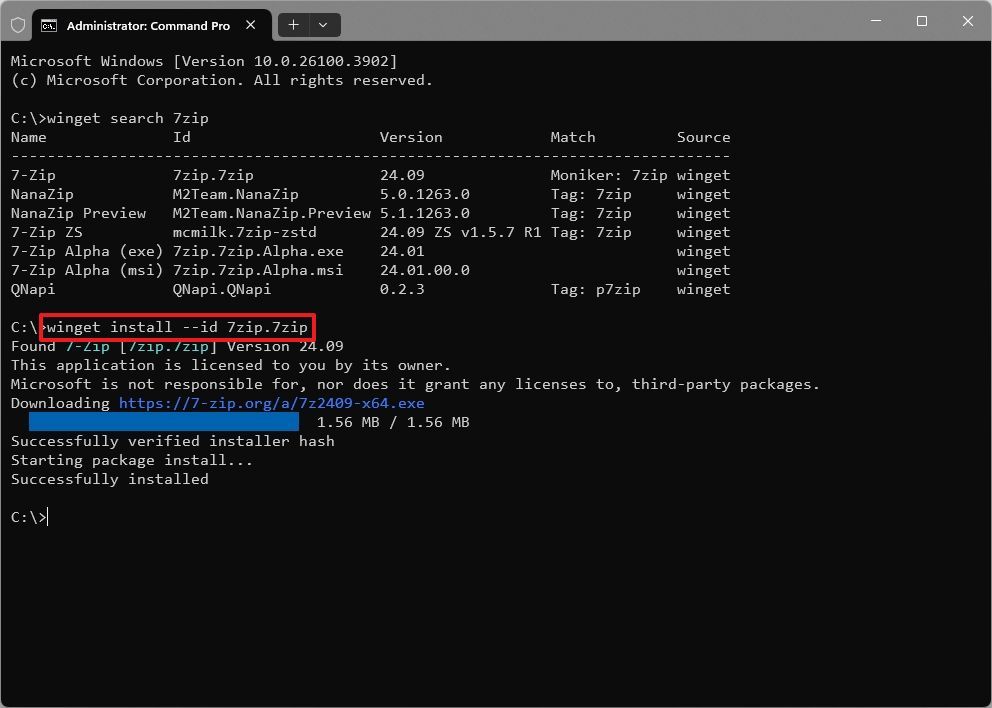
- Open Start.
- Search for Command Prompt (or Terminal), right-click the top result, and choose the Run as administrator option.
- Type the following command to install the 7-Zip app and press Enter: winget install --id 7zip.7zip
(Image credit: Mauro Huculak)
After you complete the steps, the tool will be installed on your computer.
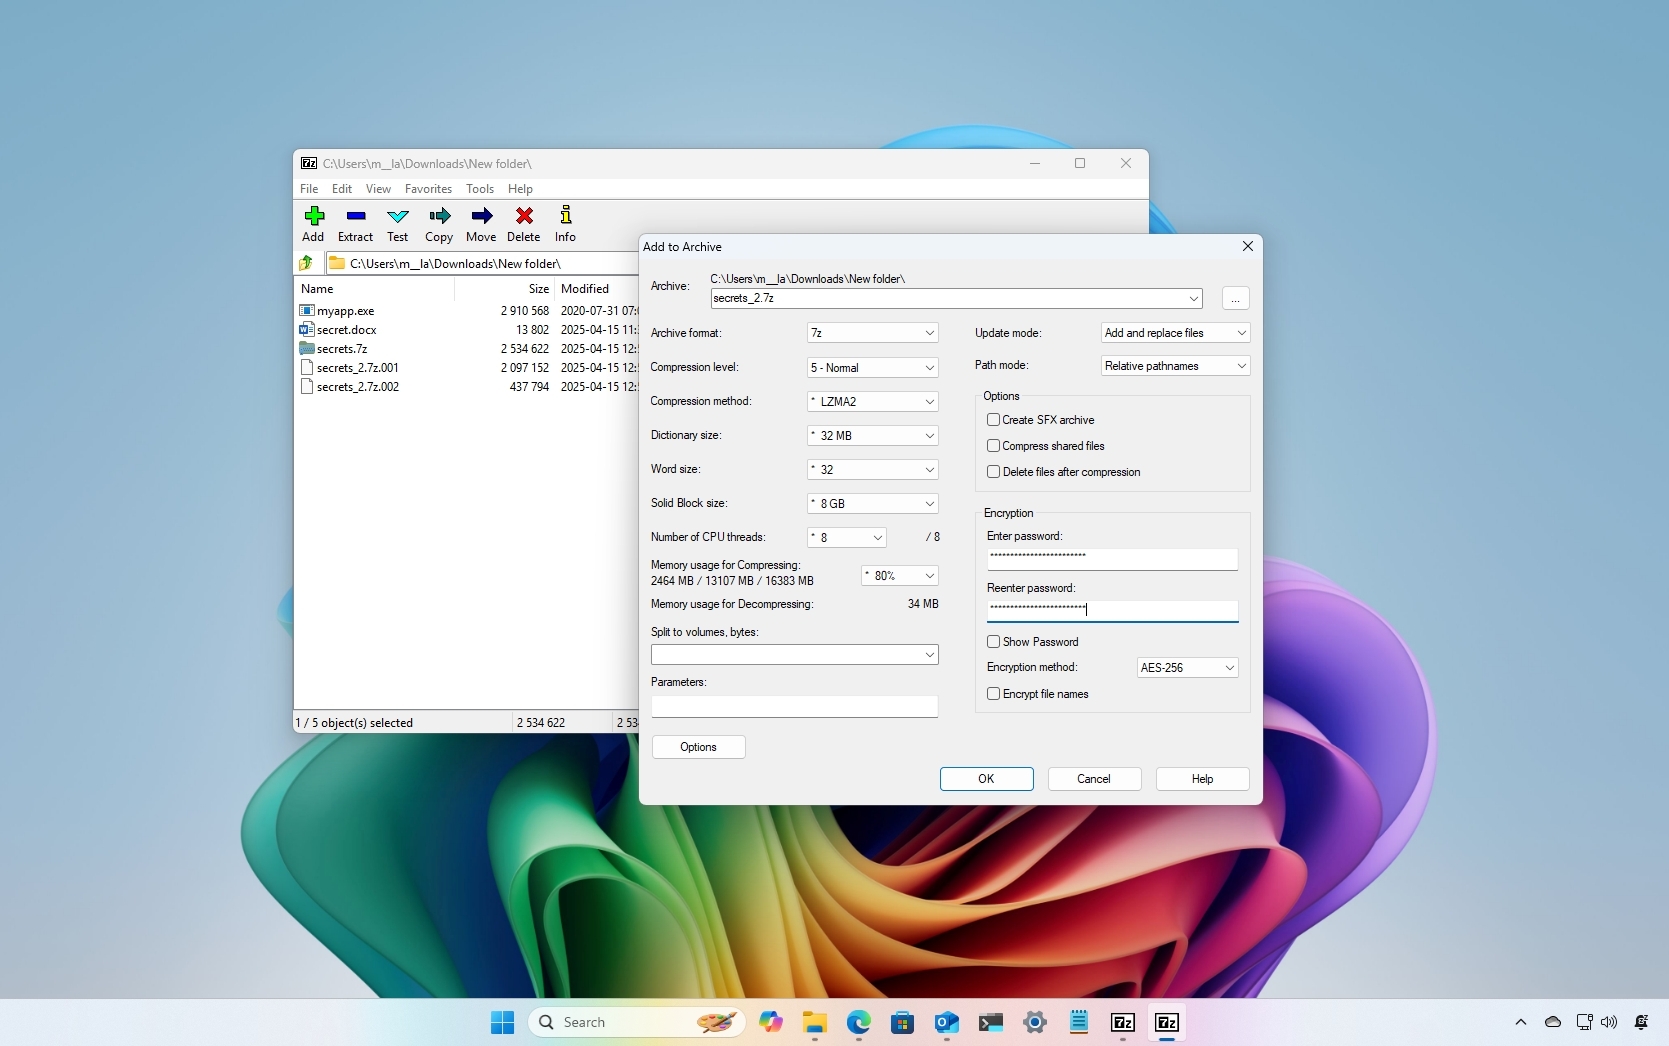
Option 1: Encrypt file
To encrypt files to protect your information with 7-Zip, use these steps:
- Open Start.
- Search for 7-Zip File Manager and click the top result to open the app.
- Open the location of the file to share.
- Click the Add button.
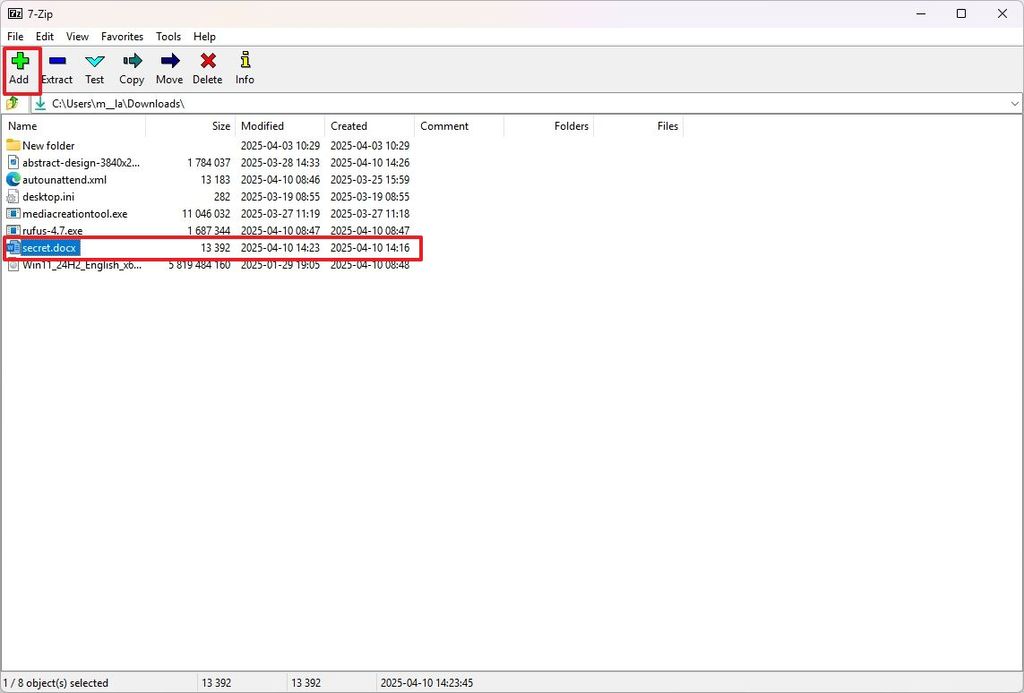
(Image credit: Mauro Huculak)
- Confirm (and re-enter) the encryption password under the "Encryption" section.
- Click the OK button.
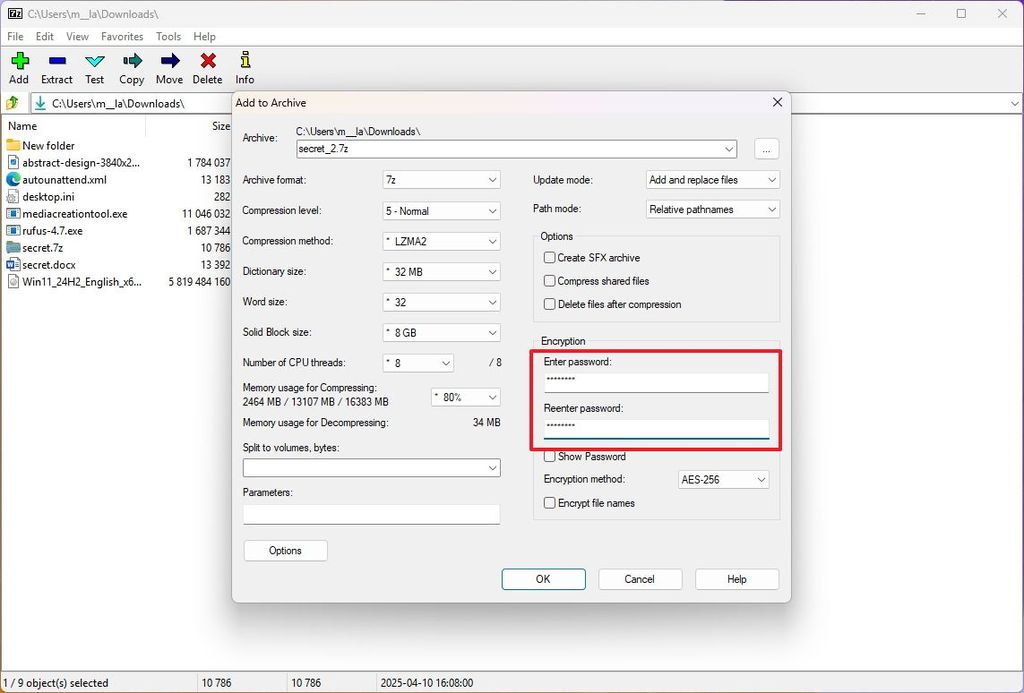
(Image credit: Mauro Huculak)
- (Optional) Select the newly encrypted file and click the Add button.
- Confirm (and re-enter) the encryption password under the "Encryption" section.
- Click the OK button.
Once you complete the steps, you can send the file over the internet, knowing it's more secure using encryption, and only the person with the decryption password will be able to access it.
The only caveat using this approach is that anyone with the 7-Zip tool will be able to browse the container, revealing the file name and type, but they won't be able to open it without the decryption password.
You can prevent this by re-encrypting the container that has already been encrypted, which I mentioned in steps 6 through 10.
It's important to note that the recipient will also need to install the 7-Zip tool to have the ability to decrypt the contents using the password.
If you choose this approach, it's best to send the encrypted file through email or another medium and then send the decryption password using different methods, such as through phone text or call.
Option 2: Encrypt and split the file
Alternatively, you can use 7-Zip to encrypt and split the file into multiple pieces and send each piece separately to add an extra layer of security.
To encrypt and split a file, use these steps:
- Open Start.
- Search for 7-Zip File Manager and click the top result to open the app.
- Open the location of the file to share.
- Click the Add button.
(Image credit: Mauro Huculak)
- Confirm (and re-enter) the encryption password under the "Encryption" section.
- Click the OK button.
- (Optional) Select the newly encrypted file and click the Add button.
- Confirm (and re-enter) the encryption password under the "Encryption" section.
- Confirm the size in megabytes to split the file using the "Split to volumes, bytes" setting.
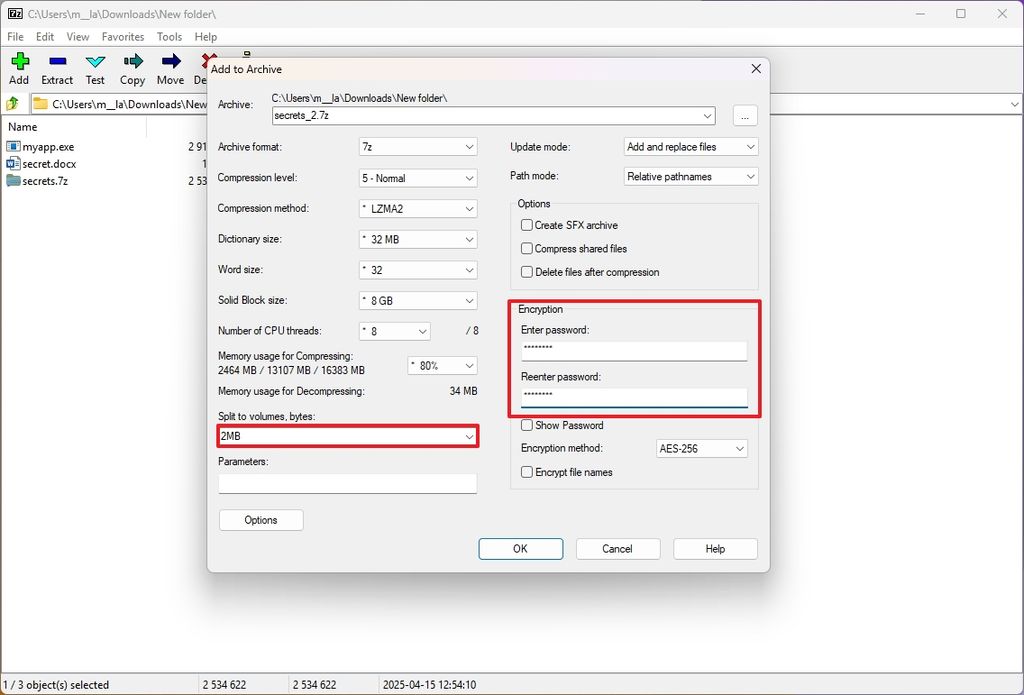
(Image credit: Mauro Huculak)
- Quick tip: If the file's original size was 20MB, you could specify "10MB" to split the file into two pieces.
- Click the OK button.
After you complete the steps, you will end up with two parts of the original file using the ".7z.001" and ".7z.002" file extensions.
The next step is to send each chunk separately to the other person. However, if you want to add another layer of security, it's recommended to send each piece using a different email account or file transfer service.
In addition, it's best to send the decryption password through another medium, such as phone text or call.
Once the recipient obtains all the pieces of the file, they will have to install the 7-Zip tool and use the corresponding password to decrypt and view the contents of the file.
It's important to note that the files may seem as if they are not associated with an application, but they will be recognized by the 7-Zip tool. You only need to open the tool, browse to the file location, select one of the files, and then click the "Extract" button.
Secure file share
The last step is to choose an online platform to perform a secure transmission of the file. For this particular task, you can find different options, from using your email account to many online services, such as Proton, Send Anywhere, Opera My Flow feature, OneDrive, and many others.
Send file through email
If you want to use your email account, you may want to consider using your Outlook account, since if you have a Microsoft 365 subscription, you can also use the email encryption feature to add yet another layer of security to send the file to the recipient.
To use Outlook to send securely send a file, use these steps:
- Open the Outlook app.
- Click the New option to create a new email.
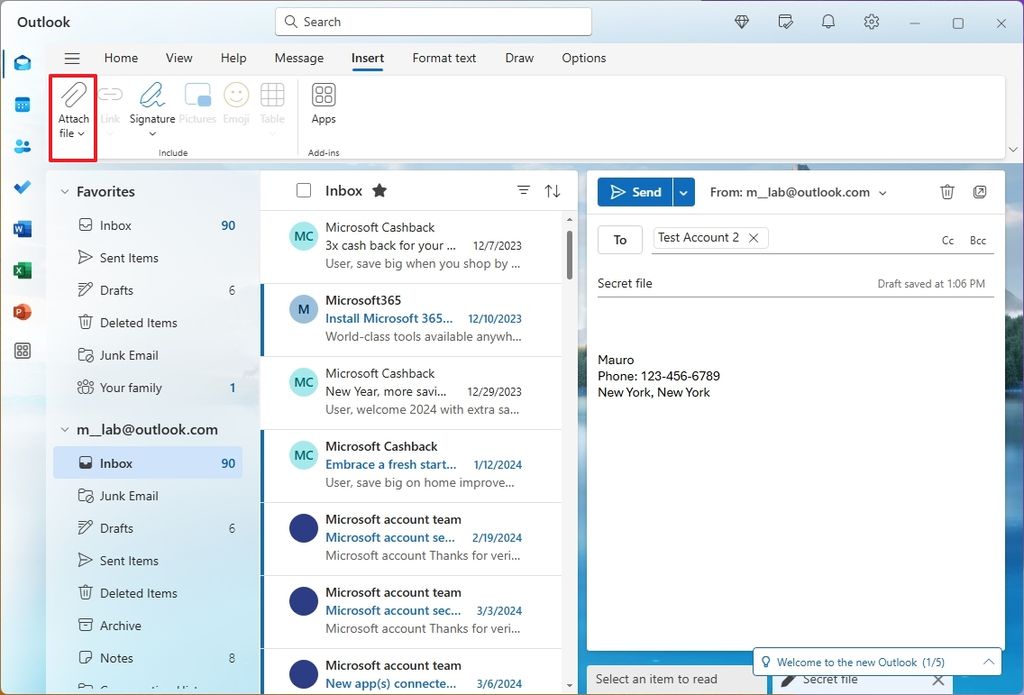
- Click the Insert tab.
- Click the Attach file option and select the "Browse this computer" option.
(Image credit: Mauro Huculak)
- Select the file and click the Open button.
- Click the Options tab.
- Click the Encrypt option and choose the Encrypt feature.
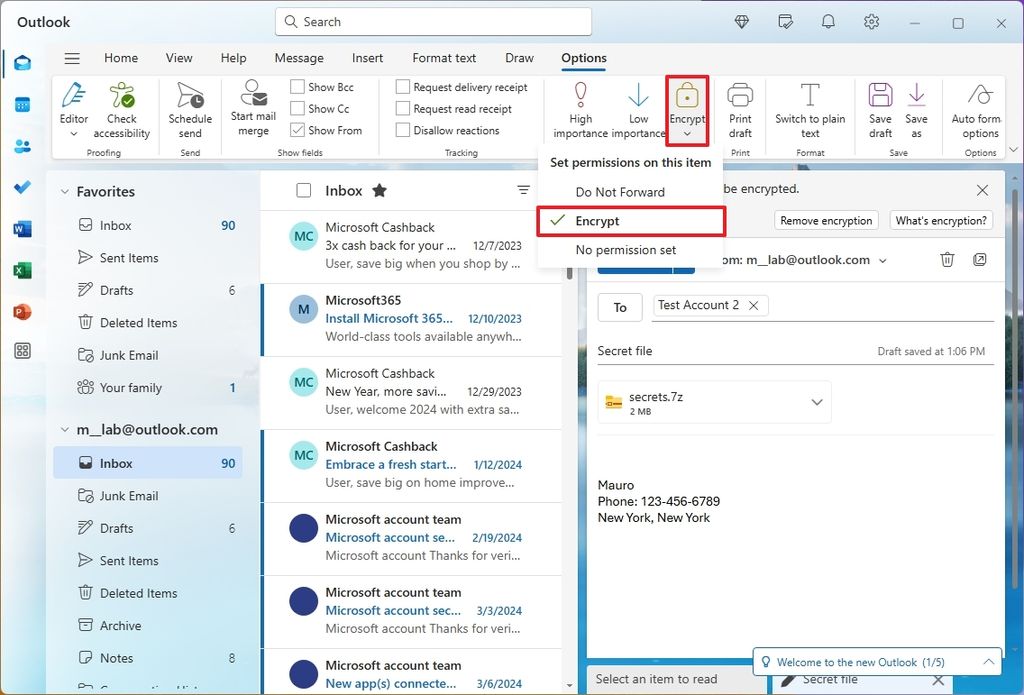
(Image credit: Mauro Huculak)
- Complete the email message.
- Click the Send button.
Once you complete the steps, the message will be sent using encryption, and the recipient will be able to download the attachment without encryption, but the experience will be different depending on the app and service they are using.
If the recipient uses the app or web version of Outlook, they can download the file in the same way you do when you're not using encryption.
On the other hand, if the recipient uses a third-party app, they will receive an email with instructions to access the files in the encrypted message. However, they will have to use their Microsoft account, or they can also use their Google or Yahoo Mail account to gain access to the contents of the message.
Finally, if the encrypted message was sent to another service, they will receive a temporary passcode to open the message and download the file.
Send file through OneDrive
You can also use OneDrive. When using this approach, you will be able to set the permissions to specify who will have access to the encrypted file, and you can stop the share at any time.
To use OneDrive to share a file with other people, use these steps:
- Open OneDrive in File Explorer.
- Open the folder with the encrypted file to share.
- Right-click the file, select OneDrive, and choose the Share option.
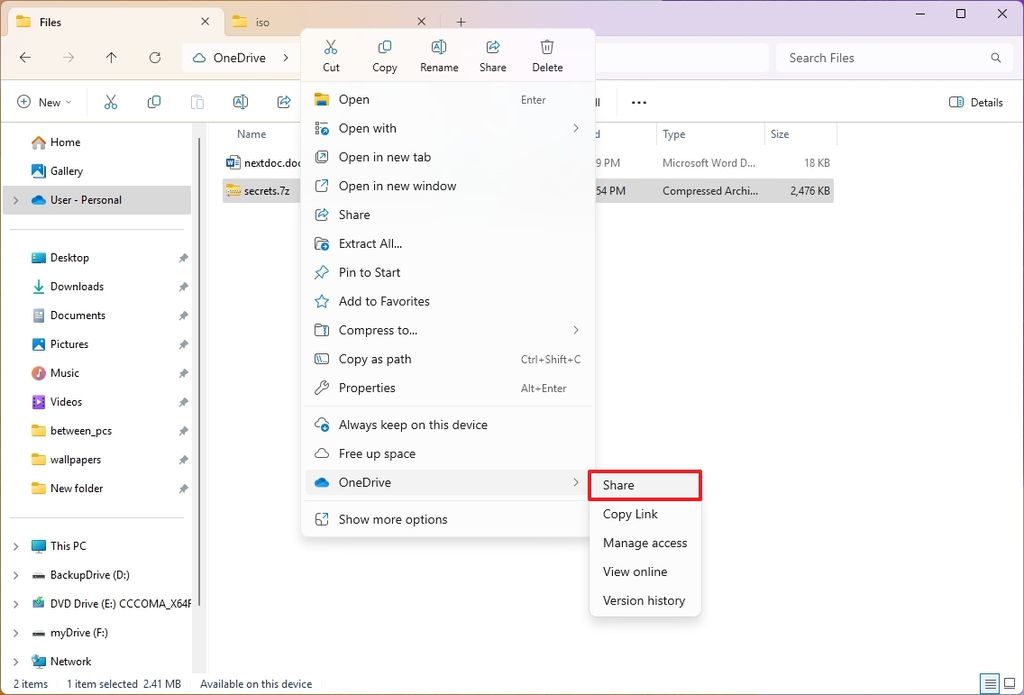
(Image credit: Mauro Huculak)
- Confirm the email address of the person to share the file.
- Click the "Anyone with the link can edit" option.
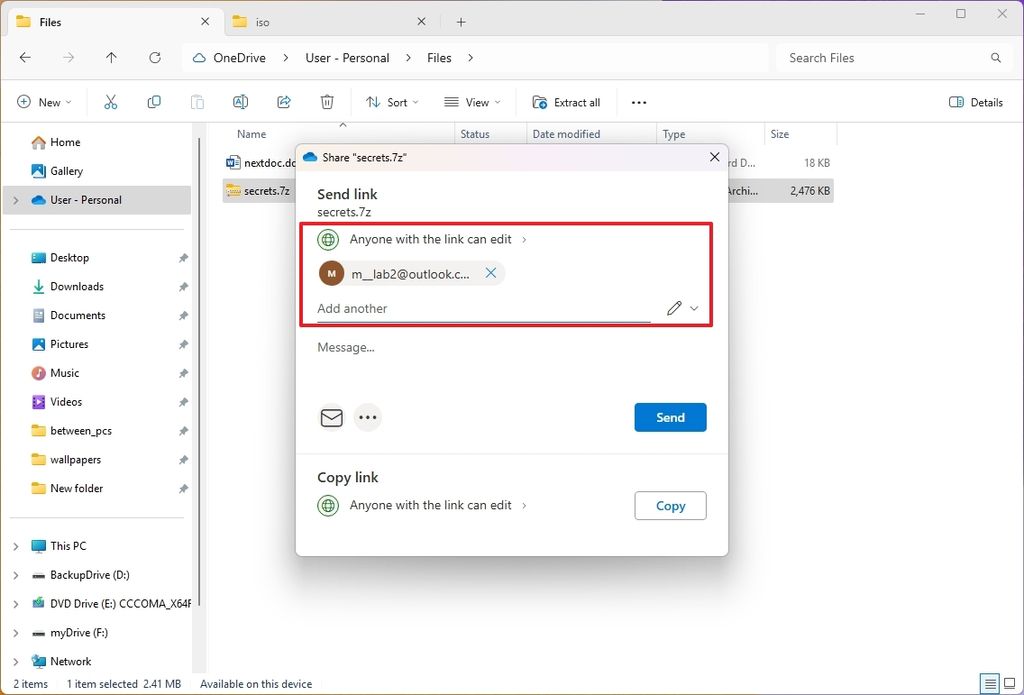
(Image credit: Mauro Huculak)
- Select the "Specific people" option.
- Click the permissions menu and choose the Can view option.
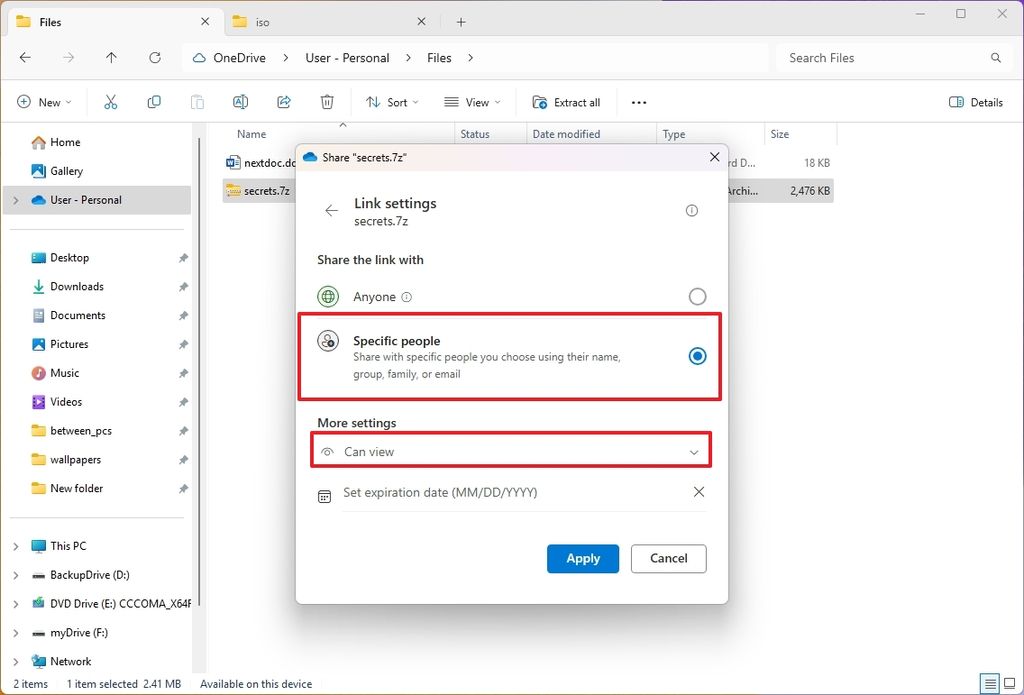
(Image credit: Mauro Huculak)
- Click the Apply button.
- Click the Send button.
After you complete the steps, the recipient will be able to download the file.
In this guide, I'm highlighting one approach on how to increase the likelihood of your information from getting compromised during the sharing process. However, there are many other ways to complete this task.
How would you send a file with sensitive information over the internet? Let me know in the comments.
Hope you enjoyed this news post.
Thank you for appreciating my time and effort posting news every day for many years.
News posts... 2023: 5,800+ | 2024: 5,700+ | 2025 (till end of March): 1,357
RIP Matrix | Farewell my friend 
- Irfannsane
-
 1
1
Recommended Comments
There are no comments to display.
Join the conversation
You can post now and register later. If you have an account, sign in now to post with your account.
Note: Your post will require moderator approval before it will be visible.