About to connect to a public wireless network? Here are five safety tips to protect your device and data.
When you're on the go (whether at a coffee shop, airport, or hotel), connecting your Windows 11 laptop to a public Wi-Fi network may be necessary. However, these networks can expose your device and personal data to various security risks, especially when handling sensitive information.
Public Wi-Fi networks are accessible to anyone, making it challenging to ensure that malicious actors are not present on the same network. These individuals can exploit vulnerabilities to intercept your data, distribute malware, or gain unauthorized access to your device.
If you want to safeguard your Windows 11 device while using a public Wi-Fi, it's crucial to implement specific security measures, including, but not limited to, enabling random MAC address, switching to a public network profile, changing to a custom DNS service, as well as using a VPN connection or accessing the internet through a mobile hotspot.
In this how-to guide, I'll share five tips to keep your device and data as safe as possible by configuring specific features on Windows 11.
How to make a secure connection to a public Wi-Fi on Windows 11
These five tips will help you add extra layers of security when connecting to the public wireless network.
1. Enable random MAC address
Random MAC address, or hardware address, randomization is primarily designed to enhance your privacy on Wi-Fi networks.
When you enable this feature, you will be changing your device's unique identifier each time it connects (or daily), making it much harder for networks and others to track your activity and location.
You can only use this feature on network adapters that support this capability. Also, some networks may require the use of a fixed MAC address. As a result, if you're having issues connecting to a particular network, you may have this feature disabled.
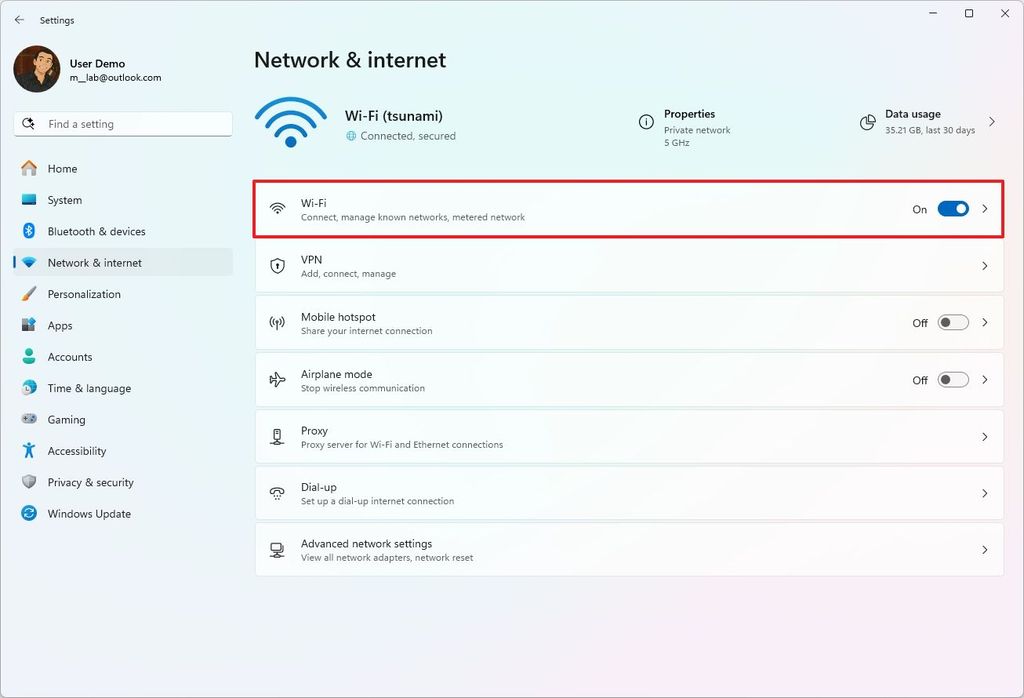
To enable the random MAC address feature on Windows 11, use these steps:
- Open Settings.
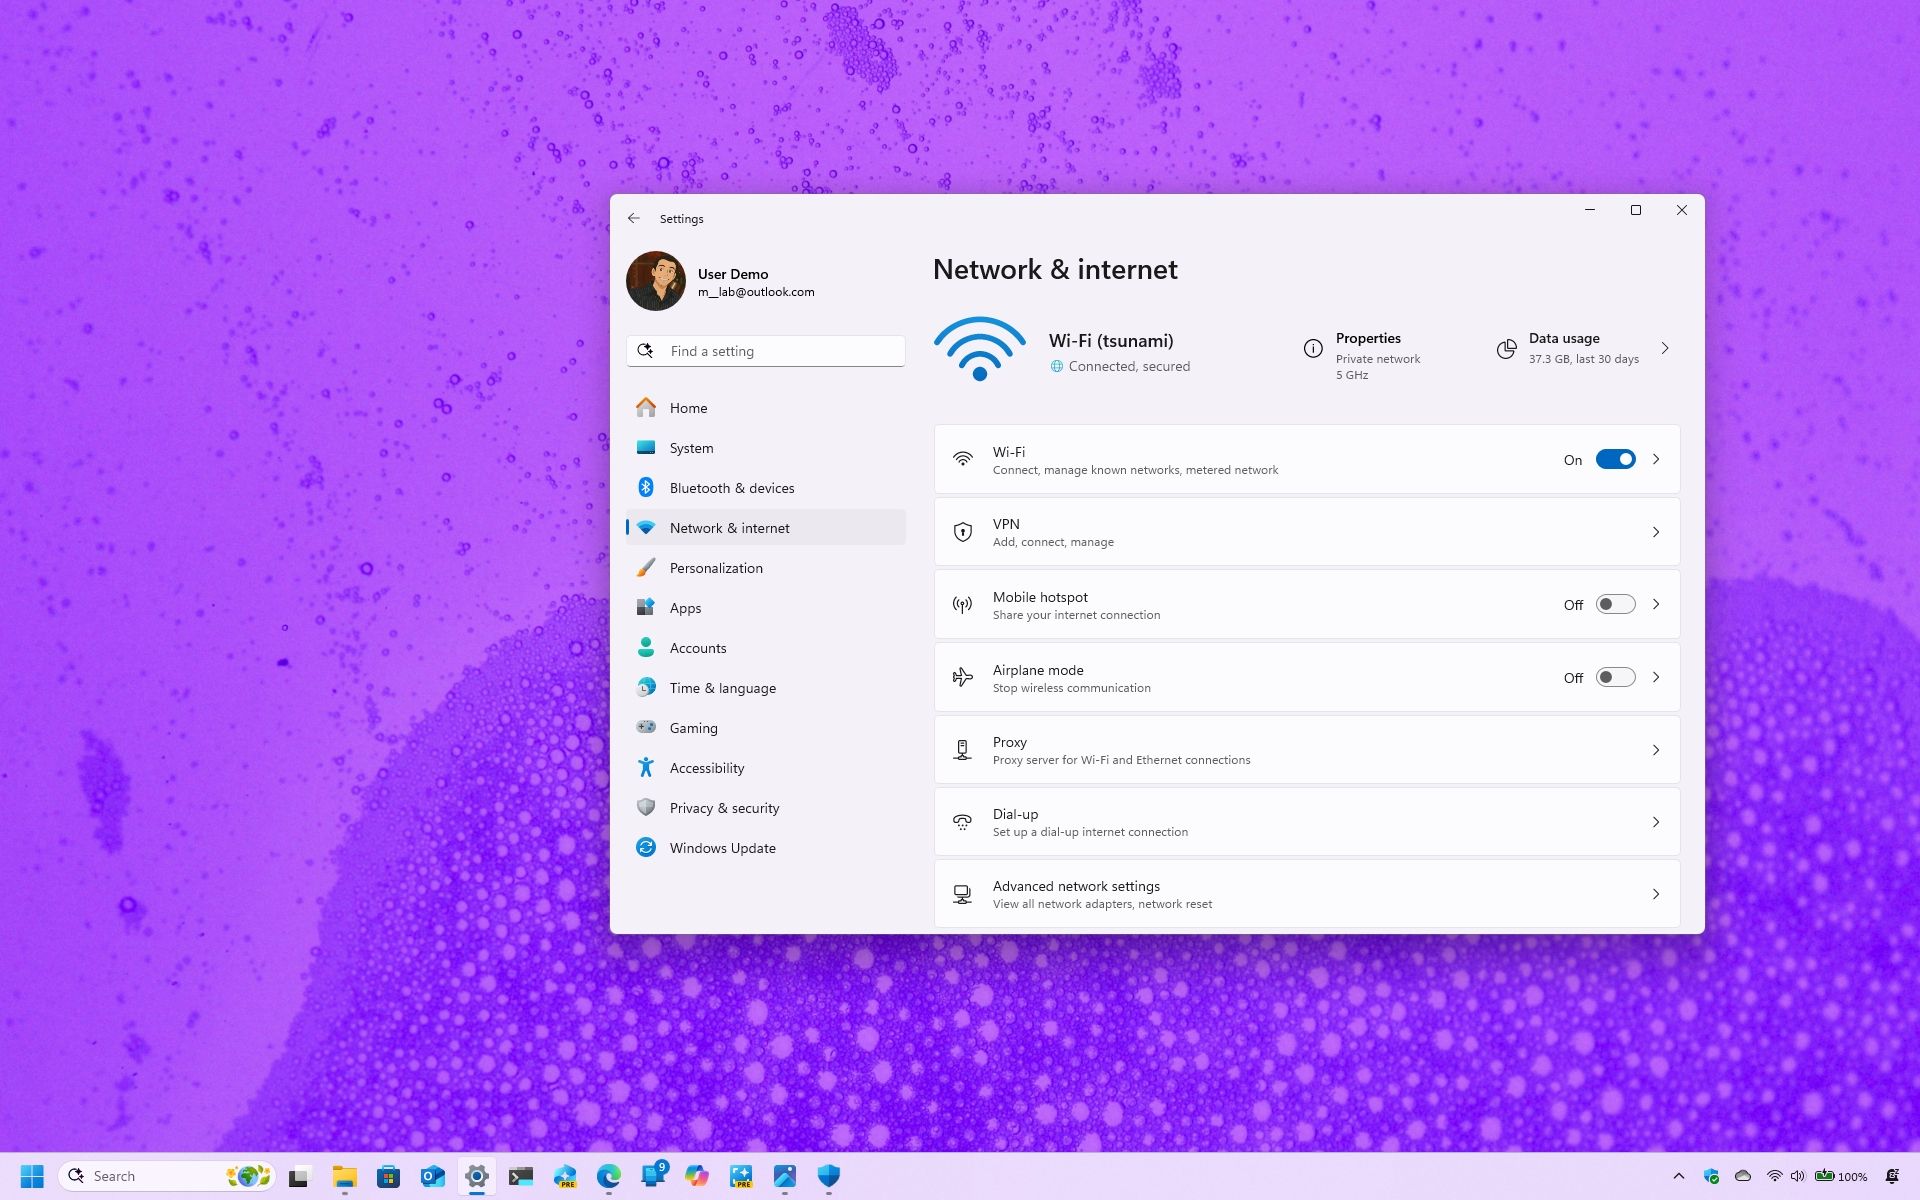
- Click on Network & Internet.
- Click the Wi-Fi page.
(Image credit: Mauro Huculak)
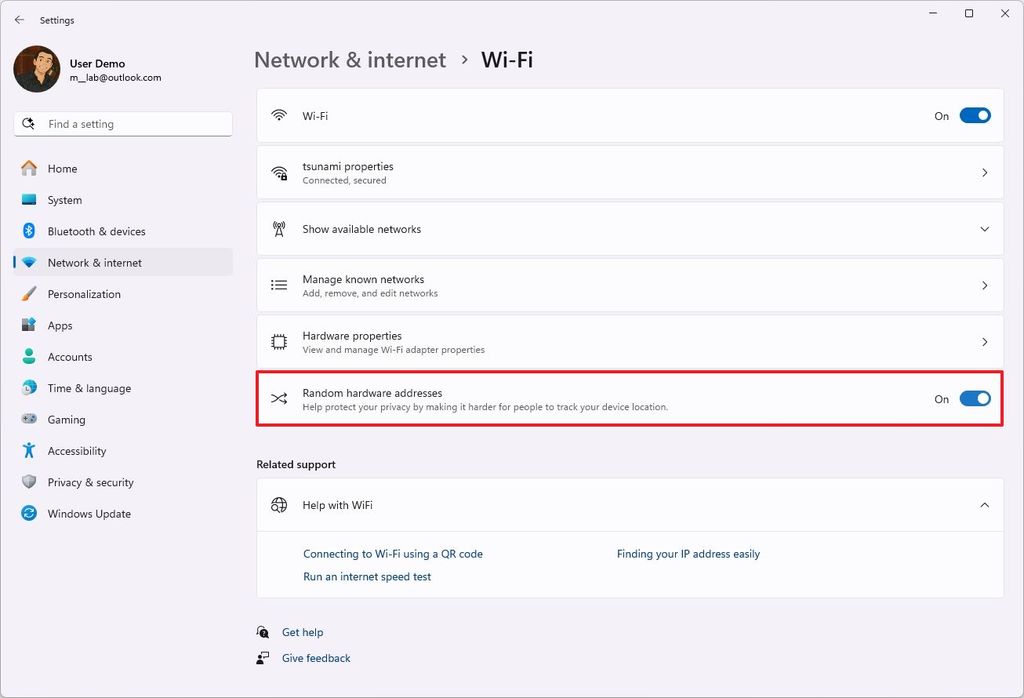
- Turn on the "Random hardware addresses" toggle switch.
(Image credit: Mauro Huculak)
Once you complete the steps, the hardware address will change every time you connect to a wireless network, depending on your configuration.
2. Switch to the Public network profile
On Windows 11, changing the network profile type allows you to tell your computer how to behave when connected to a specific network. It essentially defines the level of trust and discoverability for that specific network connection.
The operating system categorizes networks into three main profiles: Private, Public, and Domain.
While the "Private" and "Domain" profiles offer the recommended settings for networks you trust, you usually want to switch to "Public" as it provides stricter security settings to protect your device from potential threats from public places, such as public Wi-Fi hotspots in coffee shops, airports, or hotels.
To change the network profile to Public on Windows 11, use these steps:
- Open Settings.
- Click on Network & Internet.
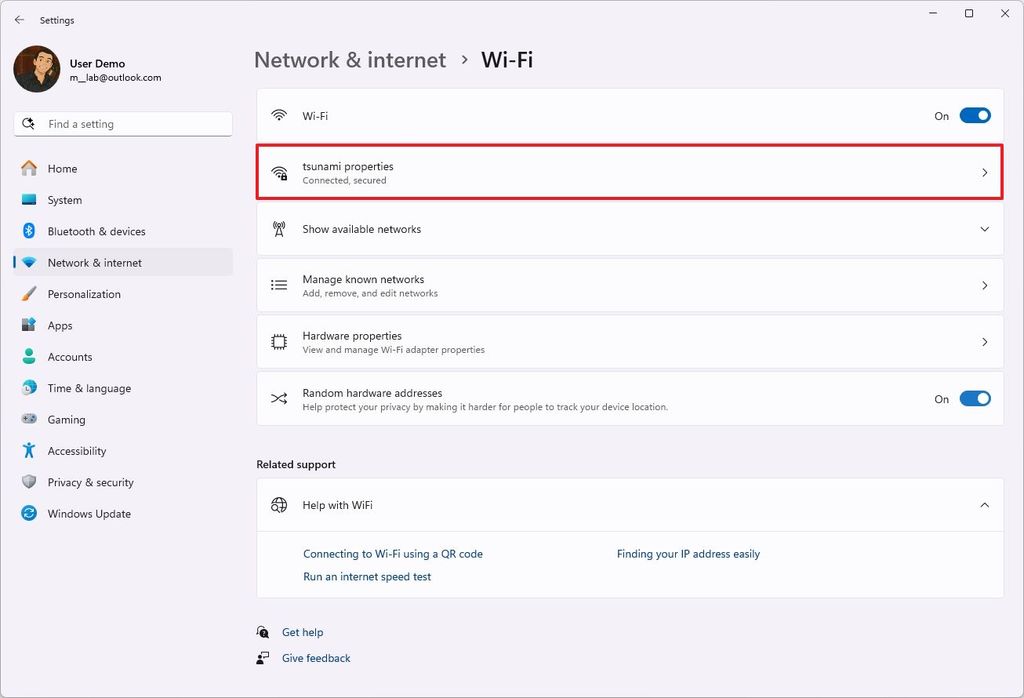
- Click the Wi-Fi page.

(Image credit: Mauro Huculak)
- Select the network you want to modify.
(Image credit: Mauro Huculak)
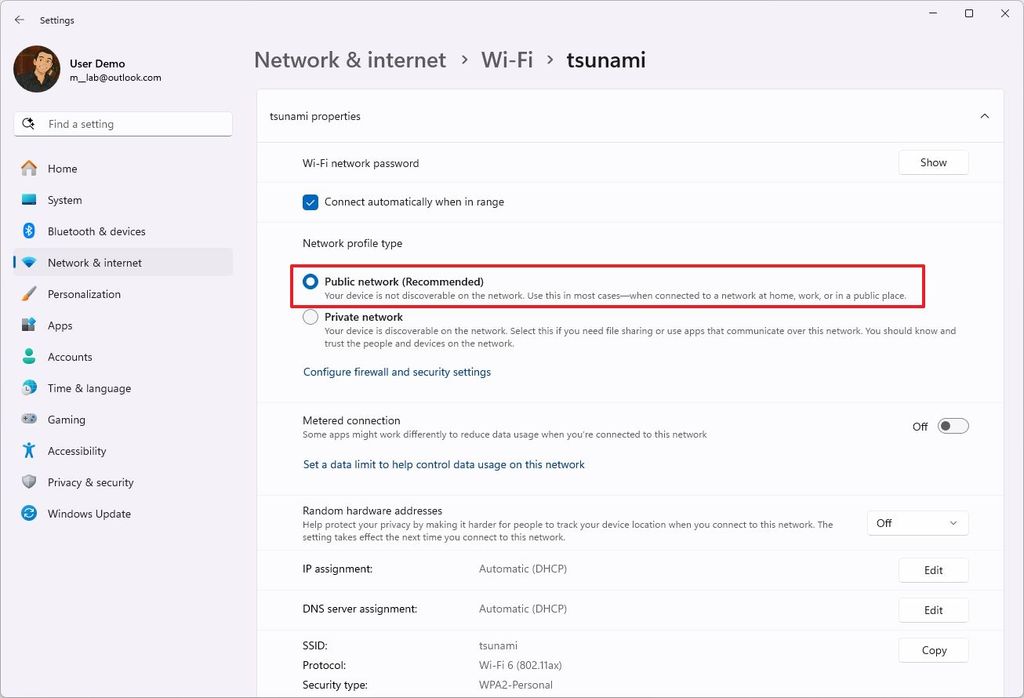
- Choose the Public network option.
(Image credit: Mauro Huculak)
After you complete the steps, the "Public network" profile will apply to the system, making your device hidden from other devices. Windows 11 will turn off network discovery and block the automatic setup of network devices and services, and the firewall will apply stricter rules to block incoming connections.
3. Configure custom DNS settings
Changing the DNS settings on Windows 11 when connecting to public Wi-Fi can enhance your browsing experience by improving speed, security, and access to content.
Usually, when you connect to the public access point, the location or service provider will provide the DNS services automatically. However, these servers may not always provide the optimal speed for DNS resolution, and every DNS query will pass through their servers, degrading speed and security.
By configuring your device to use alternative DNS servers, such as Google's (8.8.8.8), Cloudflare's (1.1.1.1), or Cisco OpenDNS (208.67.222.222), you can potentially bypass this configuration for a faster and more secure browsing experience.
However, public networks often use DNS-based filtering to block certain websites. If this is the case, using a custom configuration may not always work, and you will have to accept their network settings to access the internet.
To use a custom DNS configuration to connect to the public wireless network, use these steps:
- Open Settings.
- Click on Network & internet.
- Click the Wi-Fi page.

(Image credit: Mauro Huculak)
- Click on the "Manage known networks" setting.
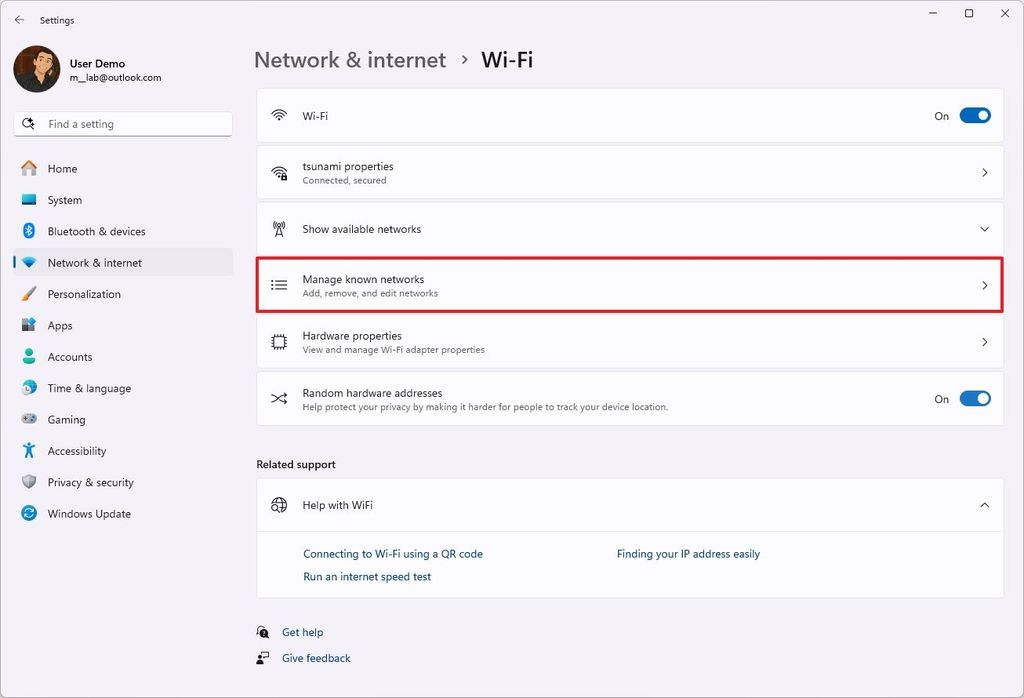
(Image credit: Mauro Huculak)
- Click the Add network button.
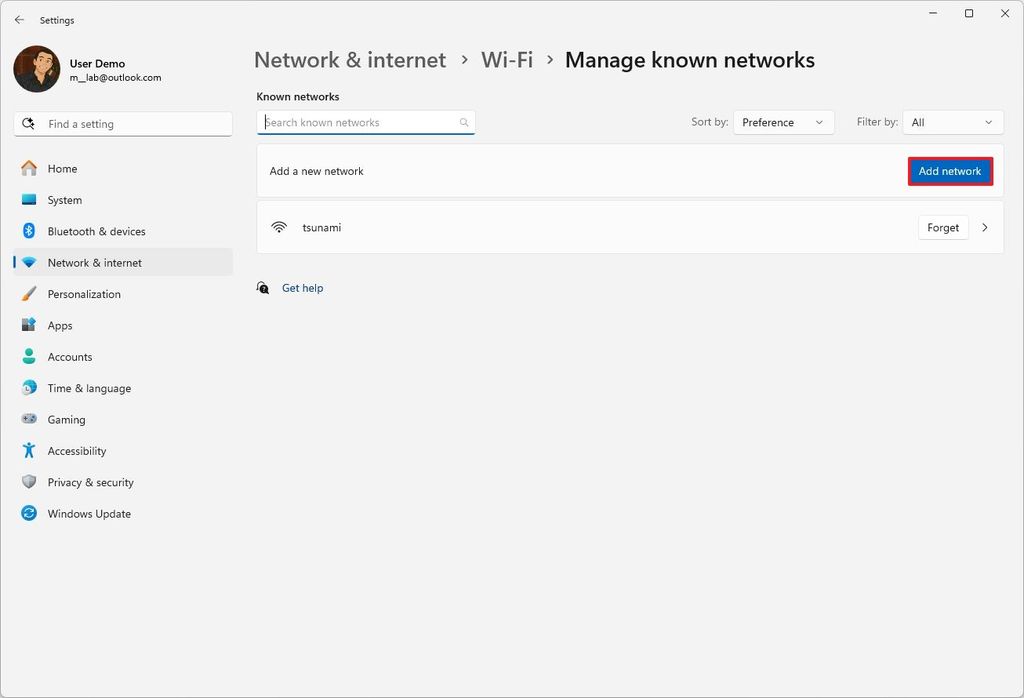
(Image credit: Mauro Huculak)
- Confirm the wireless name in the "Network name" setting.
- Choose the security type (such as WPA2-Personal AES) in the "Security type" setting.
- Quick tip: If you can't complete this configuration, it's best to connect to the access point and then open the network properties for that connection and change the DNS settings from the "Manage known networks" page.
- Confirm the connection password.
- (Optional) Clear the Connect automatically option.
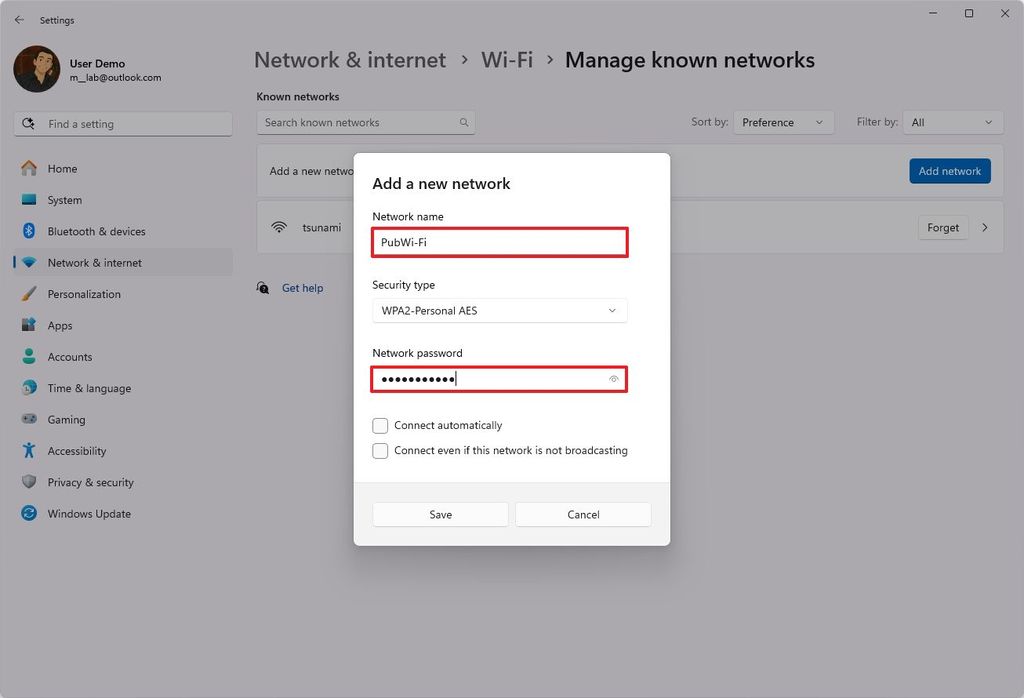
(Image credit: Mauro Huculak)
- Click the Save button.
- Click on the newly added network.
- Click the Edit button for the "DNS server assignment" setting.
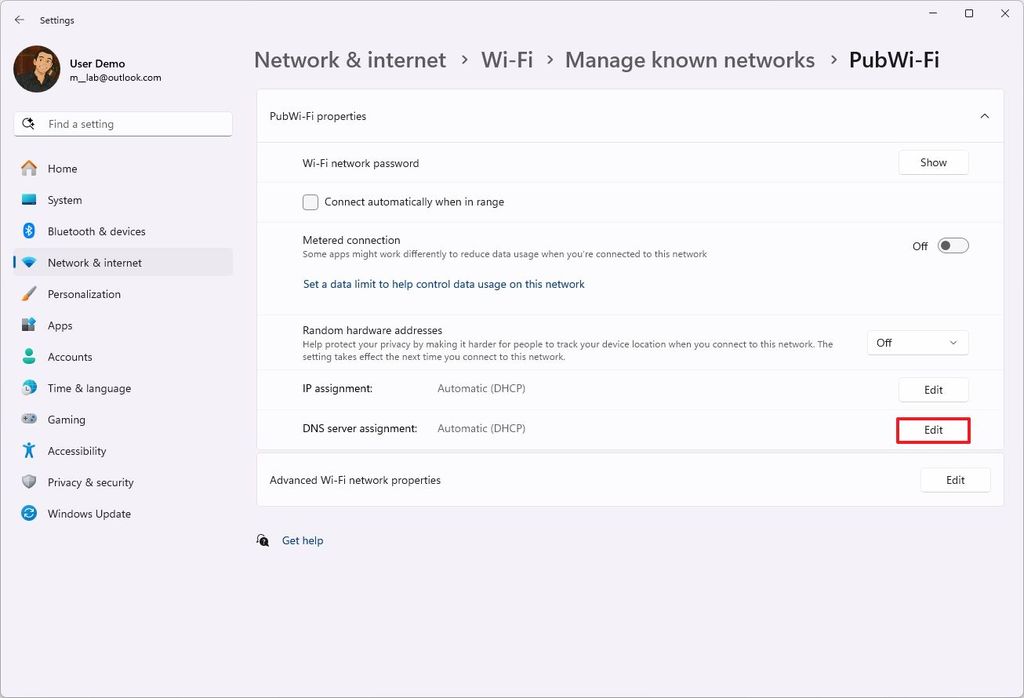
(Image credit: Mauro Huculak)
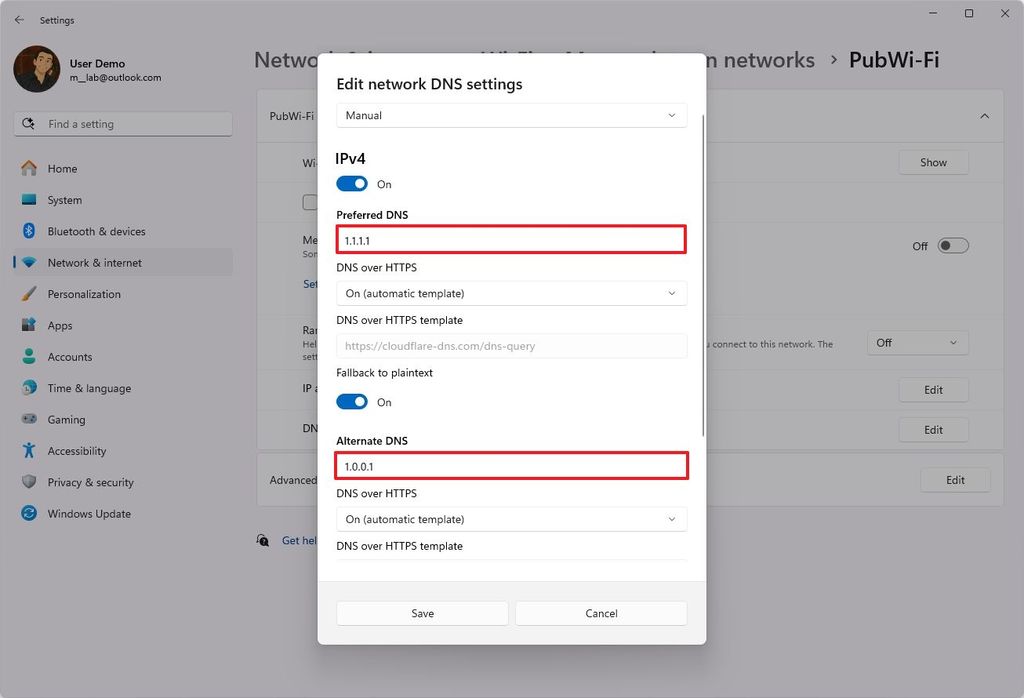
- Select the Manual option from the drop-down menu.
- Turn on the IPv4 toggle switch.
- Confirm the primary DNS address in the "Preferred DNS" setting. For example, to use Cloudflare, Google Public DNS, or Cisco OpenDNS, use these settings:
- Cloudflare: 1.1.1.1
- Google Public DNS: 8.8.8.8
- OpenDNS: 208.67.222.222
(Image credit: Mauro Huculak)
- (Optional) Select the encryption option in the "On (automatic template)" setting.
- (Optional) Turn on the "Fallback to plaintext" toggle switch.
- Quick note: DNS over HTTPS (DoH) is a network protocol that encrypts DNS queries using the standard Hypertext Transfer Protocol Secure (HTTPS) protocol to protect DNS queries, resulting in better security and privacy while browsing the web. You will only be able to enable this feature if you have specified a DNS address that supports encryption.
- Confirm the secondary DNS address in the "Alternate DNS" setting. You can use one of the secondary addresses:
- Cloudflare: 1.0.0.1
- Google Public DNS: 8.8.4.4
- OpenDNS: 208.67.220.220
- (Optional) Select the encryption option in the "Alternative DNS encryption" setting.
- Click the Save button.
Once you complete the steps, the computer will use the custom addresses for DNS queries, making the internet experience a little more private.
4. Connect to the internet via VPN
On Windows 11, another way to improve security on a public wireless network is to use a VPN (Virtual Private Network) connection.
A VPN creates an encrypted "tunnel" for your internet traffic, meaning that all the data you send and receive is scrambled, making it unreadable to anyone snooping on the public Wi-Fi network.
If you don't use encryption, sensitive information, such as passwords, financial details, and personal messages, can be easily intercepted.
Usually, you can connect to a VPN in at least two ways. You can connect to your organization's VPN, which is typically designed for remote work. You can also use online paid VPN services, such as NordVPN, ExpressVPN, and Surfshark. You can also find free alternatives, such as the free VPN service offered by the Opera browser.
To configure a VPN connection, use these steps:
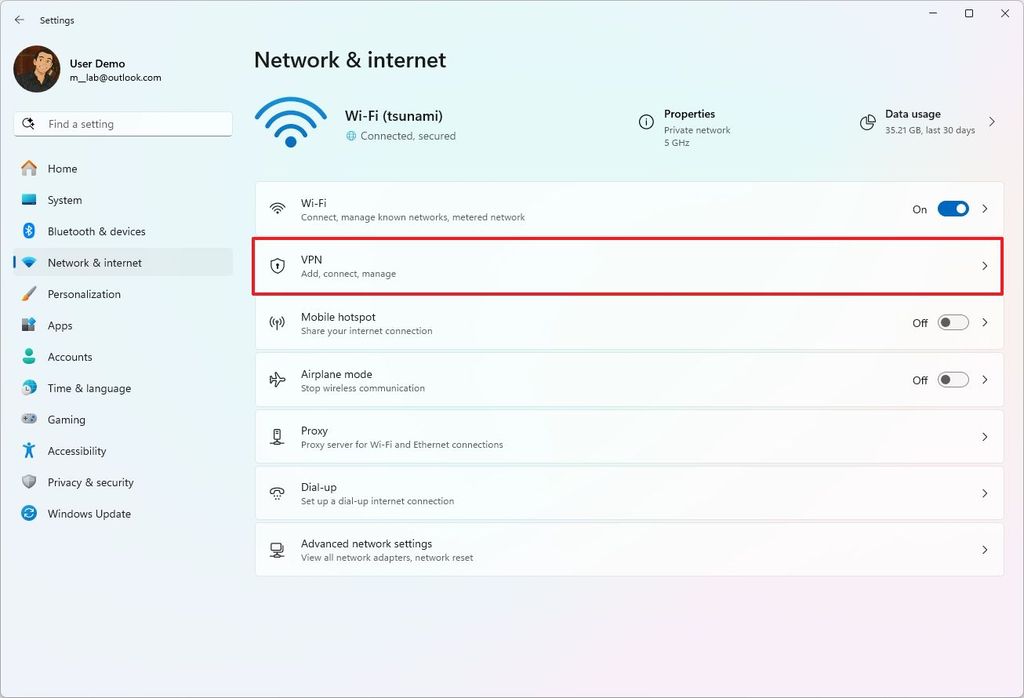
- Open Settings.
- Click on Network & internet.
- Click the VPN page.
(Image credit: Mauro Huculak)
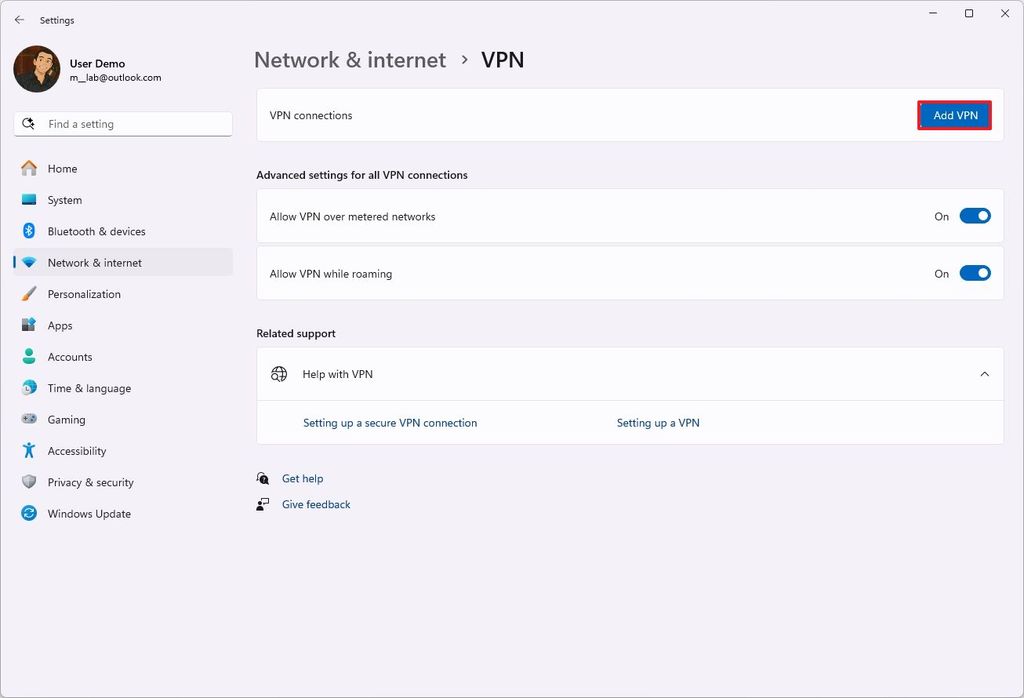
- Click the Add VPN button.
(Image credit: Mauro Huculak)
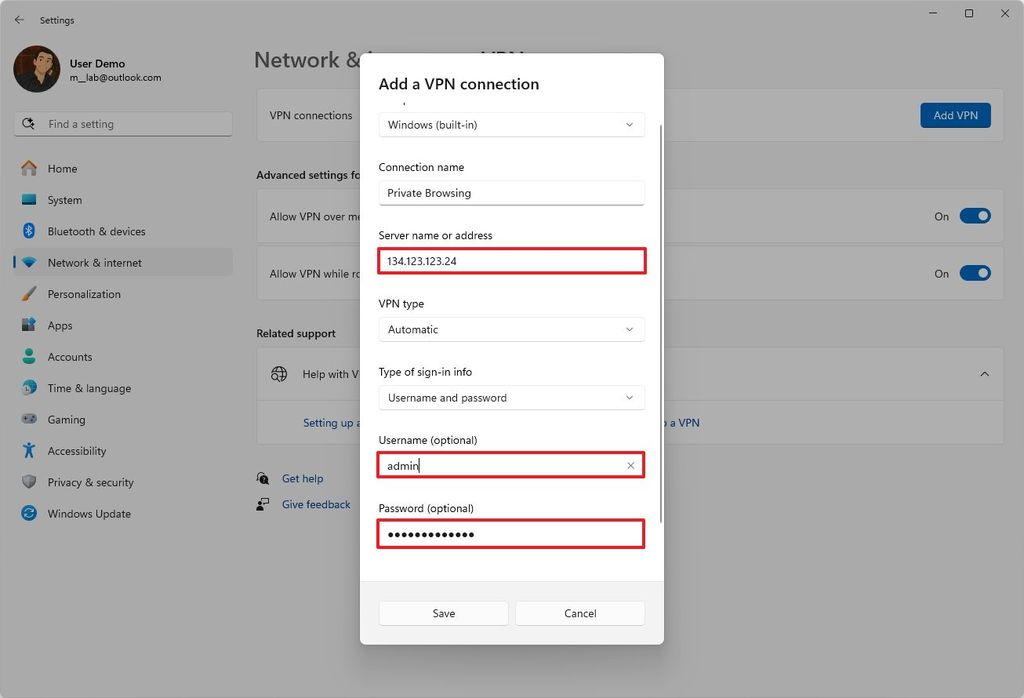
- Select the Windows (built-in) option using the "VPN provider" setting.
- In the "Connection name" setting, enter a name to identify the connection — for example, you can use a service name like IPVanish, Private Internet Access, etc.
- In the "Server name or address" setting, enter the address of the VPN server — for example, vpnserver.com or 134.123.123.24.
- Use the "VPN type" drop-down menu and select the Automatic option or the protocol required to connect to the particular VPN server.
- Select the authentication method using the "Type of sign-in info" drop-down menu.
- Confirm the username and password if you select the "Username and password" option.
(Image credit: Mauro Huculak)
- Click the Save button.
Once you complete the steps, you must connect to the public wireless network and the VPN server to make your internet browser private.
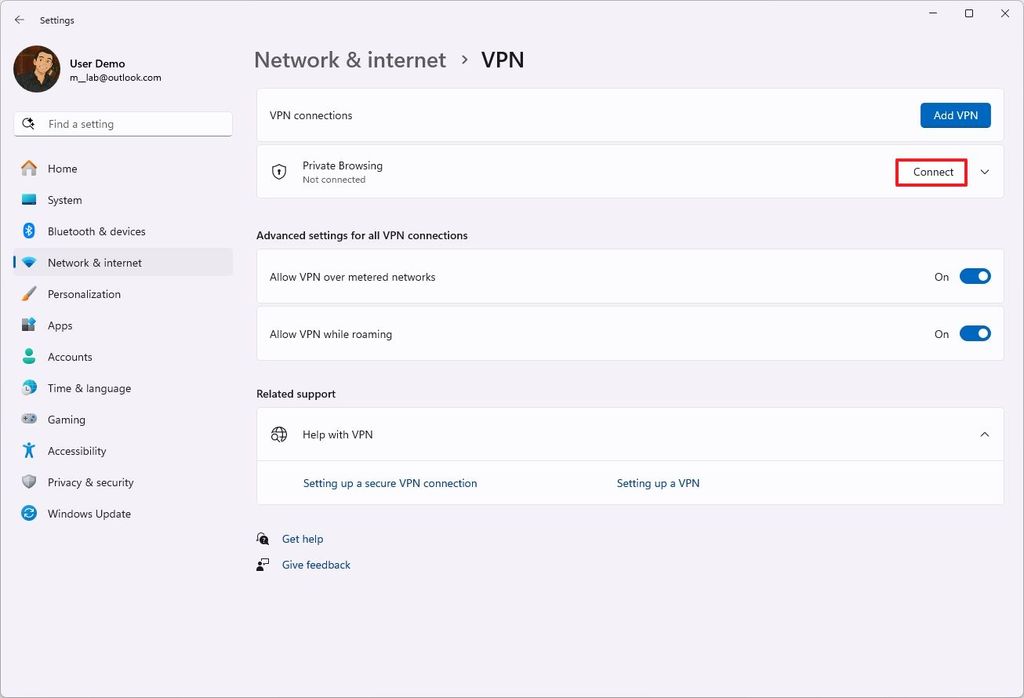
You can always connect to the VPN from Settings > Network & internet > VPN and click the "Connect" button to make the connection.
(Image credit: Mauro Huculak)
Alternatively, click the network icon in the Taskbar, click the VPN button, select the connection, and click the "Connect" button.

(Image credit: Mauro Huculak)
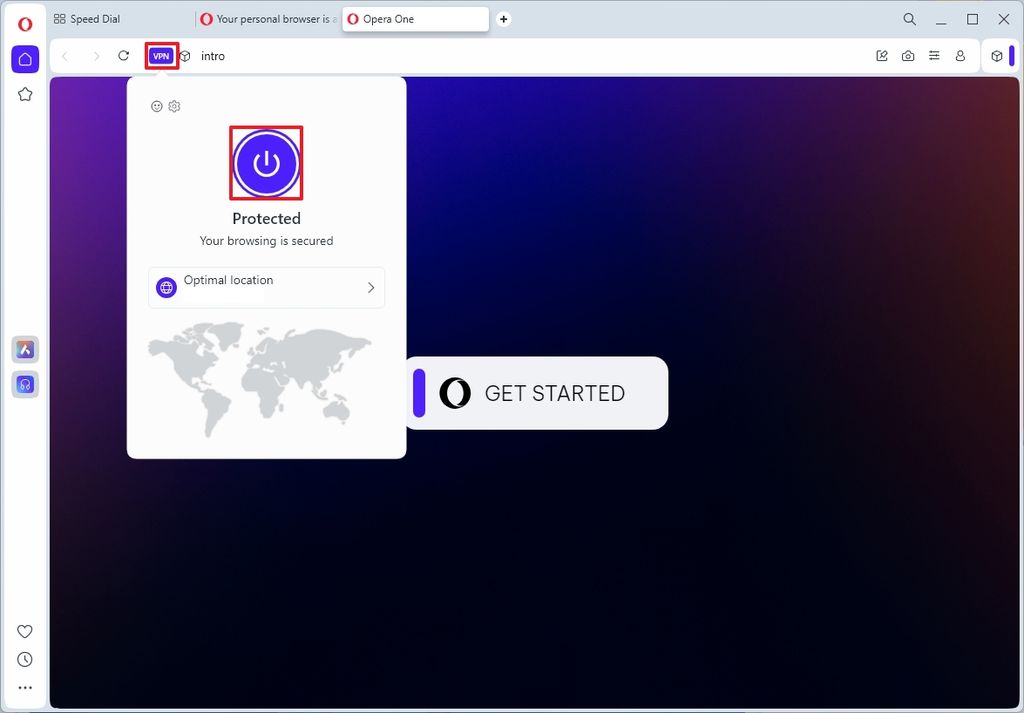
If you want to use a free VPN service, you can download and launch the Opera installer and continue with the easy on-screen directions.
(Image credit: Mauro Huculak)
After the installation, launch the browser, click the "VPN" button, click the power button, and start browsing with a little more privacy.
5. Set up a mobile hotspot instead
If you want the best internet privacy while away from home, you should consider using a mobile hotspot.
A mobile hotspot is a feature that allows you to share your internet connection with other computers and phones without installing additional software or taking any extra steps.
Windows 11 comes with a hotspot functionality, but in this case, you want to use the feature available through your iPhone or Android phone.
Usually, mobile carriers will give you some data allowance to use the hotspot feature, but in some plans, you may have to pay for this feature. As a result, it's best to check with your mobile carrier before using the feature.
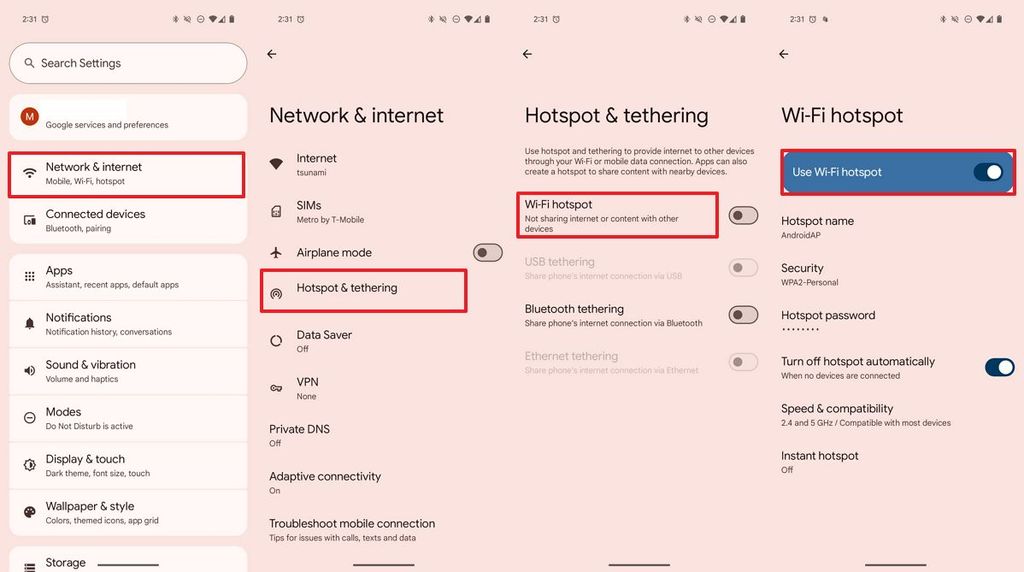
In the example, I'll highlight the process of setting up a mobile hotspot using Android and making a connection using your Windows 11 computer:
- Open your Android phone.
- Open the Settings app.
- Tap on Network & internet.
(Image credit: Mauro Huculak)
- Tap on Hotspot & tethering.
- Tap on the Wi-Fi hotspot setting.
- (Optional) Tap on the Hotspot name setting.
- Confirm the name of the wireless access point.
- Tap on OK.
- Tap the Hotspot password setting.
- Confirm a password for the access point.
- Tap on OK.
- Turn on the "Use Wi-Fi hotspot" toggle switch.
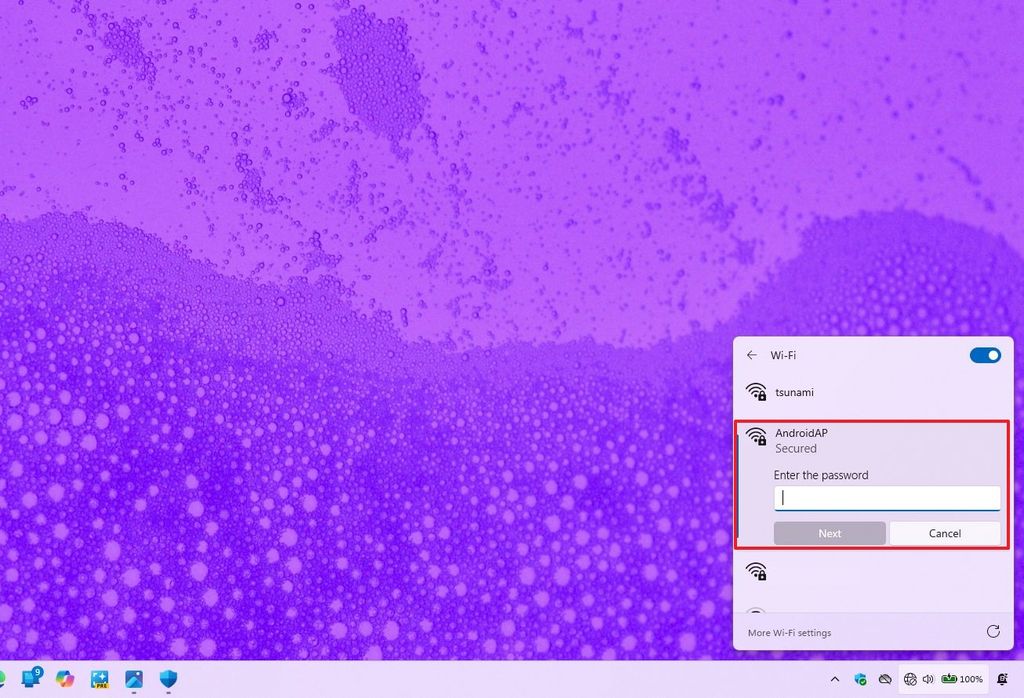
Once you complete the steps, you can connect to the hotspot from the Quick Settings flyout, just as you normally connect to a Wi-Fi network.
You can do this by clicking the network icon in the System Tray (or using the "Windows key + A" keyboard shortcut), clicking the button next to the wireless icon, selecting the hotspot network, clicking the "Connect" button, confirming the password, and clicking the "Next" button.
(Image credit: Mauro Huculak)
Alongside these tips, it's always important to download and install the latest system updates, use a strong password for your accounts, and, whenever possible, avoid working with sensitive information on a public network.
Hope you enjoyed this news post.
Thank you for appreciating my time and effort posting news every day for many years.
News posts... 2023: 5,800+ | 2024: 5,700+ | 2025 (till end of March): 1,357
RIP Matrix | Farewell my friend ![]()


3175x175(CURRENT).thumb.jpg.b05acc060982b36f5891ba728e6d953c.jpg)
Recommended Comments
There are no comments to display.
Join the conversation
You can post now and register later. If you have an account, sign in now to post with your account.
Note: Your post will require moderator approval before it will be visible.